> ## Documentation Index
> Fetch the complete documentation index at: https://docs.base44.com/llms.txt
> Use this file to discover all available pages before exploring further.
# Setting up SCIM provisioning for Microsoft Entra ID
> Automatically sync your Microsoft Entra ID users with your Base44 enterprise workspace using SCIM.
SCIM provisioning keeps your Base44 enterprise workspace membership in sync with Microsoft Entra ID (formerly Azure AD). You create a separate enterprise application, connect it to Base44, map roles, and turn on automatic syncing so members are added, updated, and removed for you. To let your team sign in, set up [SSO for Microsoft Entra ID](/Enterprise/Microsoft-Entra-SSO) separately.
SCIM provisioning is available on enterprise workspaces only. If you do not see this option, contact your Base44 account team.
***
## Before you begin
Make sure you have:
* Owner or admin access to your Base44 enterprise workspace.
* Admin access to the [Microsoft Entra admin center](https://entra.microsoft.com).
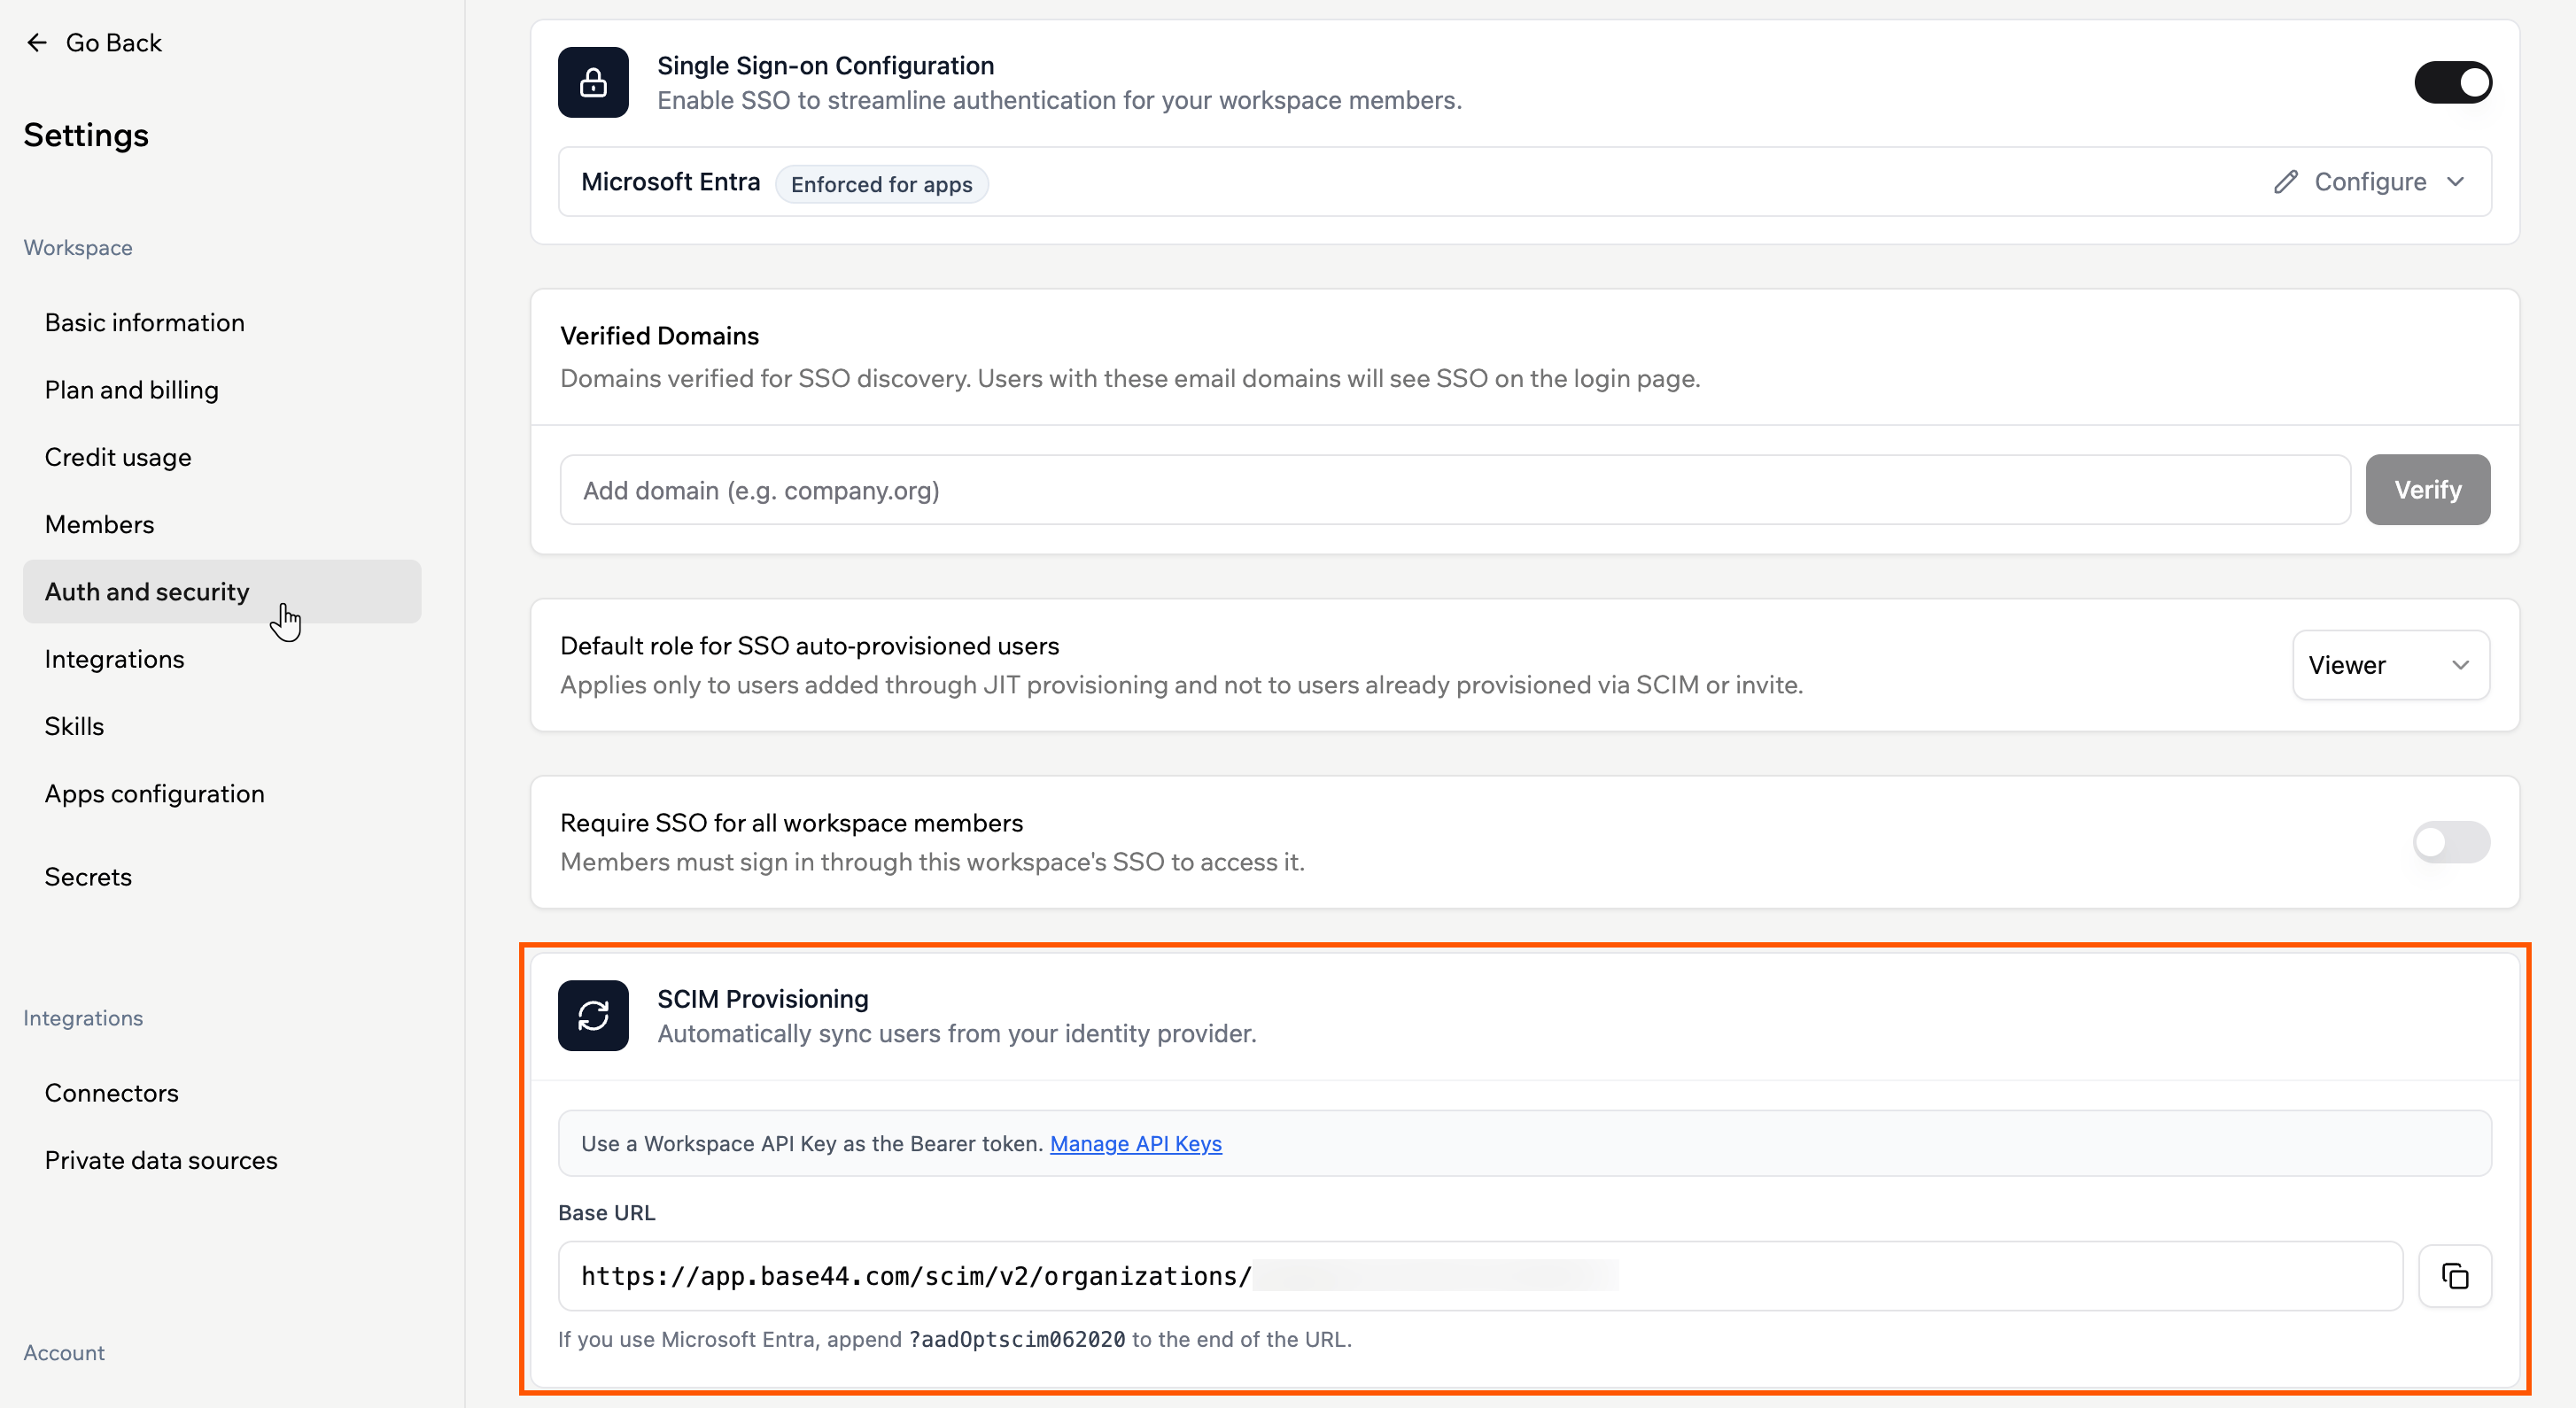
* Your **SCIM Base URL**, found in **Settings** > **Auth and security**.
* A **Workspace API key**, found in **Settings** > **Secrets**.
 ***
## Set up SCIM provisioning
Create a dedicated Entra enterprise application, connect it to Base44, map your roles and attributes, then turn on automatic syncing.
### Step 1: Create the SCIM app
Create a separate, non-gallery enterprise application for provisioning.
**To create the SCIM app:**
1. In the Microsoft Entra admin center, go to **Identity** > **Applications** > **Enterprise applications**.
2. Click **New application**, then **Create your own application**.
3. Enter a name (for example, `Base44 SCIM Provisioning`) and select **Integrate any other application you don't find in the gallery**.
4. Click **Create**.
### Step 2: Connect to Base44
Point Entra at your Base44 workspace using your SCIM Base URL and a Workspace API key. If you do not have an API key yet, create one first.
**To create a Workspace API key:**
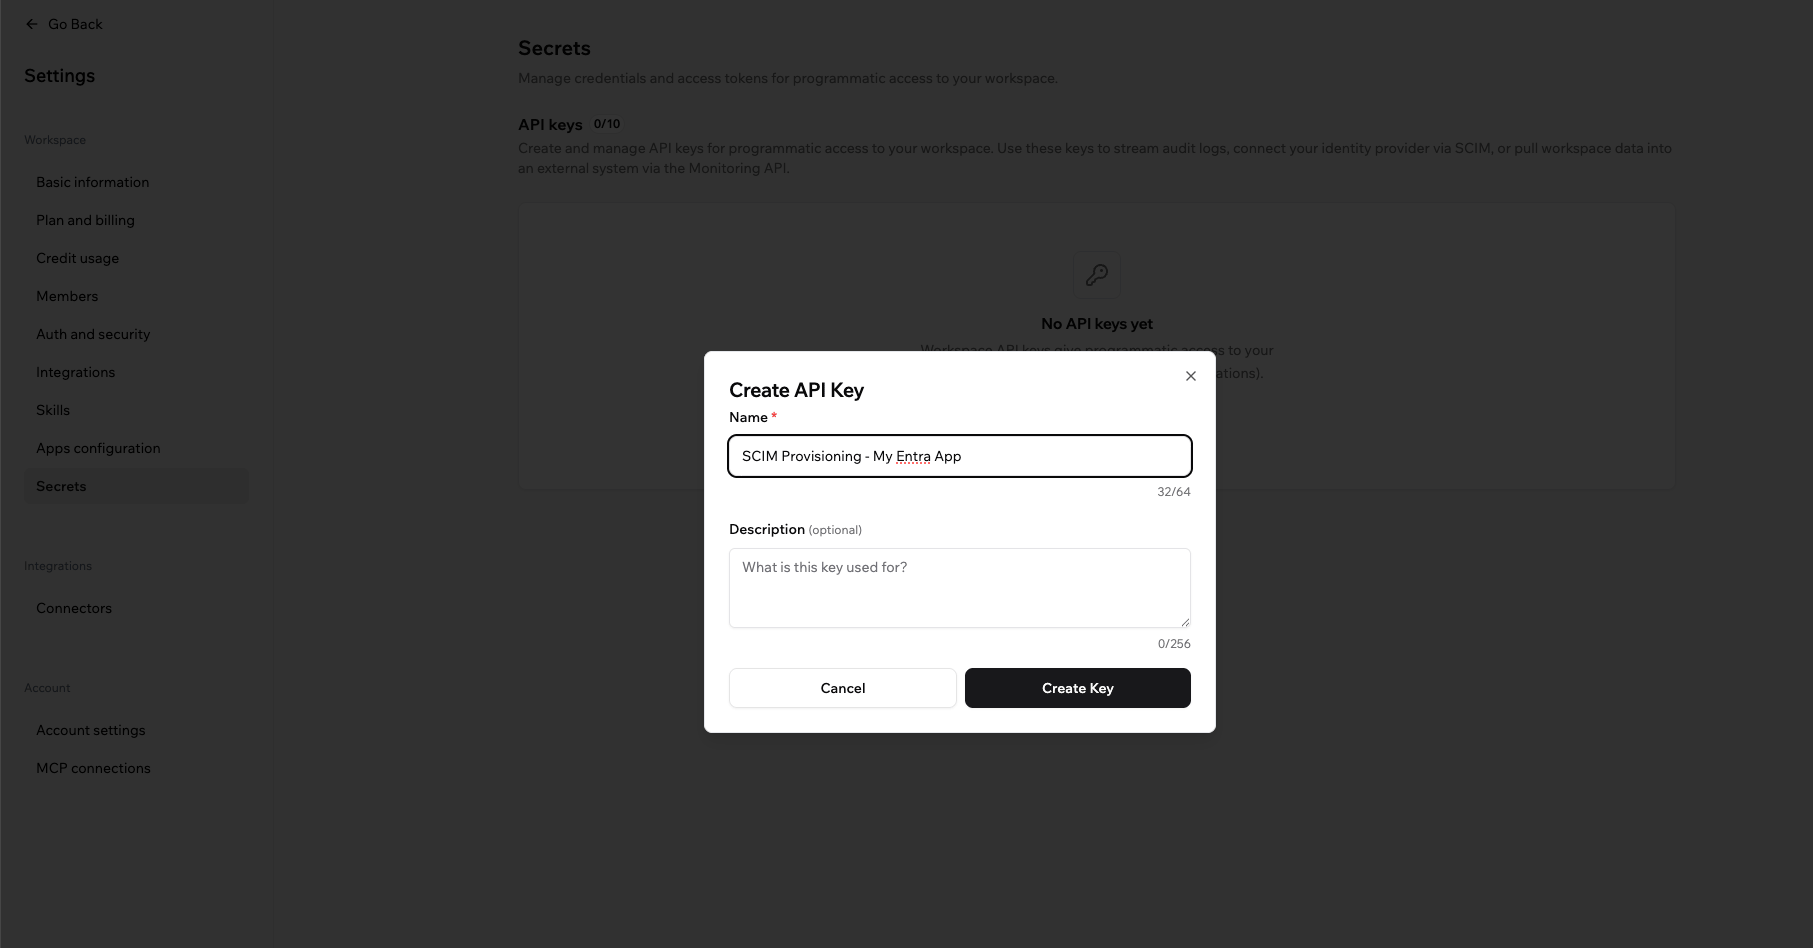
1. In your workspace **Settings**, click **Secrets**.
2. Click **Create API Key**.
3. Enter a name (for example, `Entra SCIM`), add an optional description, then click **Create Key**.
***
## Set up SCIM provisioning
Create a dedicated Entra enterprise application, connect it to Base44, map your roles and attributes, then turn on automatic syncing.
### Step 1: Create the SCIM app
Create a separate, non-gallery enterprise application for provisioning.
**To create the SCIM app:**
1. In the Microsoft Entra admin center, go to **Identity** > **Applications** > **Enterprise applications**.
2. Click **New application**, then **Create your own application**.
3. Enter a name (for example, `Base44 SCIM Provisioning`) and select **Integrate any other application you don't find in the gallery**.
4. Click **Create**.
### Step 2: Connect to Base44
Point Entra at your Base44 workspace using your SCIM Base URL and a Workspace API key. If you do not have an API key yet, create one first.
**To create a Workspace API key:**
1. In your workspace **Settings**, click **Secrets**.
2. Click **Create API Key**.
3. Enter a name (for example, `Entra SCIM`), add an optional description, then click **Create Key**.
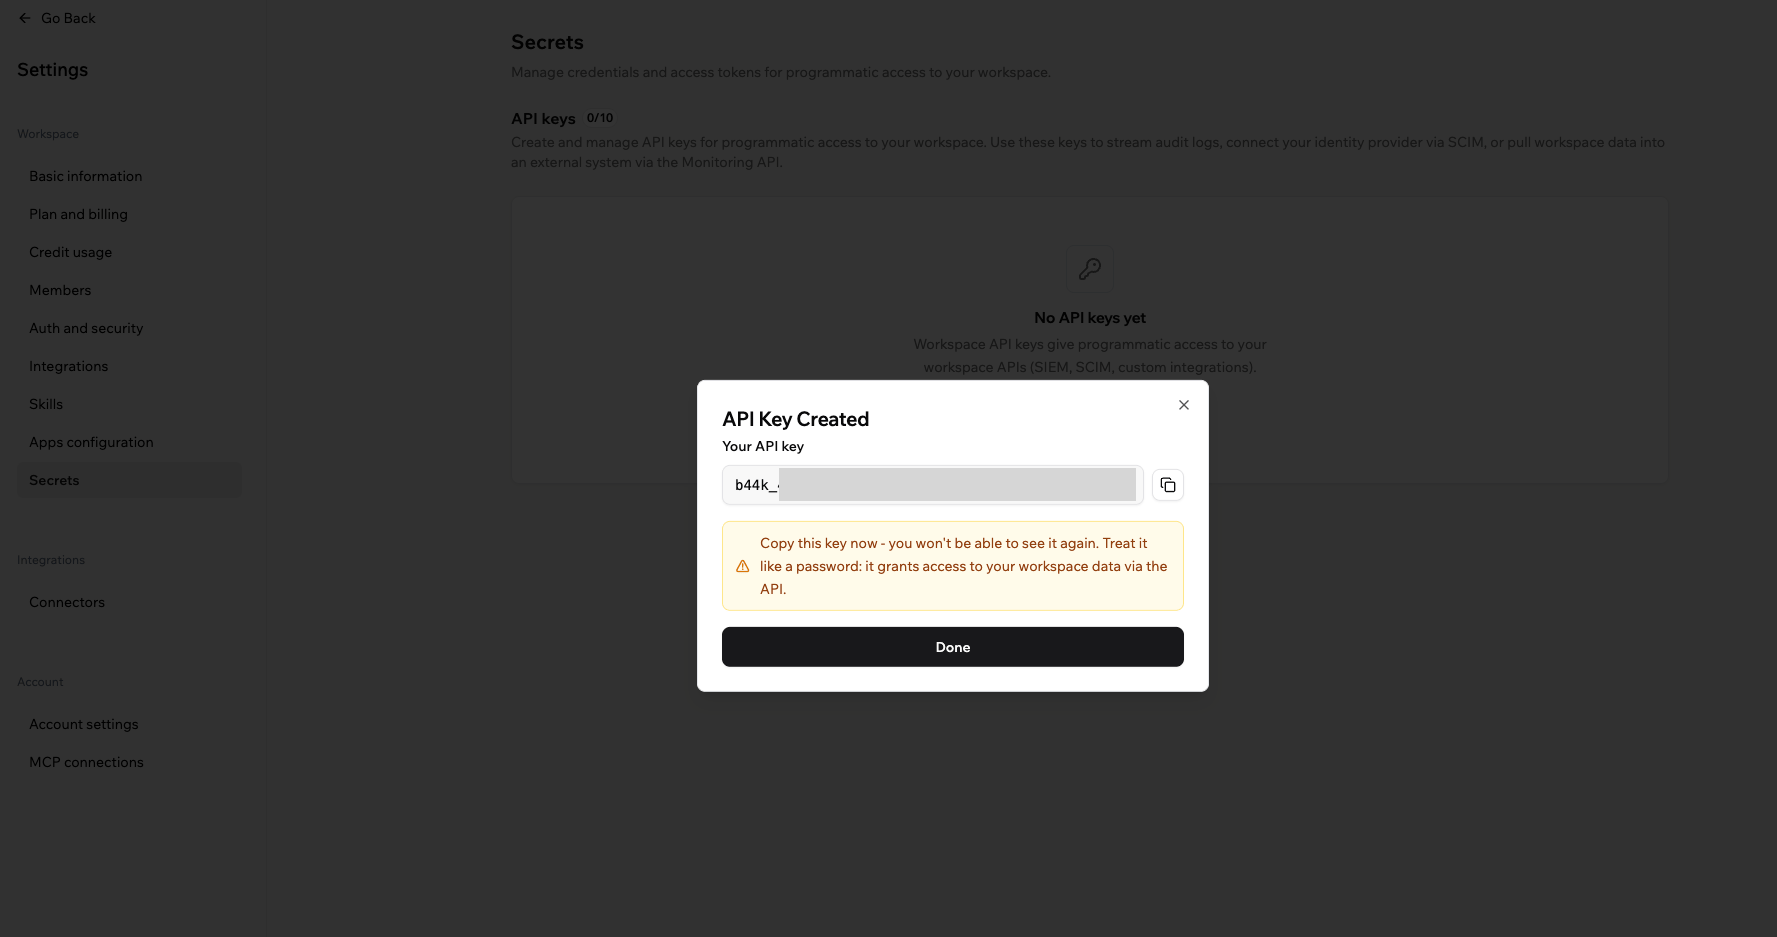
 Base44 shows the full key only once. Copy it before you close the dialog and store it somewhere safe, since you use it as the **Secret Token** below.
 **To configure provisioning:**
1. Open the app and go to **Provisioning**, then click **Get started**.
2. Set **Provisioning Mode** to **Automatic**.
3. Under **Admin Credentials**, set:
* **Tenant URL:** Your SCIM Base URL with `?aadOptscim062020` added to the end. The result looks like `https://app.base44.com/scim/v2/organizations/{{WORKSPACE_ID}}?aadOptscim062020`.
* **Secret Token:** Your Workspace API key.
4. Click **Test Connection** to confirm a successful connection.
5. Click **Save**.
Before continuing, run **Test Connection** and confirm it succeeds. A failed test usually means the Tenant URL or Secret Token is wrong.
**To configure provisioning:**
1. Open the app and go to **Provisioning**, then click **Get started**.
2. Set **Provisioning Mode** to **Automatic**.
3. Under **Admin Credentials**, set:
* **Tenant URL:** Your SCIM Base URL with `?aadOptscim062020` added to the end. The result looks like `https://app.base44.com/scim/v2/organizations/{{WORKSPACE_ID}}?aadOptscim062020`.
* **Secret Token:** Your Workspace API key.
4. Click **Test Connection** to confirm a successful connection.
5. Click **Save**.
Before continuing, run **Test Connection** and confirm it succeeds. A failed test usually means the Tenant URL or Secret Token is wrong.
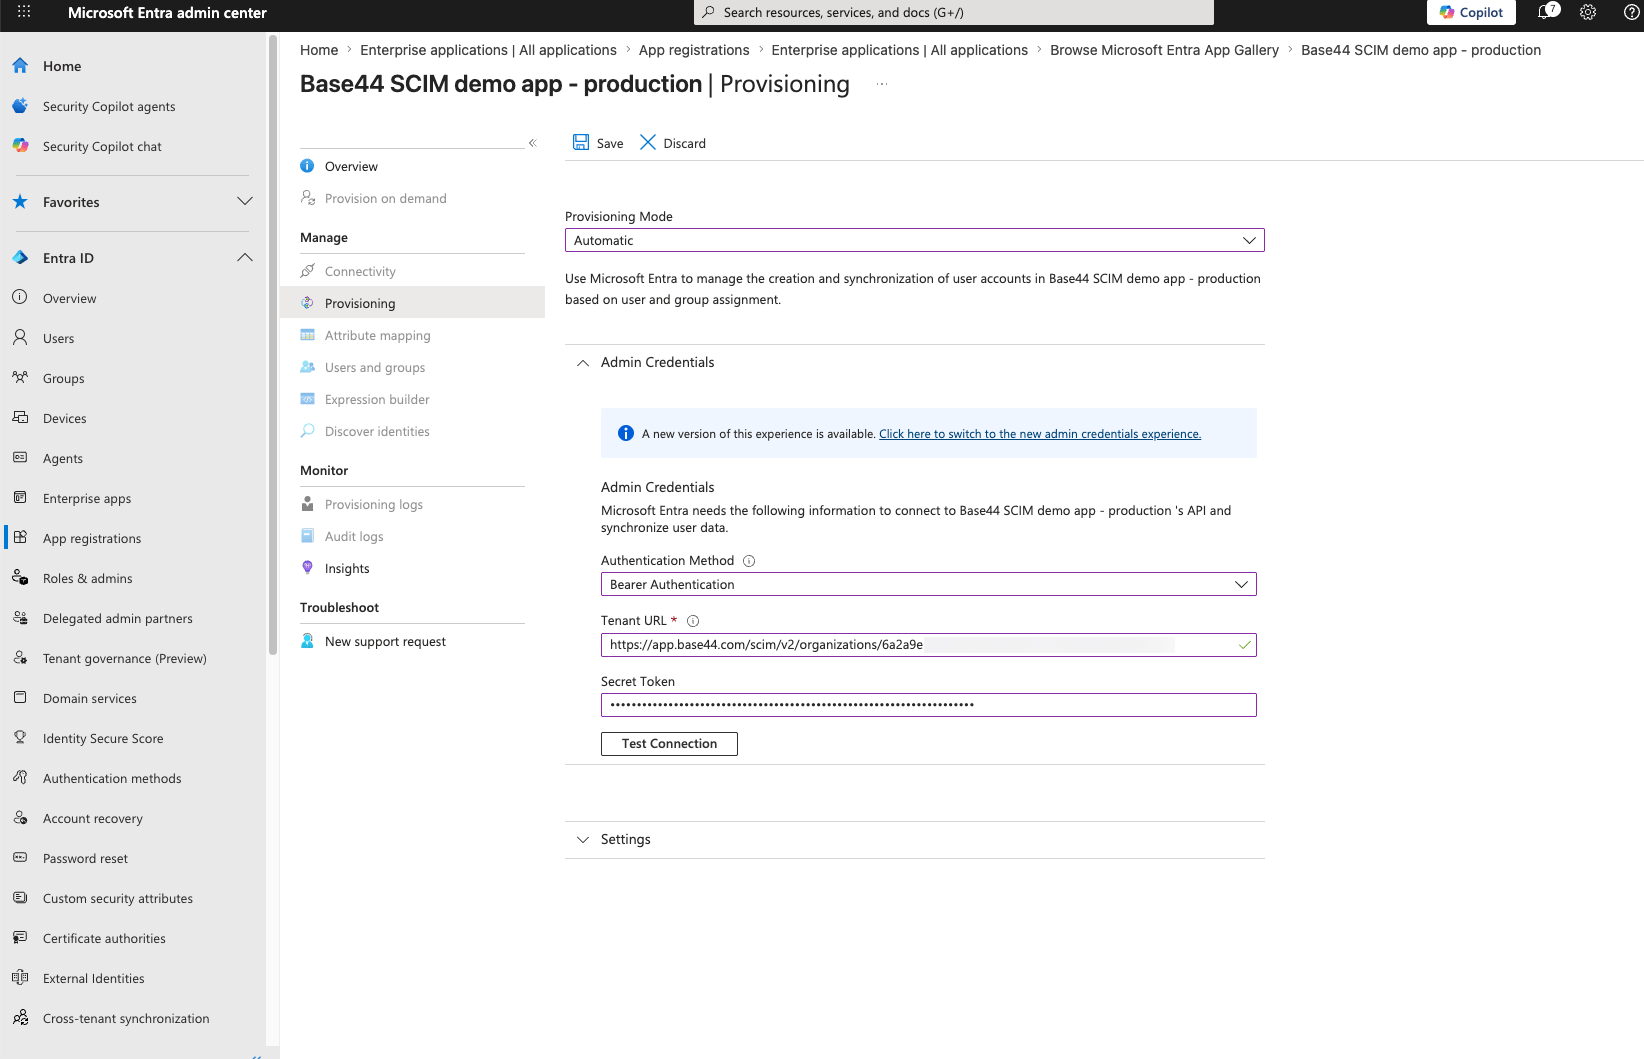 Entra requires the `?aadOptscim062020` suffix on the Tenant URL. Without it, the connection test or provisioning can fail. This suffix is specific to Entra, so do not add it for other identity providers.
### Step 3: Map externalId
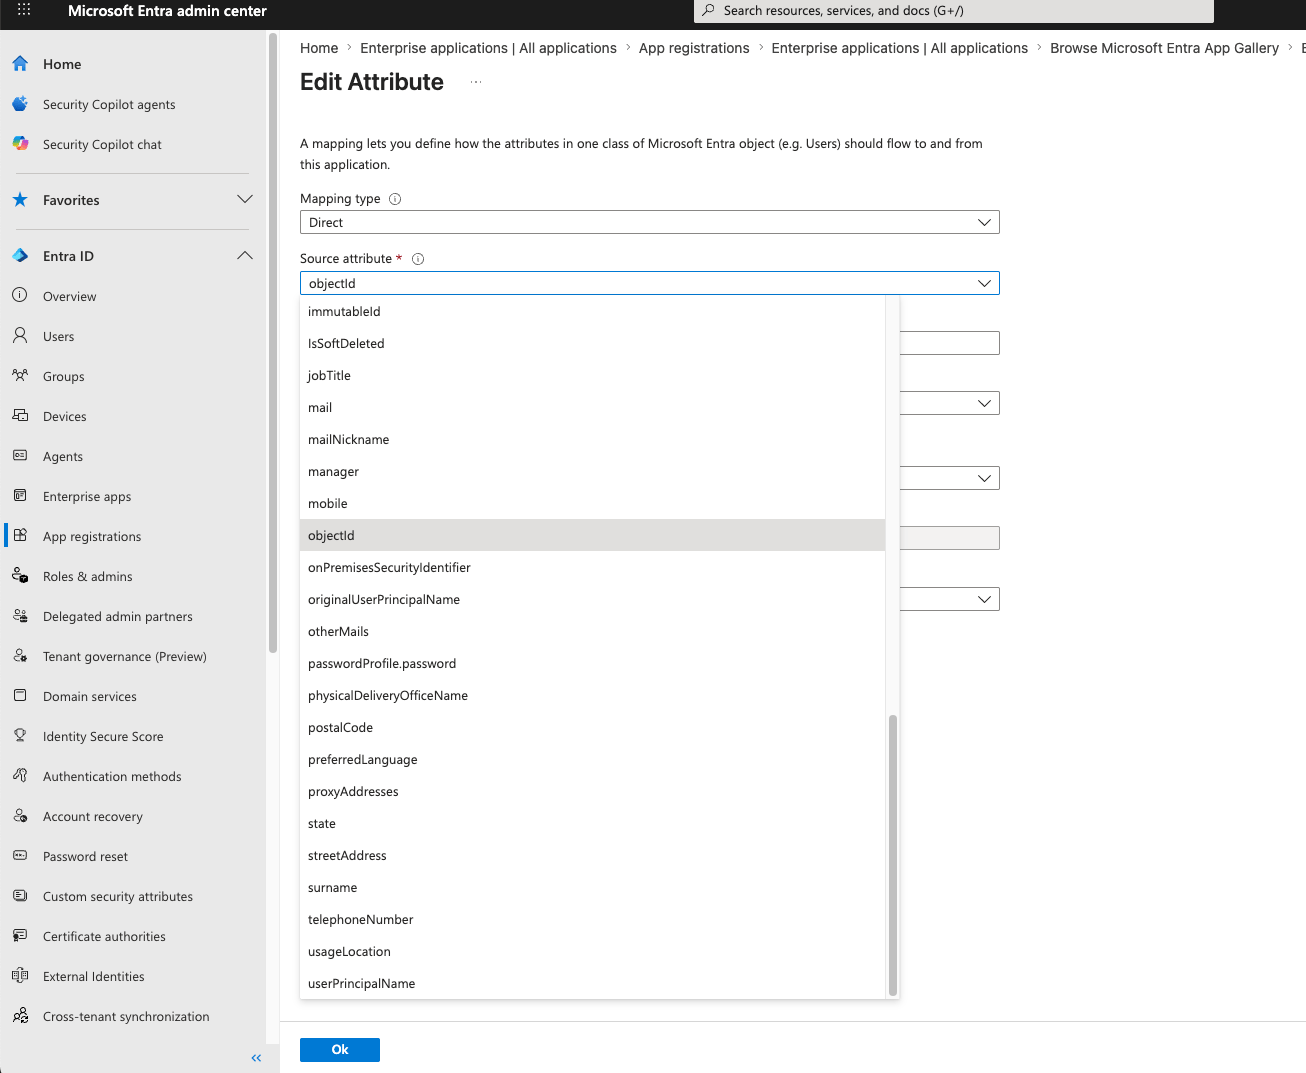
By default Entra matches users on a value that can change. Mapping `externalId` to `objectId`, a stable unique identifier, lets Base44 reliably match each user for updates and deactivation.
**To update the mapping:**
1. Under **Mappings**, click **Provision Microsoft Entra ID Users**.
2. In the mapping table, find the row where the **Target attribute** is exactly `externalId`.
3. Click that row and change the **Source attribute** to `objectId`.
4. Click **Ok**, then **Save**.
Entra requires the `?aadOptscim062020` suffix on the Tenant URL. Without it, the connection test or provisioning can fail. This suffix is specific to Entra, so do not add it for other identity providers.
### Step 3: Map externalId
By default Entra matches users on a value that can change. Mapping `externalId` to `objectId`, a stable unique identifier, lets Base44 reliably match each user for updates and deactivation.
**To update the mapping:**
1. Under **Mappings**, click **Provision Microsoft Entra ID Users**.
2. In the mapping table, find the row where the **Target attribute** is exactly `externalId`.
3. Click that row and change the **Source attribute** to `objectId`.
4. Click **Ok**, then **Save**.
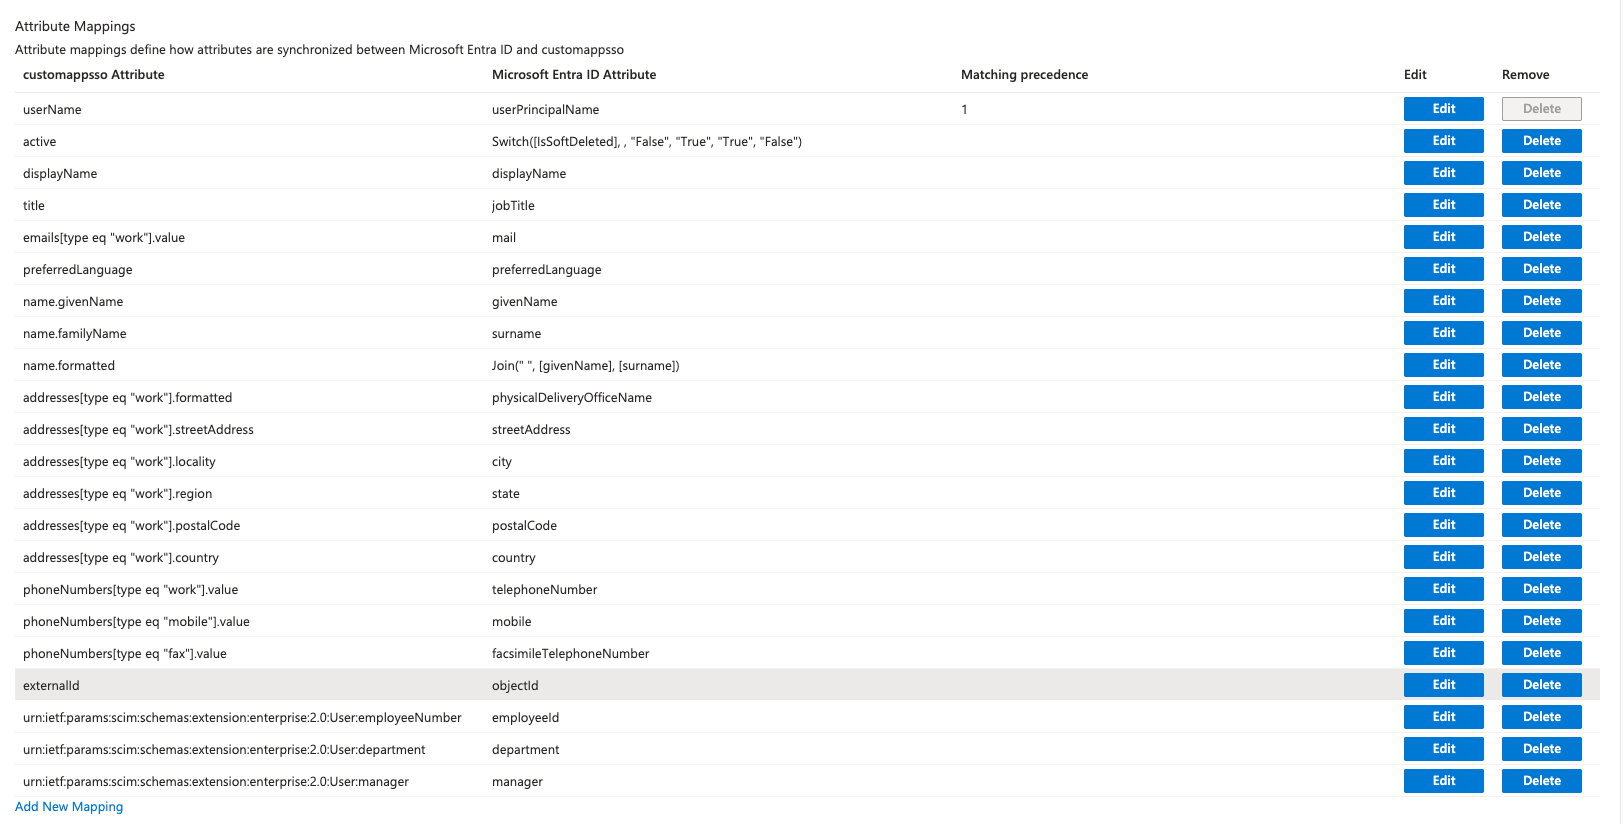
 After you save, the updated mapping appears in the attribute table, with `externalId` mapped to `objectId`.
 ### Step 4: Add custom attributes
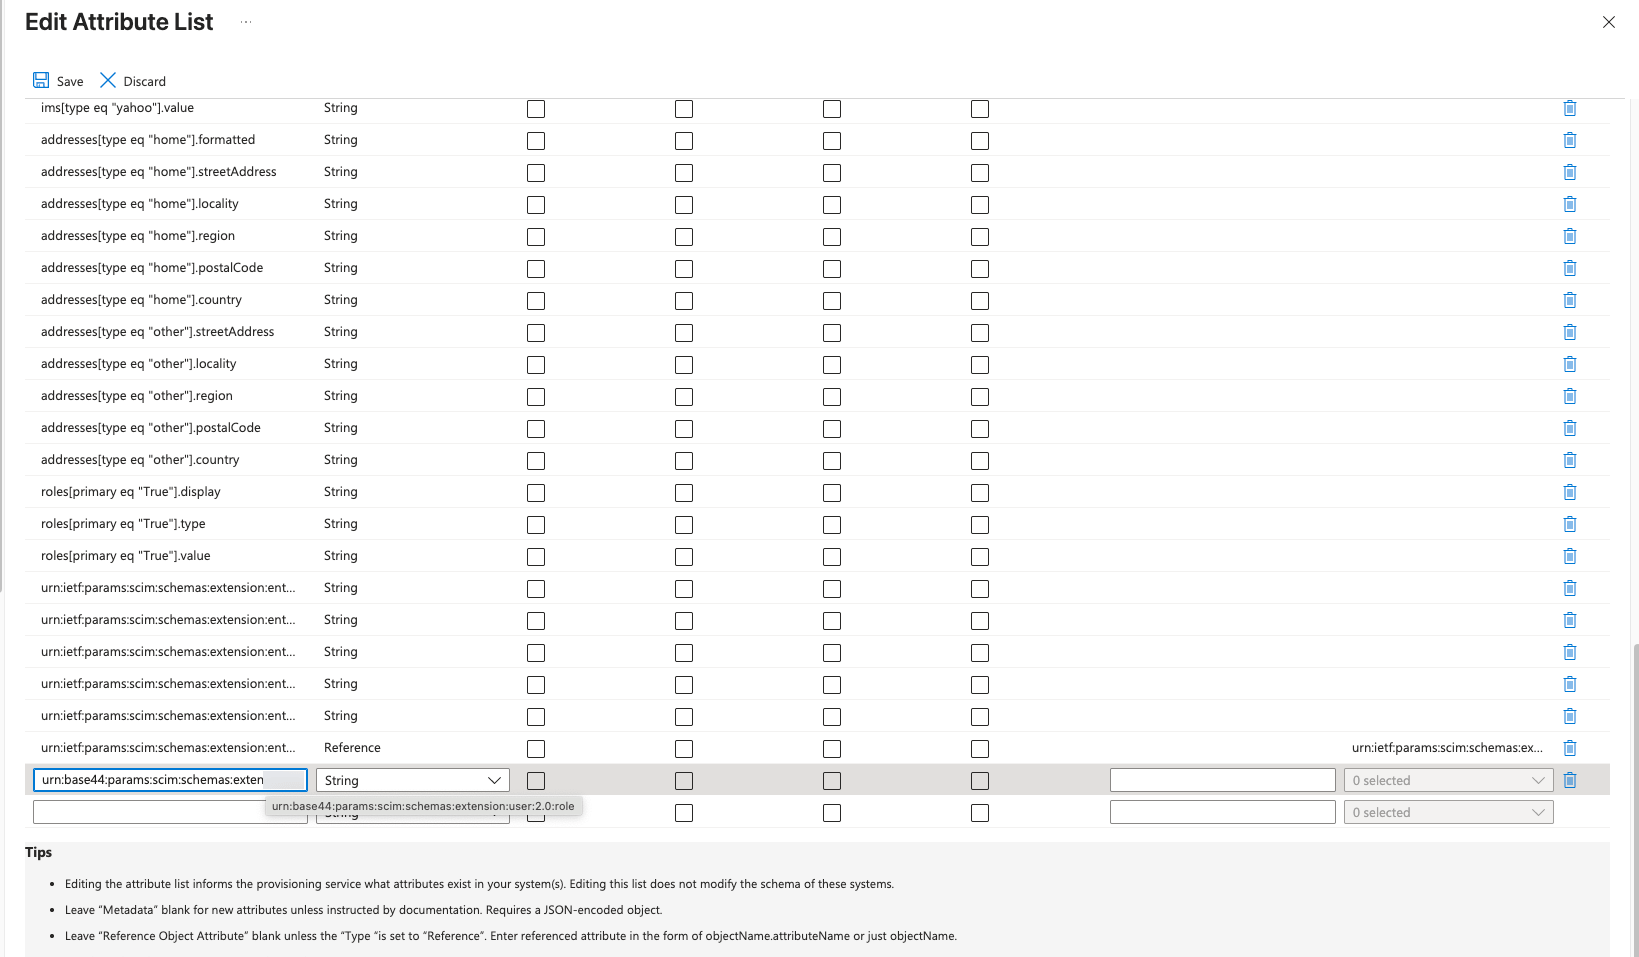
Base44's role and credit limit fields are not in Entra's default target list, so add them before you can map them.
**To add the attributes:**
1. On the **Provision Microsoft Entra ID Users** mapping screen, scroll to the bottom and check **Show advanced options**.
2. Click **Edit attribute list for** your app.
3. At the bottom of the list, add:
* **Role:** `urn:base44:params:scim:schemas:extension:user:2.0:role`, with **Type** set to `String`.
* **Credit limit (optional):** `urn:base44:params:scim:schemas:extension:user:2.0:creditLimit`, with **Type** set to `Integer`.
4. Click **Save** and confirm the change.
### Step 4: Add custom attributes
Base44's role and credit limit fields are not in Entra's default target list, so add them before you can map them.
**To add the attributes:**
1. On the **Provision Microsoft Entra ID Users** mapping screen, scroll to the bottom and check **Show advanced options**.
2. Click **Edit attribute list for** your app.
3. At the bottom of the list, add:
* **Role:** `urn:base44:params:scim:schemas:extension:user:2.0:role`, with **Type** set to `String`.
* **Credit limit (optional):** `urn:base44:params:scim:schemas:extension:user:2.0:creditLimit`, with **Type** set to `Integer`.
4. Click **Save** and confirm the change.
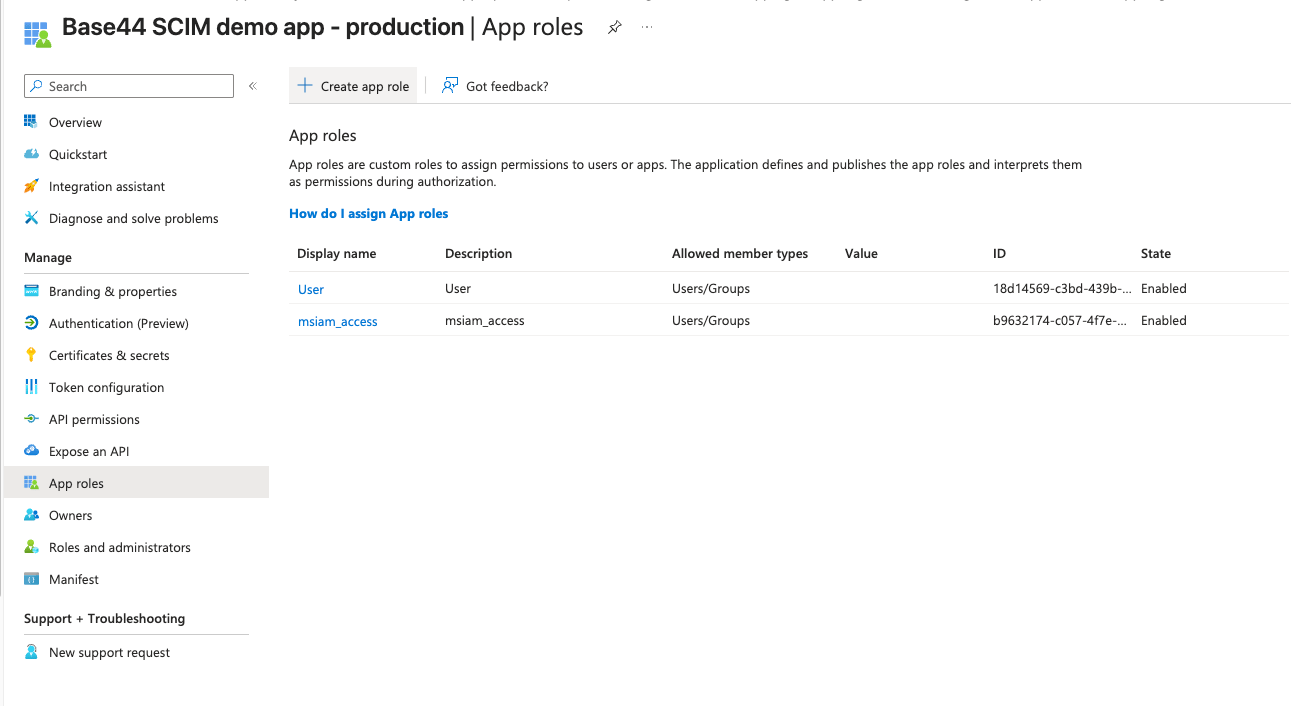
 ### Step 5: Create app roles
You create roles in **App registrations**, not in **Enterprise applications**. Enterprise applications are only where you assign them.
**To create app roles:**
1. In the Microsoft Entra admin center, go to **App registrations** and open the **All applications** tab.
2. Select your SCIM app.
3. Click **App roles**, then **Create app role**.
4. Create a separate role for each Base44 permission level: `admin`, `editor`, and `viewer`.
5. In the **Value** field, type the exact lowercase string Base44 expects (`admin`, `editor`, or `viewer`).
6. Click **Apply**.
### Step 5: Create app roles
You create roles in **App registrations**, not in **Enterprise applications**. Enterprise applications are only where you assign them.
**To create app roles:**
1. In the Microsoft Entra admin center, go to **App registrations** and open the **All applications** tab.
2. Select your SCIM app.
3. Click **App roles**, then **Create app role**.
4. Create a separate role for each Base44 permission level: `admin`, `editor`, and `viewer`.
5. In the **Value** field, type the exact lowercase string Base44 expects (`admin`, `editor`, or `viewer`).
6. Click **Apply**.
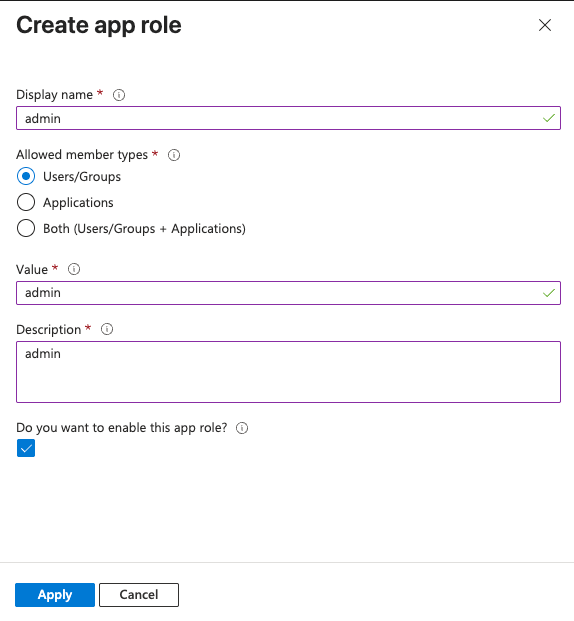 Create one role for each permission level. Once created, all 3 appear in the app's **App roles** list.
 ### Step 6: Map role and credit limit
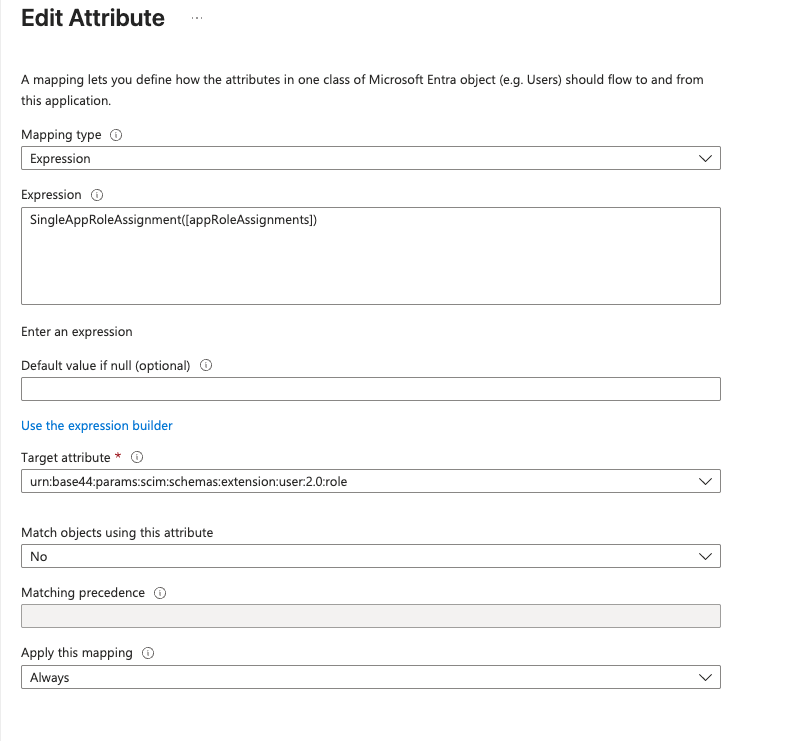
Entra stores roles as an array, but Base44 expects a single text value, so the role must be mapped with an expression rather than a direct mapping.
**To map the role:**
1. Go to **Enterprise applications** > your SCIM app > **Provisioning** > **Edit attribute mapping** > **Provision Microsoft Entra ID Users**.
2. Click **Add New Mapping**, or edit the existing role row.
3. Set **Mapping type** to **Expression**.
4. In the **Expression** field, enter: `SingleAppRoleAssignment([appRoleAssignments])`
5. Set **Target attribute** to `urn:base44:params:scim:schemas:extension:user:2.0:role`.
6. Set **Match objects using this attribute** to **No**, and **Apply this mapping** to **Always**.
7. Click **Ok**.
### Step 6: Map role and credit limit
Entra stores roles as an array, but Base44 expects a single text value, so the role must be mapped with an expression rather than a direct mapping.
**To map the role:**
1. Go to **Enterprise applications** > your SCIM app > **Provisioning** > **Edit attribute mapping** > **Provision Microsoft Entra ID Users**.
2. Click **Add New Mapping**, or edit the existing role row.
3. Set **Mapping type** to **Expression**.
4. In the **Expression** field, enter: `SingleAppRoleAssignment([appRoleAssignments])`
5. Set **Target attribute** to `urn:base44:params:scim:schemas:extension:user:2.0:role`.
6. Set **Match objects using this attribute** to **No**, and **Apply this mapping** to **Always**.
7. Click **Ok**.
 Setting a credit limit is optional. Without one, the member draws from the shared workspace credit pool with no individual cap. Add a credit limit only if you want to limit how many credits a specific member can use per month.
**To map a credit limit (optional):**
1. Enter the credit limit value in the user's Entra profile under a built-in extension field, for example `extensionAttribute1`.
2. Click **Add New Mapping** and set **Mapping type** to **Direct**.
3. Set **Source attribute** to `extensionAttribute1`.
4. Set **Target attribute** to `urn:base44:params:scim:schemas:extension:user:2.0:creditLimit`.
5. Click **Ok**, then **Save**.
### Step 7: Assign and provision
Choose who to provision, give them a role, and start the sync.
**To assign users:**
1. Go to **Enterprise applications** > your SCIM app > **Users and groups**.
2. Click **Add user/group** and select the users or groups to provision.
3. Under **Select a role**, choose the role you created (`admin`, `editor`, or `viewer`), then click **Assign**.
**To turn on provisioning:**
1. Go to **Provisioning**.
2. Set **Provisioning Status** to **On**.
Entra begins syncing the assigned users to your Base44 workspace.
If the **Edit** button for a user is grayed out, check the box next to the user, click **Remove**, then add them again with the correct role.
### Step 8: Refresh existing users
If you changed the `externalId` mapping after some users were already provisioned, refresh their records so they pick up the correct `objectId`.
**To update existing users:**
1. Go to **Provisioning** > **Provision on demand**.
2. Search for the user and run provisioning to patch their record.
3. To apply this to everyone, go back to the main **Provisioning** page and click **Restart provisioning**.
***
## Roles and credit limits
Base44 accepts only the following roles via SCIM. Map your Entra app roles to these exact values.
| Role | What they can do |
| -------- | --------------------------------------------------------------- |
| `admin` | Manage members, billing, and workspace settings |
| `editor` | Build, edit, and run apps; uses credits from the workspace pool |
| `viewer` | Read-only access to apps; does not consume credits |
Credit limits apply only to `admin` and `editor` roles, since viewers do not consume credits. Setting a credit limit of `0` is treated as no cap. You can also set credit limits directly in your workspace, without SCIM. See [Managing enterprise workspace members](/Enterprise/managing-enterprise-members#per-member-credit-limits).
Workspace owners cannot be updated or deactivated through SCIM. Promote or demote owners from your workspace settings instead.
***
## FAQs
Select a question below to learn more about Entra SCIM provisioning.
Yes. SCIM provisioning uses a dedicated **Enterprise application**, while sign-in uses a separate **App registration**. Configure provisioning on the Enterprise application, and set up sign-in separately. See [SSO for Microsoft Entra ID](/Enterprise/Microsoft-Entra-SSO).
Confirm your Tenant URL ends with `?aadOptscim062020` and that the Secret Token is your Workspace API key from **Settings** > **Secrets**. Verify the SCIM Base URL was copied from **Settings** > **Auth and security** and has not been changed.
Entra stores roles as an array, so a **Direct** mapping fails. Set the role mapping type to **Expression** and use `SingleAppRoleAssignment([appRoleAssignments])`. Make sure each app role's **Value** is exactly `admin`, `editor`, or `viewer` in lowercase.
Add it first. On the mapping screen, check **Show advanced options**, click **Edit attribute list**, add the full URN (for example, `urn:base44:params:scim:schemas:extension:user:2.0:role`), then save. The field becomes available in the dropdown afterward.
Make sure `externalId` is mapped to `objectId`. If users were provisioned before you changed this mapping, use **Provision on demand** to refresh each user, or **Restart provisioning** to refresh everyone.
Setting a credit limit is optional. Without one, the member draws from the shared workspace credit pool with no individual cap. Add a credit limit only if you want to limit how many credits a specific member can use per month.
**To map a credit limit (optional):**
1. Enter the credit limit value in the user's Entra profile under a built-in extension field, for example `extensionAttribute1`.
2. Click **Add New Mapping** and set **Mapping type** to **Direct**.
3. Set **Source attribute** to `extensionAttribute1`.
4. Set **Target attribute** to `urn:base44:params:scim:schemas:extension:user:2.0:creditLimit`.
5. Click **Ok**, then **Save**.
### Step 7: Assign and provision
Choose who to provision, give them a role, and start the sync.
**To assign users:**
1. Go to **Enterprise applications** > your SCIM app > **Users and groups**.
2. Click **Add user/group** and select the users or groups to provision.
3. Under **Select a role**, choose the role you created (`admin`, `editor`, or `viewer`), then click **Assign**.
**To turn on provisioning:**
1. Go to **Provisioning**.
2. Set **Provisioning Status** to **On**.
Entra begins syncing the assigned users to your Base44 workspace.
If the **Edit** button for a user is grayed out, check the box next to the user, click **Remove**, then add them again with the correct role.
### Step 8: Refresh existing users
If you changed the `externalId` mapping after some users were already provisioned, refresh their records so they pick up the correct `objectId`.
**To update existing users:**
1. Go to **Provisioning** > **Provision on demand**.
2. Search for the user and run provisioning to patch their record.
3. To apply this to everyone, go back to the main **Provisioning** page and click **Restart provisioning**.
***
## Roles and credit limits
Base44 accepts only the following roles via SCIM. Map your Entra app roles to these exact values.
| Role | What they can do |
| -------- | --------------------------------------------------------------- |
| `admin` | Manage members, billing, and workspace settings |
| `editor` | Build, edit, and run apps; uses credits from the workspace pool |
| `viewer` | Read-only access to apps; does not consume credits |
Credit limits apply only to `admin` and `editor` roles, since viewers do not consume credits. Setting a credit limit of `0` is treated as no cap. You can also set credit limits directly in your workspace, without SCIM. See [Managing enterprise workspace members](/Enterprise/managing-enterprise-members#per-member-credit-limits).
Workspace owners cannot be updated or deactivated through SCIM. Promote or demote owners from your workspace settings instead.
***
## FAQs
Select a question below to learn more about Entra SCIM provisioning.
Yes. SCIM provisioning uses a dedicated **Enterprise application**, while sign-in uses a separate **App registration**. Configure provisioning on the Enterprise application, and set up sign-in separately. See [SSO for Microsoft Entra ID](/Enterprise/Microsoft-Entra-SSO).
Confirm your Tenant URL ends with `?aadOptscim062020` and that the Secret Token is your Workspace API key from **Settings** > **Secrets**. Verify the SCIM Base URL was copied from **Settings** > **Auth and security** and has not been changed.
Entra stores roles as an array, so a **Direct** mapping fails. Set the role mapping type to **Expression** and use `SingleAppRoleAssignment([appRoleAssignments])`. Make sure each app role's **Value** is exactly `admin`, `editor`, or `viewer` in lowercase.
Add it first. On the mapping screen, check **Show advanced options**, click **Edit attribute list**, add the full URN (for example, `urn:base44:params:scim:schemas:extension:user:2.0:role`), then save. The field becomes available in the dropdown afterward.
Make sure `externalId` is mapped to `objectId`. If users were provisioned before you changed this mapping, use **Provision on demand** to refresh each user, or **Restart provisioning** to refresh everyone.