> ## Documentation Index
> Fetch the complete documentation index at: https://docs.base44.com/llms.txt
> Use this file to discover all available pages before exploring further.
# Setting up SCIM provisioning for Okta
> Automatically sync your Okta users with your Base44 enterprise workspace using SCIM.
SCIM provisioning keeps your Base44 enterprise workspace membership in sync with Okta. Because Okta OIDC apps do not support SCIM, you create a separate SCIM app, connect it to Base44, map attributes, and turn on provisioning so members are added, updated, and removed for you. To let your team sign in, set up [SSO for Okta](/Enterprise/Okta-SSO) separately.
SCIM provisioning is available on enterprise workspaces only. If you do not see this option, contact your Base44 account team.
***
## Before you begin
Make sure you have:
* Owner or admin access to your Base44 enterprise workspace.
* Admin access to your Okta organization.
* Your **SCIM Base URL**, found in **Settings** > **Auth and security**.
* A **Workspace API key**, found in **Settings** > **Secrets**.
***
## Set up SCIM provisioning
Create a SCIM app in Okta, connect it to Base44, map your roles and attributes, then turn on provisioning.
### Step 1: Create a SCIM app
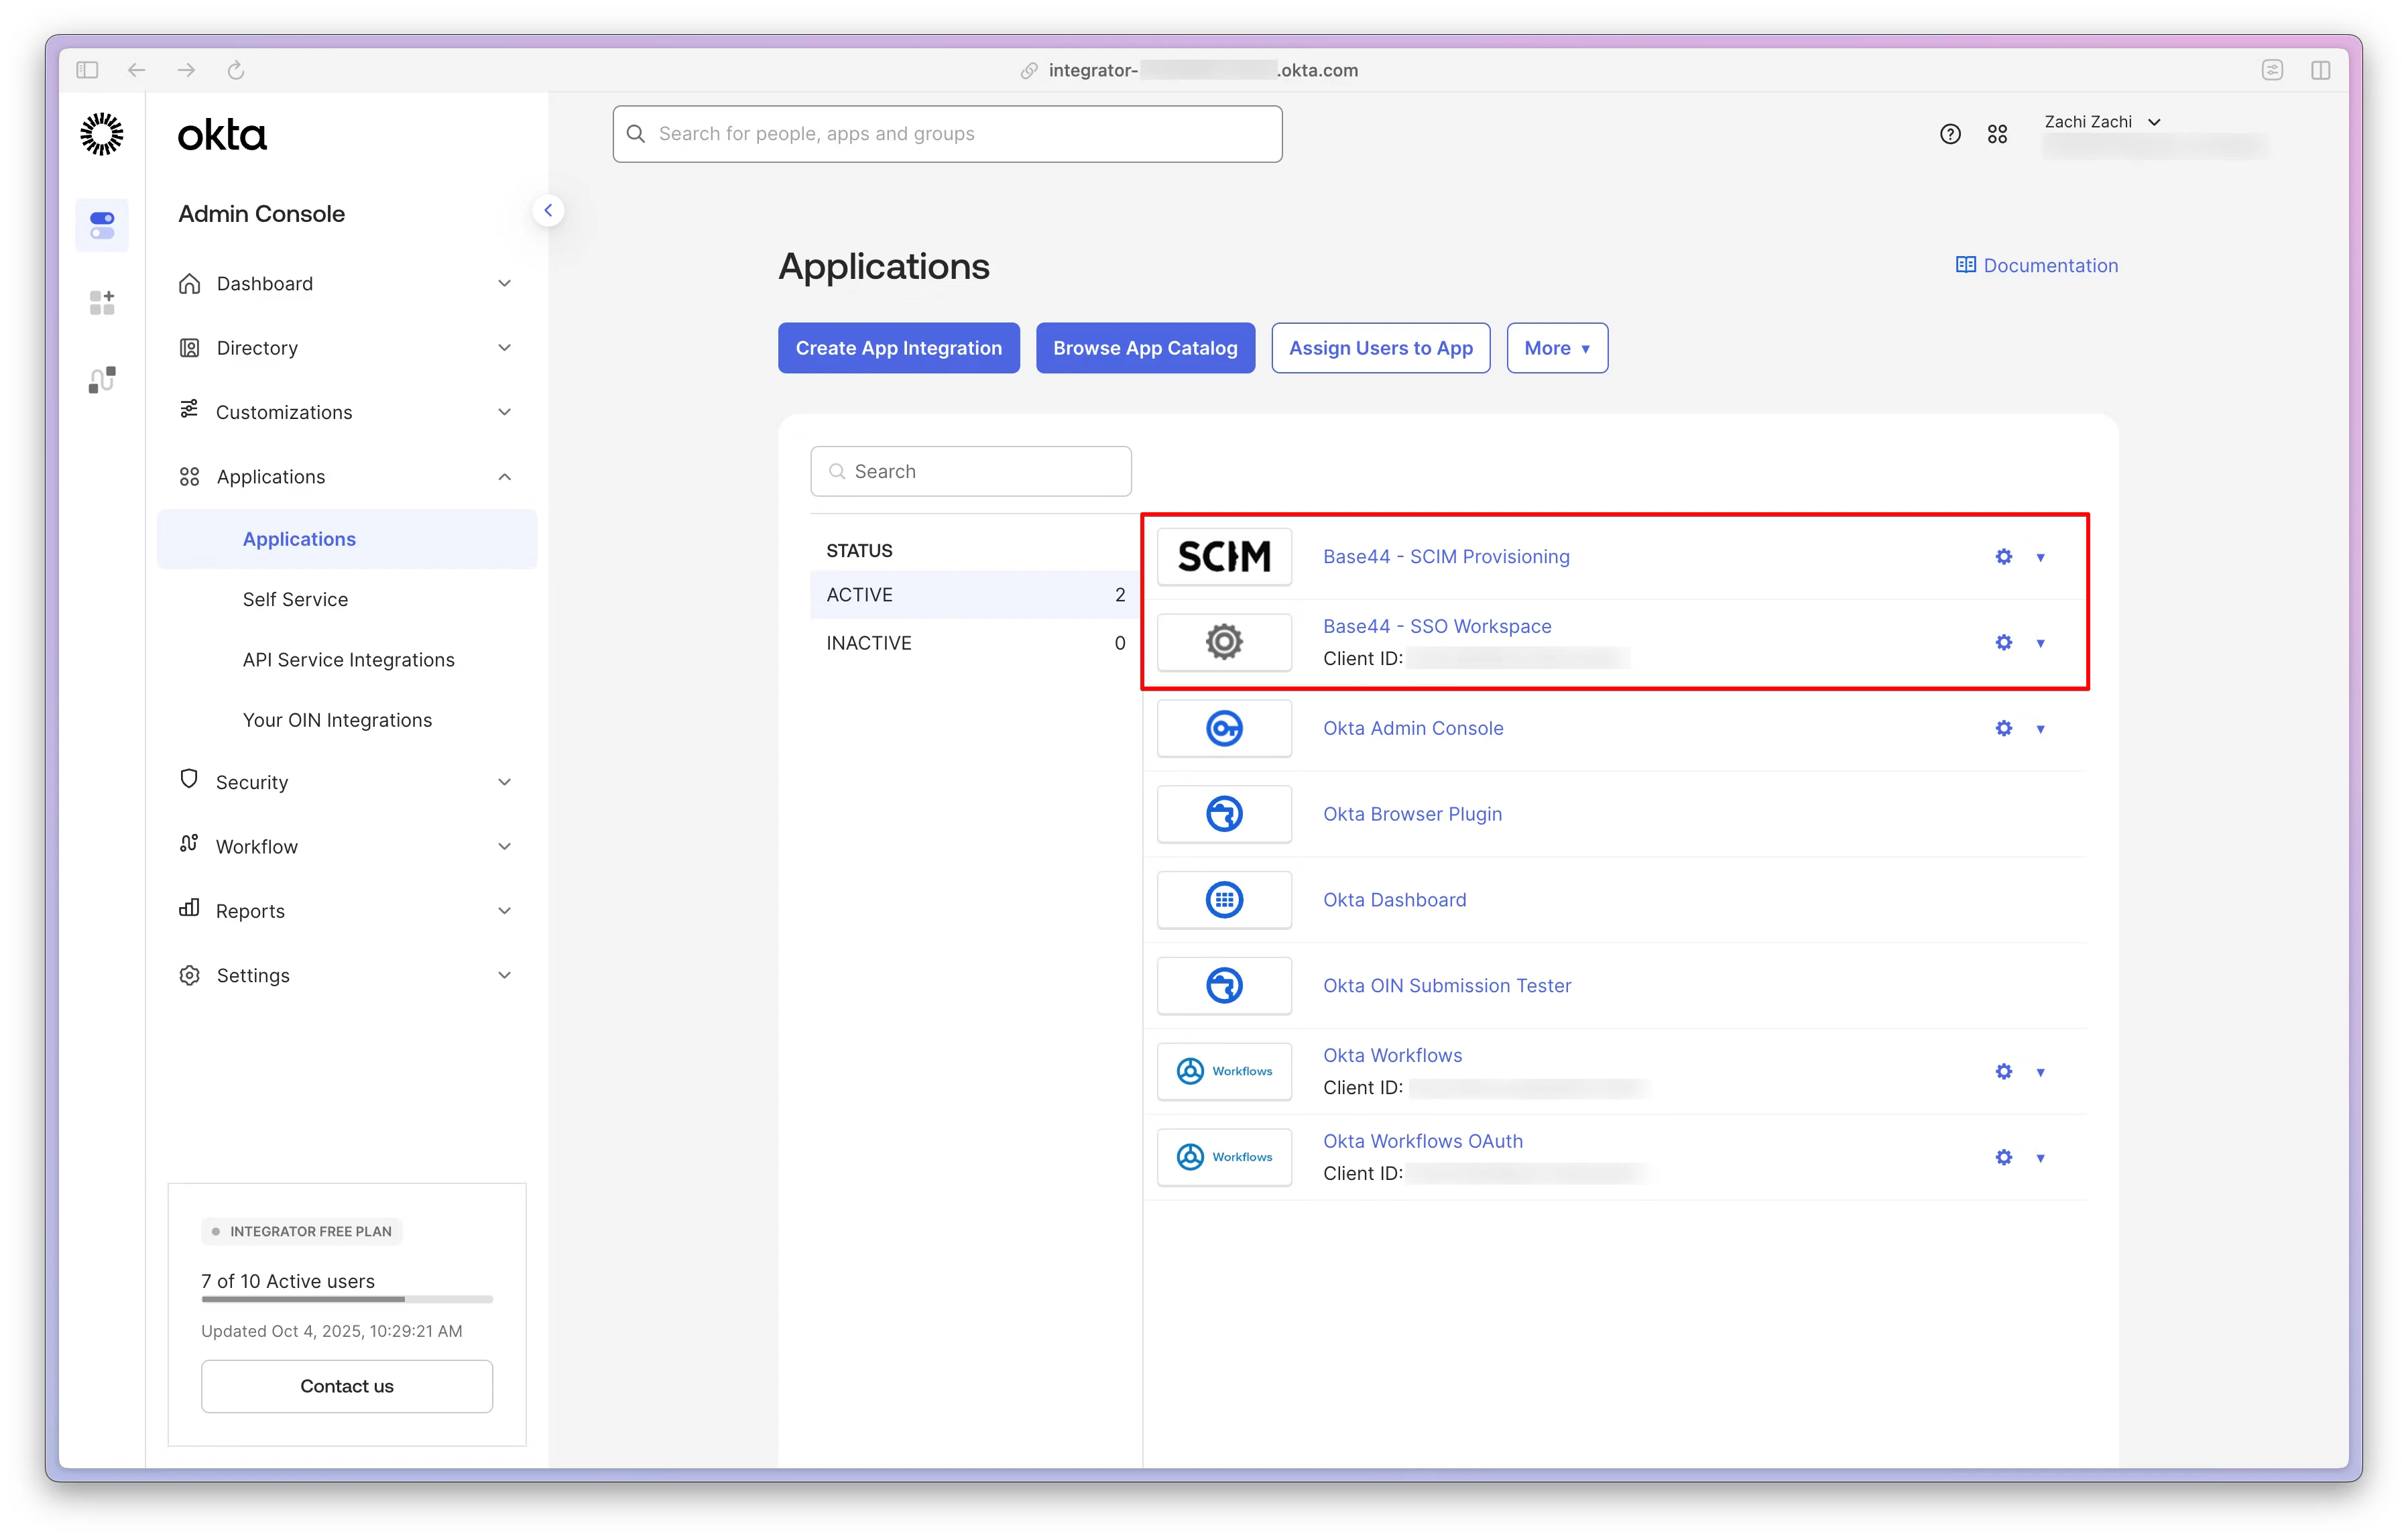
Okta OIDC apps do not support SCIM, so you need a separate SCIM app.
**To create the SCIM app:**
1. In the Okta Admin Console, go to **Applications** > **Browse App Catalog**.
2. Search for **SCIM 2.0 Test App (Header Auth)**.
3. Click **Add Integration**.
4. Name the app (for example, `Base44 - SCIM Provisioning`), then click **Done**.
 ### Step 2: Connect to Base44
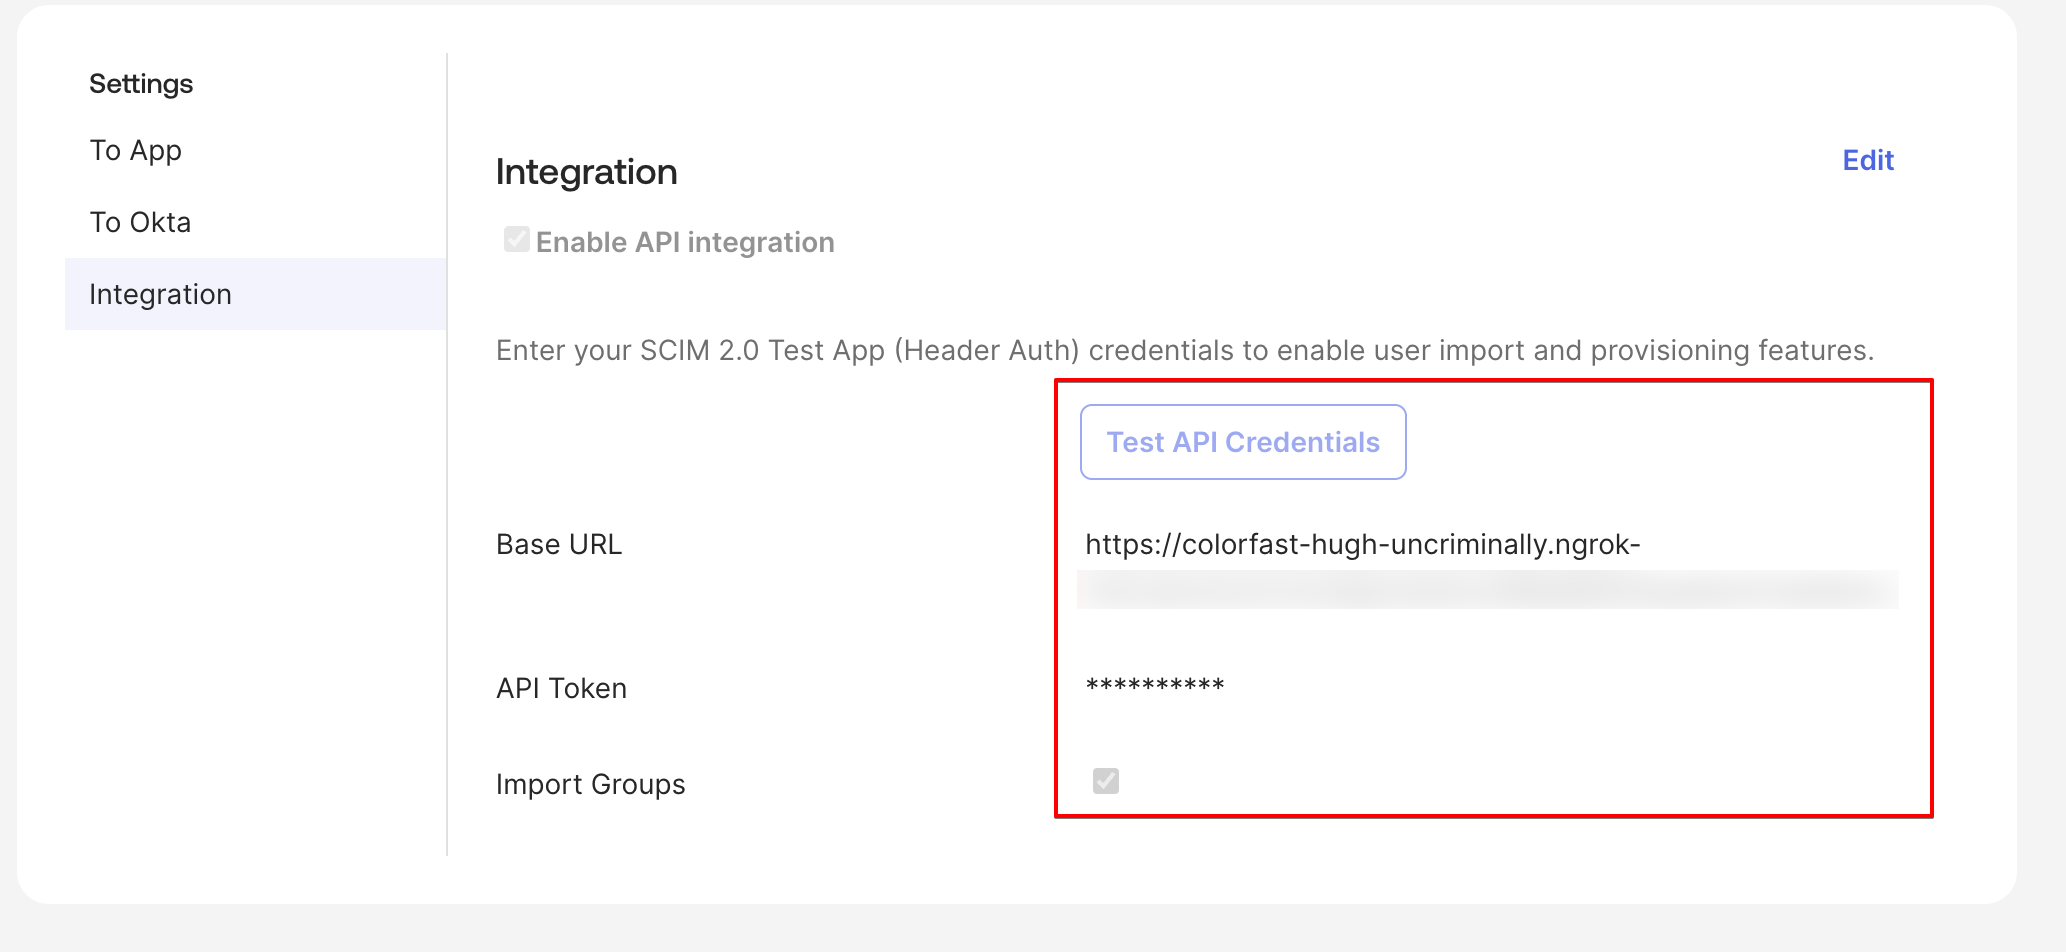
Point Okta at your Base44 workspace using your SCIM Base URL and Workspace API key.
**To configure the API integration:**
1. Open your new SCIM app and go to the **Provisioning** tab.
2. Click **Configure API Integration**, then check **Enable API integration**.
3. Set **SCIM 2.0 Base URL** to your SCIM Base URL from **Settings** > **Auth and security**.
4. Set **API Token** to your Workspace API key, with no `Bearer` prefix.
5. Click **Test API Credentials**. You should see a success confirmation.
6. Click **Save**.
### Step 2: Connect to Base44
Point Okta at your Base44 workspace using your SCIM Base URL and Workspace API key.
**To configure the API integration:**
1. Open your new SCIM app and go to the **Provisioning** tab.
2. Click **Configure API Integration**, then check **Enable API integration**.
3. Set **SCIM 2.0 Base URL** to your SCIM Base URL from **Settings** > **Auth and security**.
4. Set **API Token** to your Workspace API key, with no `Bearer` prefix.
5. Click **Test API Credentials**. You should see a success confirmation.
6. Click **Save**.
 ### Step 3: Enable provisioning actions
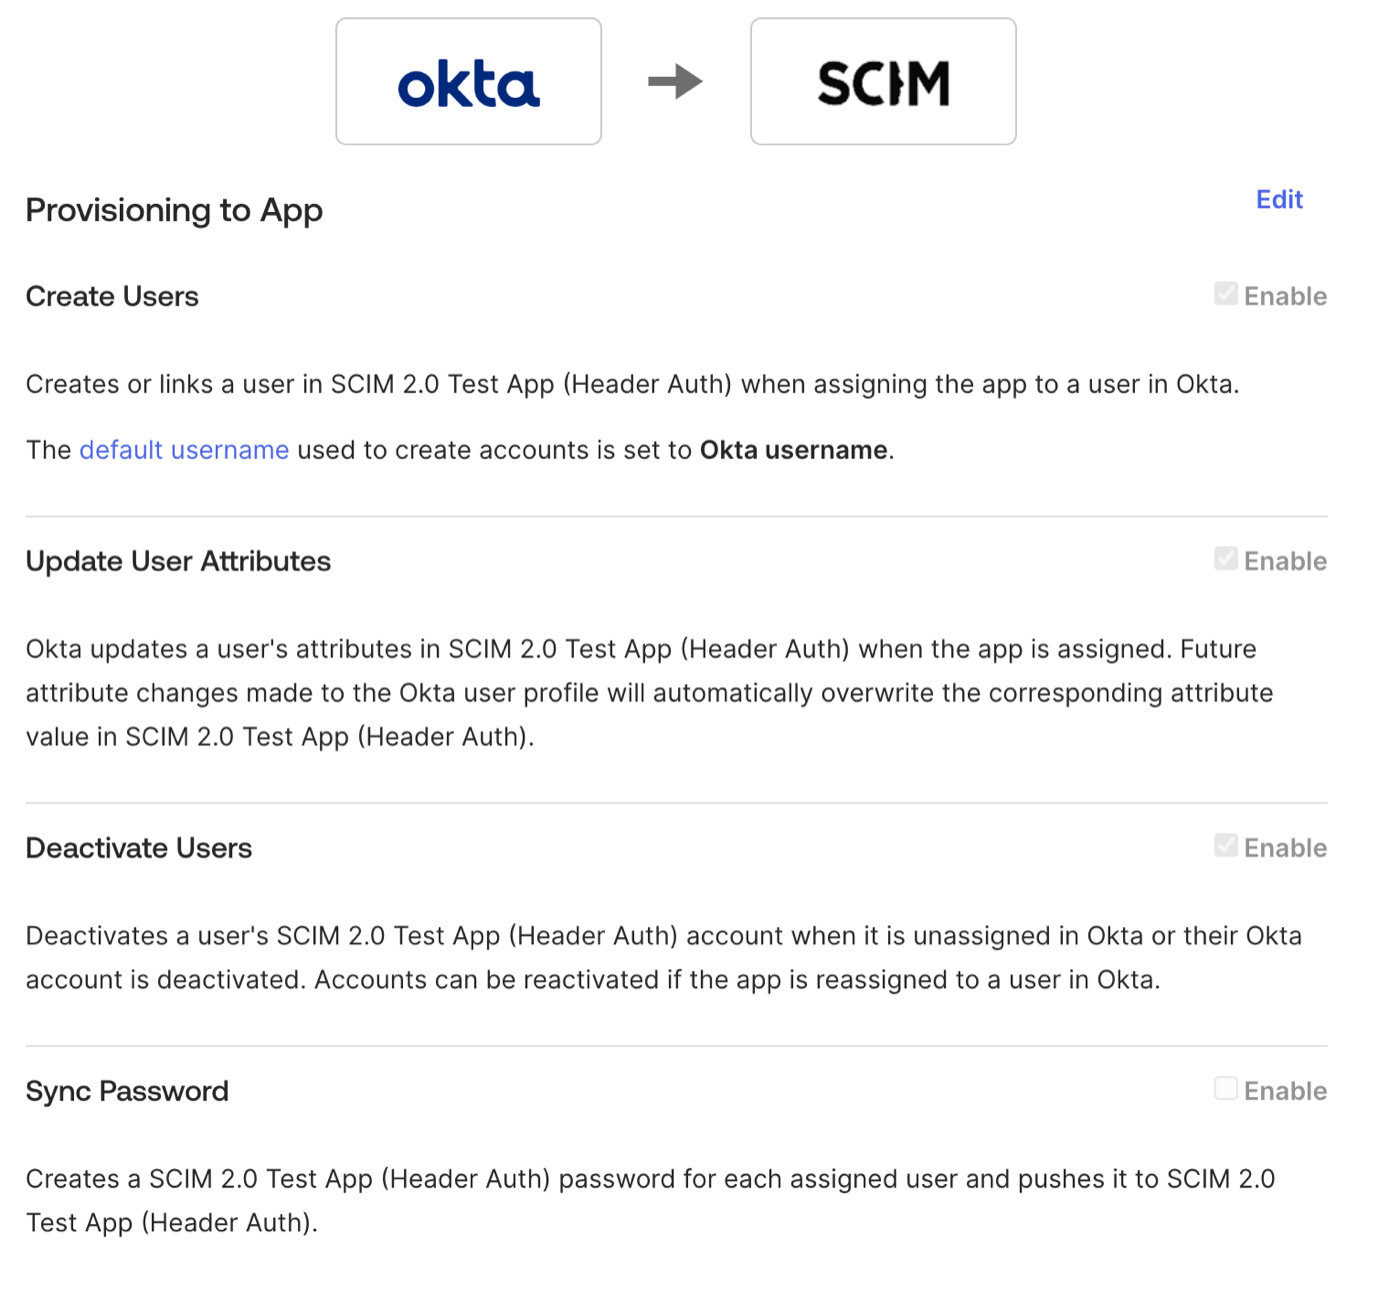
Choose which actions Okta can perform on your Base44 workspace members.
**To enable provisioning:**
1. In the **Provisioning** tab, click **To App**, then **Edit**.
2. Enable **Create Users**, **Update User Attributes**, and **Deactivate Users**.
3. Click **Save**.
### Step 3: Enable provisioning actions
Choose which actions Okta can perform on your Base44 workspace members.
**To enable provisioning:**
1. In the **Provisioning** tab, click **To App**, then **Edit**.
2. Enable **Create Users**, **Update User Attributes**, and **Deactivate Users**.
3. Click **Save**.
 ### Step 4: Add custom attributes
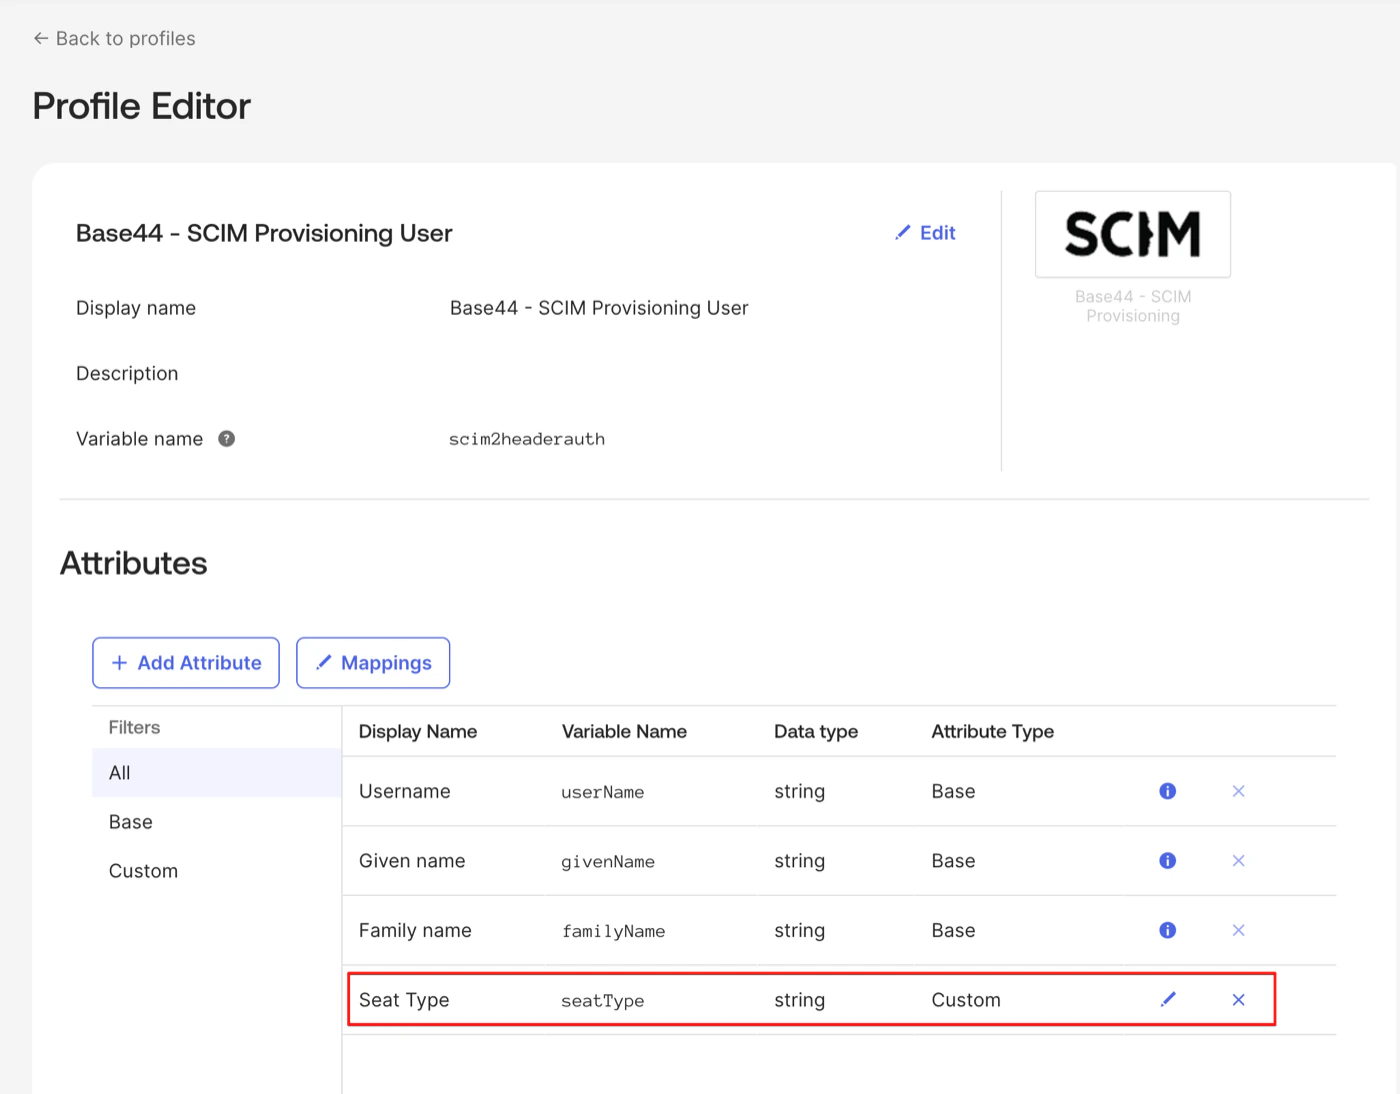
Base44's role and credit limit fields are not in Okta's default profile, so add them first. In the Profile Editor you can also remove attributes Base44 does not use, keeping `userName`, `givenName`, and `familyName`.
**To add the `role` attribute:**
1. Go to **Directory** > **Profile Editor** and open your SCIM app.
2. Click **Add Attribute** and set:
* **Data type:** String
* **Display name:** Role
* **Variable name:** `role`
* **External name:** `role`
* **External namespace:** `urn:base44:params:scim:schemas:extension:user:2.0`
* **Enum:** Check **Define enumerated list of values** and add `admin`, `editor`, and `viewer`.
* **Attribute required:** No
3. Click **Save**.
**To add the `creditLimit` attribute (optional):**
Skip this if you do not want per-member credit caps. The default is no cap.
1. In the same Profile Editor, click **Add Attribute** and set:
* **Data type:** Integer
* **Display name:** Credit Limit
* **Variable name:** `creditLimit`
* **External name:** `creditLimit`
* **External namespace:** `urn:base44:params:scim:schemas:extension:user:2.0`
* **Attribute required:** No
2. Click **Save**.
### Step 4: Add custom attributes
Base44's role and credit limit fields are not in Okta's default profile, so add them first. In the Profile Editor you can also remove attributes Base44 does not use, keeping `userName`, `givenName`, and `familyName`.
**To add the `role` attribute:**
1. Go to **Directory** > **Profile Editor** and open your SCIM app.
2. Click **Add Attribute** and set:
* **Data type:** String
* **Display name:** Role
* **Variable name:** `role`
* **External name:** `role`
* **External namespace:** `urn:base44:params:scim:schemas:extension:user:2.0`
* **Enum:** Check **Define enumerated list of values** and add `admin`, `editor`, and `viewer`.
* **Attribute required:** No
3. Click **Save**.
**To add the `creditLimit` attribute (optional):**
Skip this if you do not want per-member credit caps. The default is no cap.
1. In the same Profile Editor, click **Add Attribute** and set:
* **Data type:** Integer
* **Display name:** Credit Limit
* **Variable name:** `creditLimit`
* **External name:** `creditLimit`
* **External namespace:** `urn:base44:params:scim:schemas:extension:user:2.0`
* **Attribute required:** No
2. Click **Save**.
 ### Step 5: Map attributes and assign users
Map the Base44 attributes, then assign users so they are provisioned.
**To map the attributes:**
1. Go to your SCIM app > **Provisioning** > **To App** > **Attribute Mappings**.
2. Set:
* `userName` to `user.email`
* `role` to `"editor"`, or map it from your IdP's role attribute
* `creditLimit` to your preferred value or IdP attribute, if you added it
3. Remove any unsupported mappings, such as `firstName`, `lastName`, and `displayName`.
4. Click **Save**.
**To assign and test a user:**
1. Go to the **Assignments** tab, click **Assign**, then **Assign to People**.
2. Select a user, set their `role` and optionally their `creditLimit`, then click **Save and Go Back** and **Done**.
3. Check your Base44 workspace members to confirm the user appears.
### Step 5: Map attributes and assign users
Map the Base44 attributes, then assign users so they are provisioned.
**To map the attributes:**
1. Go to your SCIM app > **Provisioning** > **To App** > **Attribute Mappings**.
2. Set:
* `userName` to `user.email`
* `role` to `"editor"`, or map it from your IdP's role attribute
* `creditLimit` to your preferred value or IdP attribute, if you added it
3. Remove any unsupported mappings, such as `firstName`, `lastName`, and `displayName`.
4. Click **Save**.
**To assign and test a user:**
1. Go to the **Assignments** tab, click **Assign**, then **Assign to People**.
2. Select a user, set their `role` and optionally their `creditLimit`, then click **Save and Go Back** and **Done**.
3. Check your Base44 workspace members to confirm the user appears.
 **To test deactivation:**
1. On the **Assignments** tab, click **Unassign** next to the user, then confirm.
2. Check that the user is no longer an active member in Base44 and their seat is released.
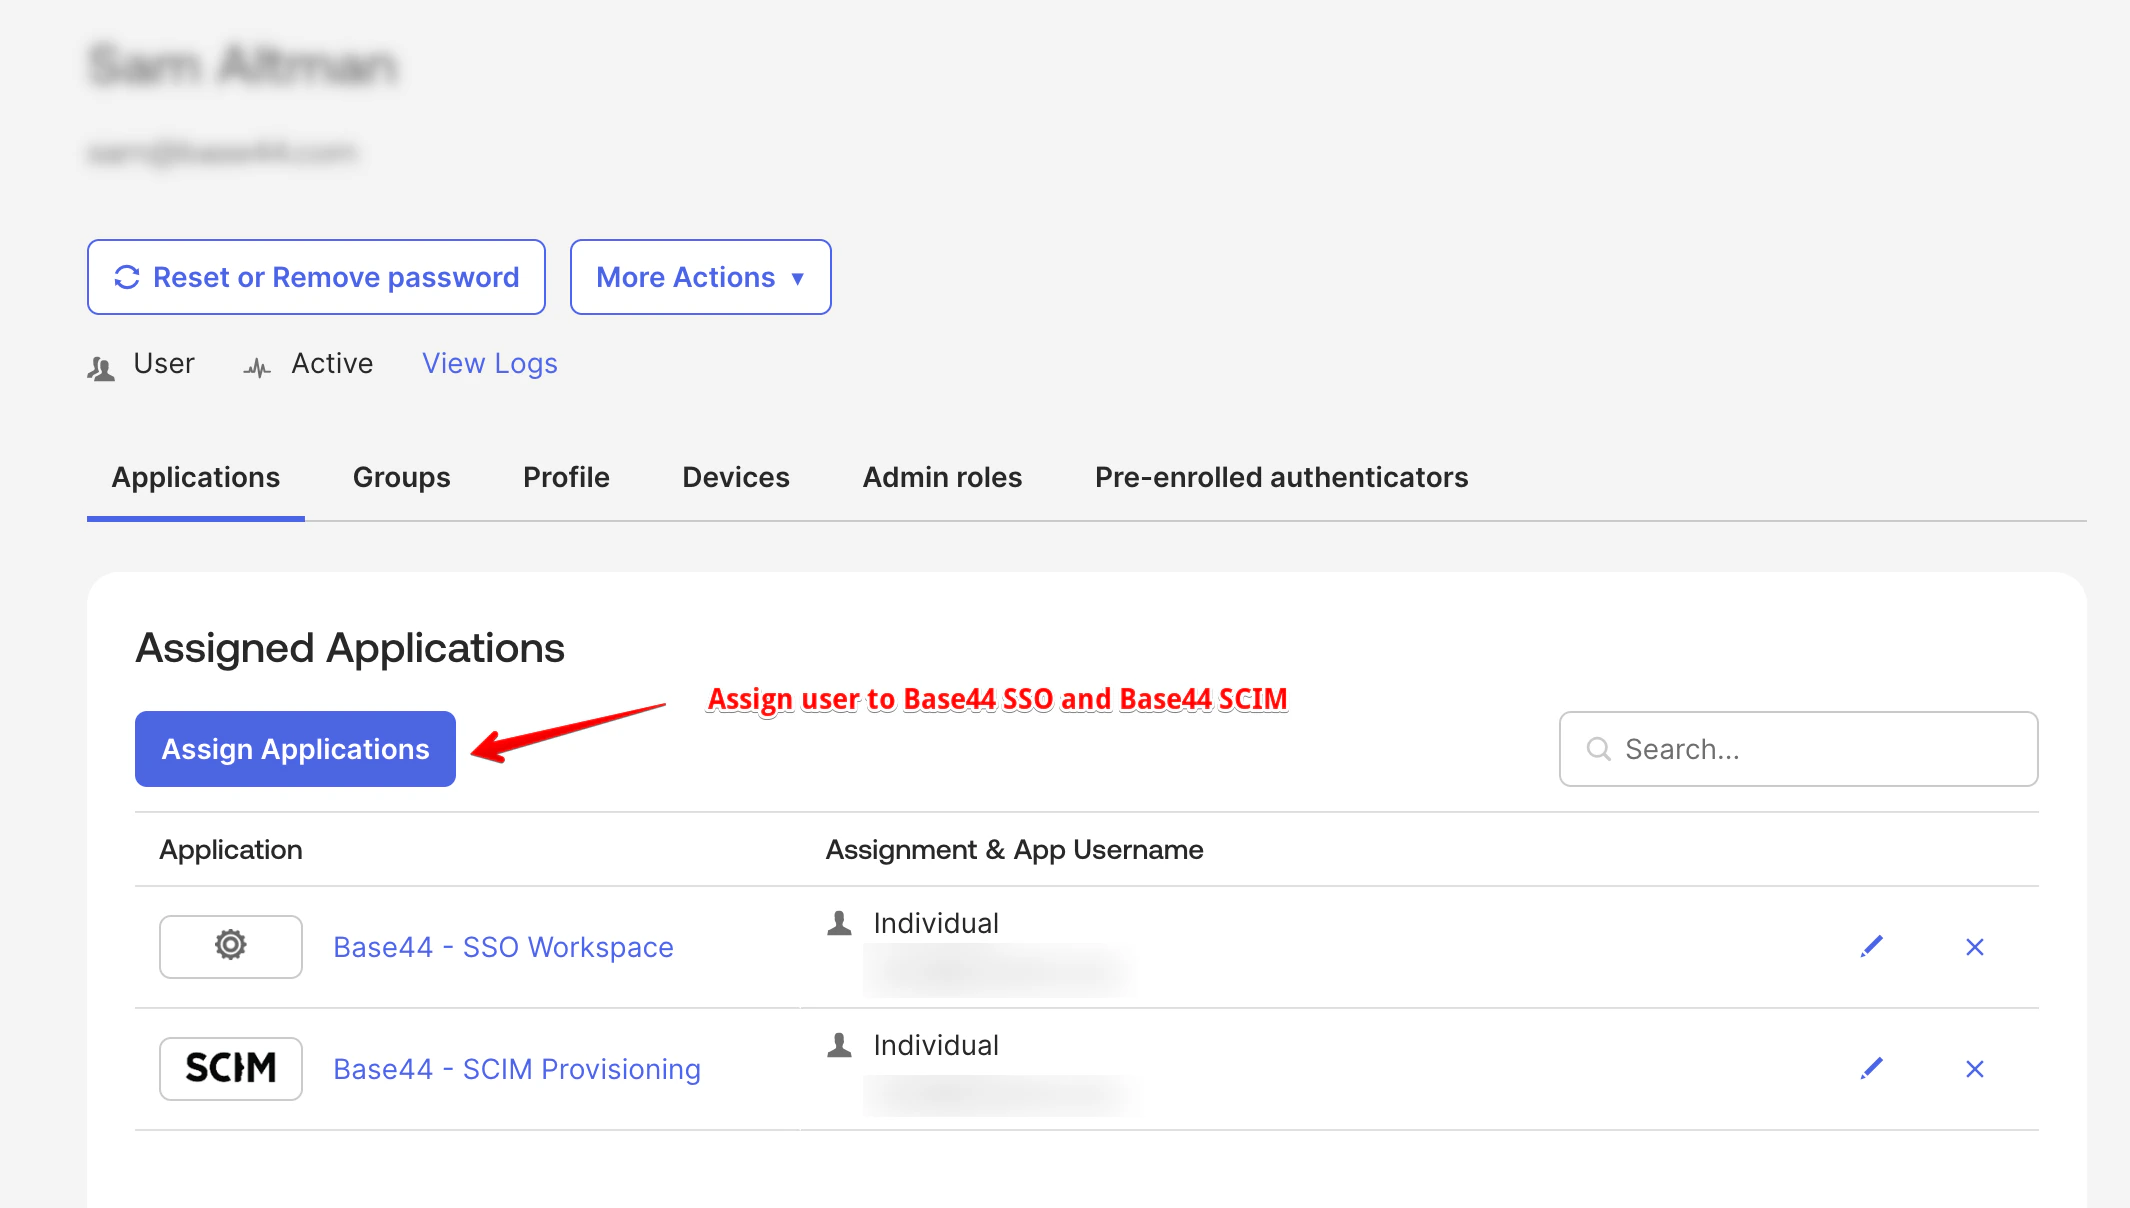
Assign each user to both your Okta SSO app and your SCIM app. Assigning to the SCIM app only provisions the user but does not let them sign in.
***
## Roles and credit limits
Base44 accepts only the following roles via SCIM. Map your Okta `role` attribute to these exact values.
| Role | What they can do |
| -------- | --------------------------------------------------------------- |
| `admin` | Manage members, billing, and workspace settings |
| `editor` | Build, edit, and run apps; uses credits from the workspace pool |
| `viewer` | Read-only access to apps; does not consume credits |
`owner`, `member`, and `guest` cannot be assigned via SCIM. Credit limits apply only to `admin` and `editor` roles, since viewers do not consume credits. Setting a credit limit of `0` is treated as no cap. You can also set credit limits directly in your workspace, without SCIM. See [Managing enterprise workspace members](/Enterprise/managing-enterprise-members#per-member-credit-limits).
Workspace owners cannot be updated or deactivated through SCIM. Promote or demote owners from your workspace settings instead.
***
## FAQs
Select a question below to learn more about Okta SCIM provisioning.
Check that your API token is your Workspace API key with no `Bearer` prefix, and that the SCIM Base URL was copied from **Settings** > **Auth and security** with the correct workspace ID.
Okta OIDC apps do not support SCIM. Use the **SCIM 2.0 Test App (Header Auth)** from the App Catalog instead.
Check your Okta provisioning logs for errors, and confirm `role` is one of `admin`, `editor`, or `viewer`. `owner`, `member`, and `guest` are rejected.
The SCIM app provisions the member, and the SSO app lets them sign in. Assigning to only one means they either cannot sign in or are not provisioned.
**To test deactivation:**
1. On the **Assignments** tab, click **Unassign** next to the user, then confirm.
2. Check that the user is no longer an active member in Base44 and their seat is released.
Assign each user to both your Okta SSO app and your SCIM app. Assigning to the SCIM app only provisions the user but does not let them sign in.
***
## Roles and credit limits
Base44 accepts only the following roles via SCIM. Map your Okta `role` attribute to these exact values.
| Role | What they can do |
| -------- | --------------------------------------------------------------- |
| `admin` | Manage members, billing, and workspace settings |
| `editor` | Build, edit, and run apps; uses credits from the workspace pool |
| `viewer` | Read-only access to apps; does not consume credits |
`owner`, `member`, and `guest` cannot be assigned via SCIM. Credit limits apply only to `admin` and `editor` roles, since viewers do not consume credits. Setting a credit limit of `0` is treated as no cap. You can also set credit limits directly in your workspace, without SCIM. See [Managing enterprise workspace members](/Enterprise/managing-enterprise-members#per-member-credit-limits).
Workspace owners cannot be updated or deactivated through SCIM. Promote or demote owners from your workspace settings instead.
***
## FAQs
Select a question below to learn more about Okta SCIM provisioning.
Check that your API token is your Workspace API key with no `Bearer` prefix, and that the SCIM Base URL was copied from **Settings** > **Auth and security** with the correct workspace ID.
Okta OIDC apps do not support SCIM. Use the **SCIM 2.0 Test App (Header Auth)** from the App Catalog instead.
Check your Okta provisioning logs for errors, and confirm `role` is one of `admin`, `editor`, or `viewer`. `owner`, `member`, and `guest` are rejected.
The SCIM app provisions the member, and the SSO app lets them sign in. Assigning to only one means they either cannot sign in or are not provisioned.