> ## Documentation Index
> Fetch the complete documentation index at: https://docs.base44.com/llms.txt
> Use this file to discover all available pages before exploring further.
# Connecting GitHub to your app
> Connect your Base44 app to GitHub and manage repositories, list issues, review pull requests, and automate workflows connected to your codebase.
## About the GitHub connector
The GitHub connector lets your Base44 app securely access GitHub data using OAuth. Use it to build pull request and issue dashboards, automate issue creation, generate release notes, and sync repository activity into your app.
GitHub supports two connection types: a **connector for app builders**, where you connect one GitHub account that powers the whole app, and a **connector for app users**, where each person using your app connects their own GitHub account.
 Not sure which type you need? Use a **connector for app builders** when one GitHub account should serve the whole app, or a **connector for app users** when each person connects their own account. See the [connectors overview](/Integrations/Connectors) for how the two types work.
**Before you begin:** You need a [Builder plan](https://base44.com/pricing) or higher to use connectors in your app.
***
## GitHub use cases and prompts
Use the GitHub connector to track engineering work, keep stakeholders updated, and connect code workflows to the rest of your tools.
Build dashboards that list pull requests, show their status, and surface what needs review. You can also create views for recent commits, contributors, and repository activity.
**Example prompts:**
```text theme={null}
Connect to GitHub and show all open pull requests across my repositories that are waiting for review.
```
```text theme={null}
Build a dashboard for one repository showing open pull requests, status checks, reviewers, and last update time.
```
```text theme={null}
Create a page that shows the latest commits for this repository with author, message, and timestamp.
```
```text theme={null}
Add a widget that highlights pull requests marked as "changes requested" and still open.
```
```text theme={null}
Show a list of pull requests merged in the last 7 days, grouped by repository.
```
Turn GitHub issues into structured queues inside your app. Track priorities, assignees, labels, and aging issues, and keep a clear view of what is blocked or overdue.
**Example prompts:**
```text theme={null}
Show open issues from my repository in a table with labels, assignee, priority, and created date.
```
```text theme={null}
Create a page that lists issues labeled "bug" and "p0" and sort them by oldest first.
```
```text theme={null}
Build a weekly report that summarizes new issues created this week and the top labels.
```
```text theme={null}
Add a view that shows issues that have not been updated in 14 days.
```
```text theme={null}
Create a dashboard that counts open issues by label and assignee.
```
Trigger GitHub actions from events in your app, such as creating an issue when a bug is reported, or opening a tracking issue when an incident is created.
**Example prompts:**
```text theme={null}
When a new bug report is created in this app, create a GitHub issue in repo org/repo with the title and steps to reproduce.
```
```text theme={null}
Create a GitHub issue automatically when a critical incident is created, including severity, owner, and incident link.
```
```text theme={null}
When a feature request is marked Approved, open a GitHub issue with acceptance criteria and priority label.
```
```text theme={null}
When a customer ticket is escalated, create a GitHub issue and link back to the ticket.
```
```text theme={null}
Add a button that lets an admin create a GitHub issue from a record in this app.
```
Sync merged pull requests and commits into a changelog, or generate release notes automatically from GitHub activity.
**Example prompts:**
```text theme={null}
Sync merged pull requests from org/repo into a changelog page with title, author, and link.
```
```text theme={null}
Generate release notes for the last 2 weeks based on merged pull requests, grouped by label.
```
```text theme={null}
Create a weekly digest summarizing what shipped, including links to pull requests and issues closed.
```
```text theme={null}
Show a list of releases and their notes for this repository.
```
```text theme={null}
Create a "What's new" page that updates every Friday with this week's merged pull requests.
```
Connect GitHub to Slack, Gmail, BigQuery, Notion, or CRMs to route engineering updates where teams work.
**Example prompts:**
```text theme={null}
Post a message in Slack when a pull request is merged, including title, author, and link.
```
```text theme={null}
Send a weekly Gmail digest with merged pull requests and closed issues, grouped by repository.
```
```text theme={null}
When a GitHub issue labeled "customer" is created, add it to a Notion database and notify #support in Slack.
```
```text theme={null}
Mirror issues labeled "docs" into a documentation backlog table inside my app.
```
```text theme={null}
Create a dashboard that joins GitHub deployment activity with BigQuery performance metrics.
```
When describing multi-tool flows in the AI chat, be explicit about which GitHub event should trigger the action and what details to include (repo, issue/PR number, title, labels, link).
***
## Connecting GitHub to your app
Use the AI chat to connect to GitHub, or connect using a pre-made prompt from your app dashboard.
### Using the AI chat
1. Go to your app editor.
2. Describe what you want to do with GitHub in the AI chat, for example:
* `Connect to GitHub and show all open pull requests for org/repo that are waiting for review.`
* `Create a GitHub issue when a new bug is reported in this app.`
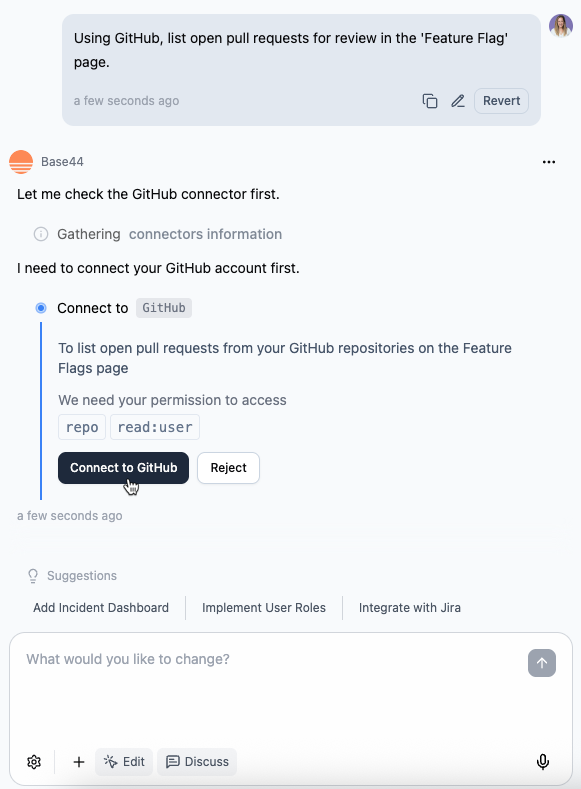
3. Review the **Action required** and **Required permissions** in the side panel.
4. Click **Connect to GitHub**.
5. In the GitHub window that opens:
1. Sign in to the GitHub account you want to connect.
2. Review the requested permissions and click **Authorize**.
6. Return to the editor and let the AI finish creating the GitHub-powered pages, tables, and flows.
Not sure which type you need? Use a **connector for app builders** when one GitHub account should serve the whole app, or a **connector for app users** when each person connects their own account. See the [connectors overview](/Integrations/Connectors) for how the two types work.
**Before you begin:** You need a [Builder plan](https://base44.com/pricing) or higher to use connectors in your app.
***
## GitHub use cases and prompts
Use the GitHub connector to track engineering work, keep stakeholders updated, and connect code workflows to the rest of your tools.
Build dashboards that list pull requests, show their status, and surface what needs review. You can also create views for recent commits, contributors, and repository activity.
**Example prompts:**
```text theme={null}
Connect to GitHub and show all open pull requests across my repositories that are waiting for review.
```
```text theme={null}
Build a dashboard for one repository showing open pull requests, status checks, reviewers, and last update time.
```
```text theme={null}
Create a page that shows the latest commits for this repository with author, message, and timestamp.
```
```text theme={null}
Add a widget that highlights pull requests marked as "changes requested" and still open.
```
```text theme={null}
Show a list of pull requests merged in the last 7 days, grouped by repository.
```
Turn GitHub issues into structured queues inside your app. Track priorities, assignees, labels, and aging issues, and keep a clear view of what is blocked or overdue.
**Example prompts:**
```text theme={null}
Show open issues from my repository in a table with labels, assignee, priority, and created date.
```
```text theme={null}
Create a page that lists issues labeled "bug" and "p0" and sort them by oldest first.
```
```text theme={null}
Build a weekly report that summarizes new issues created this week and the top labels.
```
```text theme={null}
Add a view that shows issues that have not been updated in 14 days.
```
```text theme={null}
Create a dashboard that counts open issues by label and assignee.
```
Trigger GitHub actions from events in your app, such as creating an issue when a bug is reported, or opening a tracking issue when an incident is created.
**Example prompts:**
```text theme={null}
When a new bug report is created in this app, create a GitHub issue in repo org/repo with the title and steps to reproduce.
```
```text theme={null}
Create a GitHub issue automatically when a critical incident is created, including severity, owner, and incident link.
```
```text theme={null}
When a feature request is marked Approved, open a GitHub issue with acceptance criteria and priority label.
```
```text theme={null}
When a customer ticket is escalated, create a GitHub issue and link back to the ticket.
```
```text theme={null}
Add a button that lets an admin create a GitHub issue from a record in this app.
```
Sync merged pull requests and commits into a changelog, or generate release notes automatically from GitHub activity.
**Example prompts:**
```text theme={null}
Sync merged pull requests from org/repo into a changelog page with title, author, and link.
```
```text theme={null}
Generate release notes for the last 2 weeks based on merged pull requests, grouped by label.
```
```text theme={null}
Create a weekly digest summarizing what shipped, including links to pull requests and issues closed.
```
```text theme={null}
Show a list of releases and their notes for this repository.
```
```text theme={null}
Create a "What's new" page that updates every Friday with this week's merged pull requests.
```
Connect GitHub to Slack, Gmail, BigQuery, Notion, or CRMs to route engineering updates where teams work.
**Example prompts:**
```text theme={null}
Post a message in Slack when a pull request is merged, including title, author, and link.
```
```text theme={null}
Send a weekly Gmail digest with merged pull requests and closed issues, grouped by repository.
```
```text theme={null}
When a GitHub issue labeled "customer" is created, add it to a Notion database and notify #support in Slack.
```
```text theme={null}
Mirror issues labeled "docs" into a documentation backlog table inside my app.
```
```text theme={null}
Create a dashboard that joins GitHub deployment activity with BigQuery performance metrics.
```
When describing multi-tool flows in the AI chat, be explicit about which GitHub event should trigger the action and what details to include (repo, issue/PR number, title, labels, link).
***
## Connecting GitHub to your app
Use the AI chat to connect to GitHub, or connect using a pre-made prompt from your app dashboard.
### Using the AI chat
1. Go to your app editor.
2. Describe what you want to do with GitHub in the AI chat, for example:
* `Connect to GitHub and show all open pull requests for org/repo that are waiting for review.`
* `Create a GitHub issue when a new bug is reported in this app.`
3. Review the **Action required** and **Required permissions** in the side panel.
4. Click **Connect to GitHub**.
5. In the GitHub window that opens:
1. Sign in to the GitHub account you want to connect.
2. Review the requested permissions and click **Authorize**.
6. Return to the editor and let the AI finish creating the GitHub-powered pages, tables, and flows.
 ### From the app dashboard
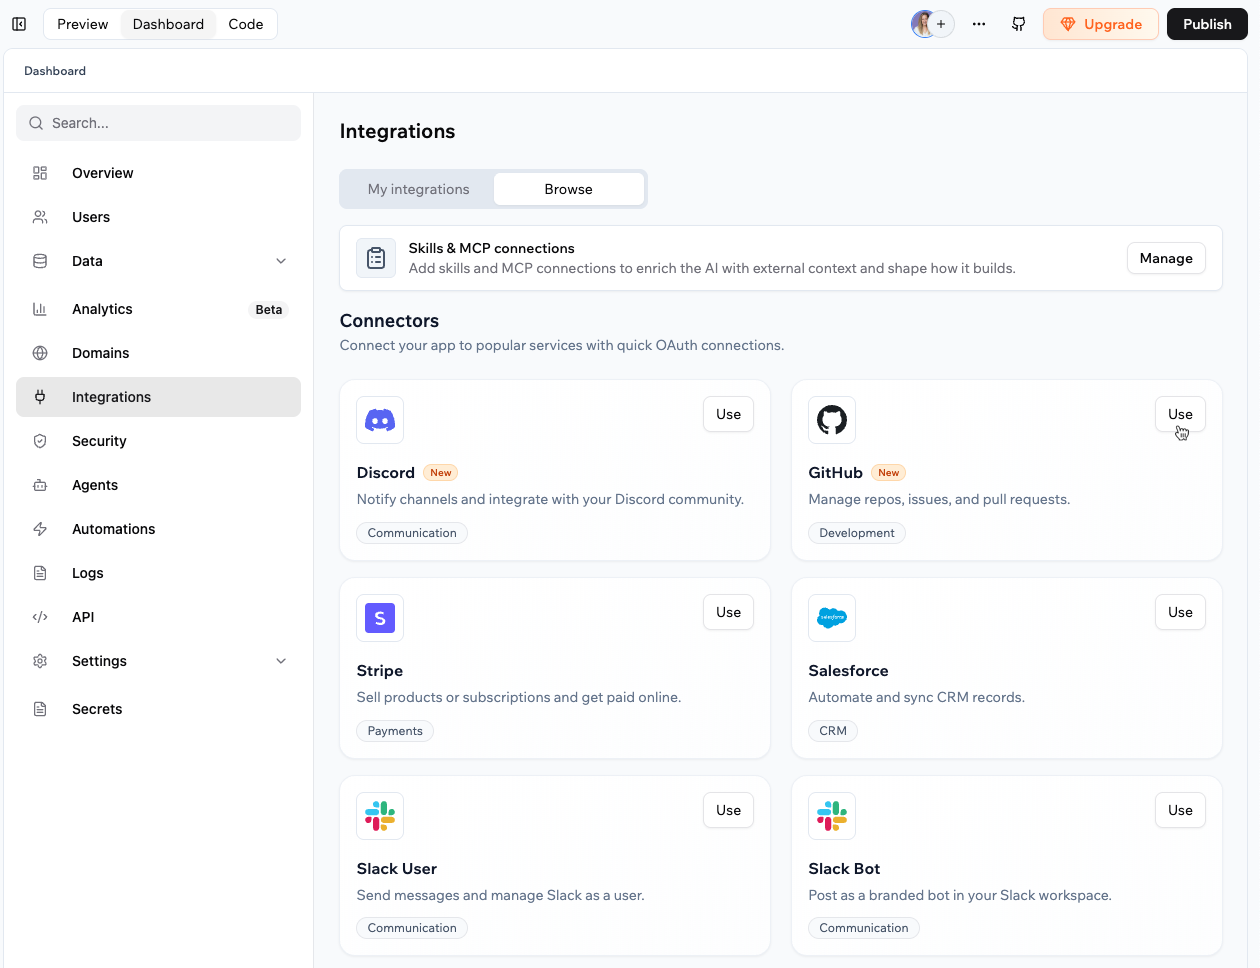
1. Click **Dashboard** in your app editor.
2. Click **Integrations**.
3. Click the **Browse** tab.
4. Find **GitHub** and click **Use**.
5. Select the pre-made prompt you want to add to the AI chat.
6. In the AI chat, review the **Action required** and **Required permissions**.
7. Click **Connect to GitHub** and complete the authorization flow.
8. Return to the editor and let the AI finish creating the GitHub-powered flows.
### From the app dashboard
1. Click **Dashboard** in your app editor.
2. Click **Integrations**.
3. Click the **Browse** tab.
4. Find **GitHub** and click **Use**.
5. Select the pre-made prompt you want to add to the AI chat.
6. In the AI chat, review the **Action required** and **Required permissions**.
7. Click **Connect to GitHub** and complete the authorization flow.
8. Return to the editor and let the AI finish creating the GitHub-powered flows.
 Start with a simple read-only flow (like listing open pull requests) to confirm the connection works. Then add write actions like creating issues.
If you click **Reject** or close the authorization window, the connector is not added. You can run the connection flow again from the AI chat or from **Integrations** → **Browse**.
***
## GitHub scopes and permissions
When you connect GitHub, the connector requests permissions through GitHub’s OAuth authorization flow. The exact permissions you see depend on what your app is trying to build or run.
Always review the permissions shown in the GitHub authorization window before approving access.
**Example permissions you may see:**
* `repo`: Full access to repositories the connected account can access.
* `read:user`: Read basic profile information for the connected account.
* `user:email`: Read email addresses for the connected account.
GitHub permissions may change depending on the flows you build. The authorization window always shows the current access being requested.
***
## FAQs
A shared connection uses one GitHub account for the whole app. To let each person use their own GitHub account instead, use a **connector for app users**, where each person connects their own account.
Yes. Use a **connector for app users** so each person using your app connects their own GitHub account and acts as themselves. A **connector for app builders**, by contrast, uses one GitHub account for the whole app.
1. Go to your app's dashboard.
2. Click **Integrations**.
3. Click the **My integrations** tab.
4. Click the **More actions** icon on the **GitHub** connector and select **Switch account**.
5. Complete the GitHub authorization flow for the new account.
Access to private repositories depends on what you approved during authorization and which repositories your connected GitHub account can access. Reconnect GitHub and review the permissions shown in the authorization window to make sure the connector is authorized for the repositories you need.
To reconnect with the repository access you need, [learn more about managing connectors](/Integrations/Connectors#managing-connectors).
Yes, if the flow you build requires write permissions and you approve them during authorization. Always review the permissions shown in the connection flow before approving access.
Click the **More actions** icon on the connector in your app's **Integrations** tab, then choose an option such as switch account, reconnect, or disconnect. [Learn more about managing connectors](/Integrations/Connectors#managing-connectors).
Start with a simple read-only flow (like listing open pull requests) to confirm the connection works. Then add write actions like creating issues.
If you click **Reject** or close the authorization window, the connector is not added. You can run the connection flow again from the AI chat or from **Integrations** → **Browse**.
***
## GitHub scopes and permissions
When you connect GitHub, the connector requests permissions through GitHub’s OAuth authorization flow. The exact permissions you see depend on what your app is trying to build or run.
Always review the permissions shown in the GitHub authorization window before approving access.
**Example permissions you may see:**
* `repo`: Full access to repositories the connected account can access.
* `read:user`: Read basic profile information for the connected account.
* `user:email`: Read email addresses for the connected account.
GitHub permissions may change depending on the flows you build. The authorization window always shows the current access being requested.
***
## FAQs
A shared connection uses one GitHub account for the whole app. To let each person use their own GitHub account instead, use a **connector for app users**, where each person connects their own account.
Yes. Use a **connector for app users** so each person using your app connects their own GitHub account and acts as themselves. A **connector for app builders**, by contrast, uses one GitHub account for the whole app.
1. Go to your app's dashboard.
2. Click **Integrations**.
3. Click the **My integrations** tab.
4. Click the **More actions** icon on the **GitHub** connector and select **Switch account**.
5. Complete the GitHub authorization flow for the new account.
Access to private repositories depends on what you approved during authorization and which repositories your connected GitHub account can access. Reconnect GitHub and review the permissions shown in the authorization window to make sure the connector is authorized for the repositories you need.
To reconnect with the repository access you need, [learn more about managing connectors](/Integrations/Connectors#managing-connectors).
Yes, if the flow you build requires write permissions and you approve them during authorization. Always review the permissions shown in the connection flow before approving access.
Click the **More actions** icon on the connector in your app's **Integrations** tab, then choose an option such as switch account, reconnect, or disconnect. [Learn more about managing connectors](/Integrations/Connectors#managing-connectors).