

Good to know:
- Workspace single sign-on is available on an Enterprise plan (Business or Enterprise). Workspaces created before October 1, 2026 keep their earlier plan requirement.
- To add and update members automatically, use SCIM provisioning for Okta.
How it works
Base44 signs your team in through Okta using OIDC. To do this, you need to create an OIDC app in Okta, then enter 3 values into your Base44 workspace under Settings > Authentication:- Client ID: From your Okta app.
- Client Secret: From your Okta app.
- Okta domain: Your Okta subdomain (for example,
your-company), or your full custom Okta URL domain if you have one (for example,login.your-company.com).
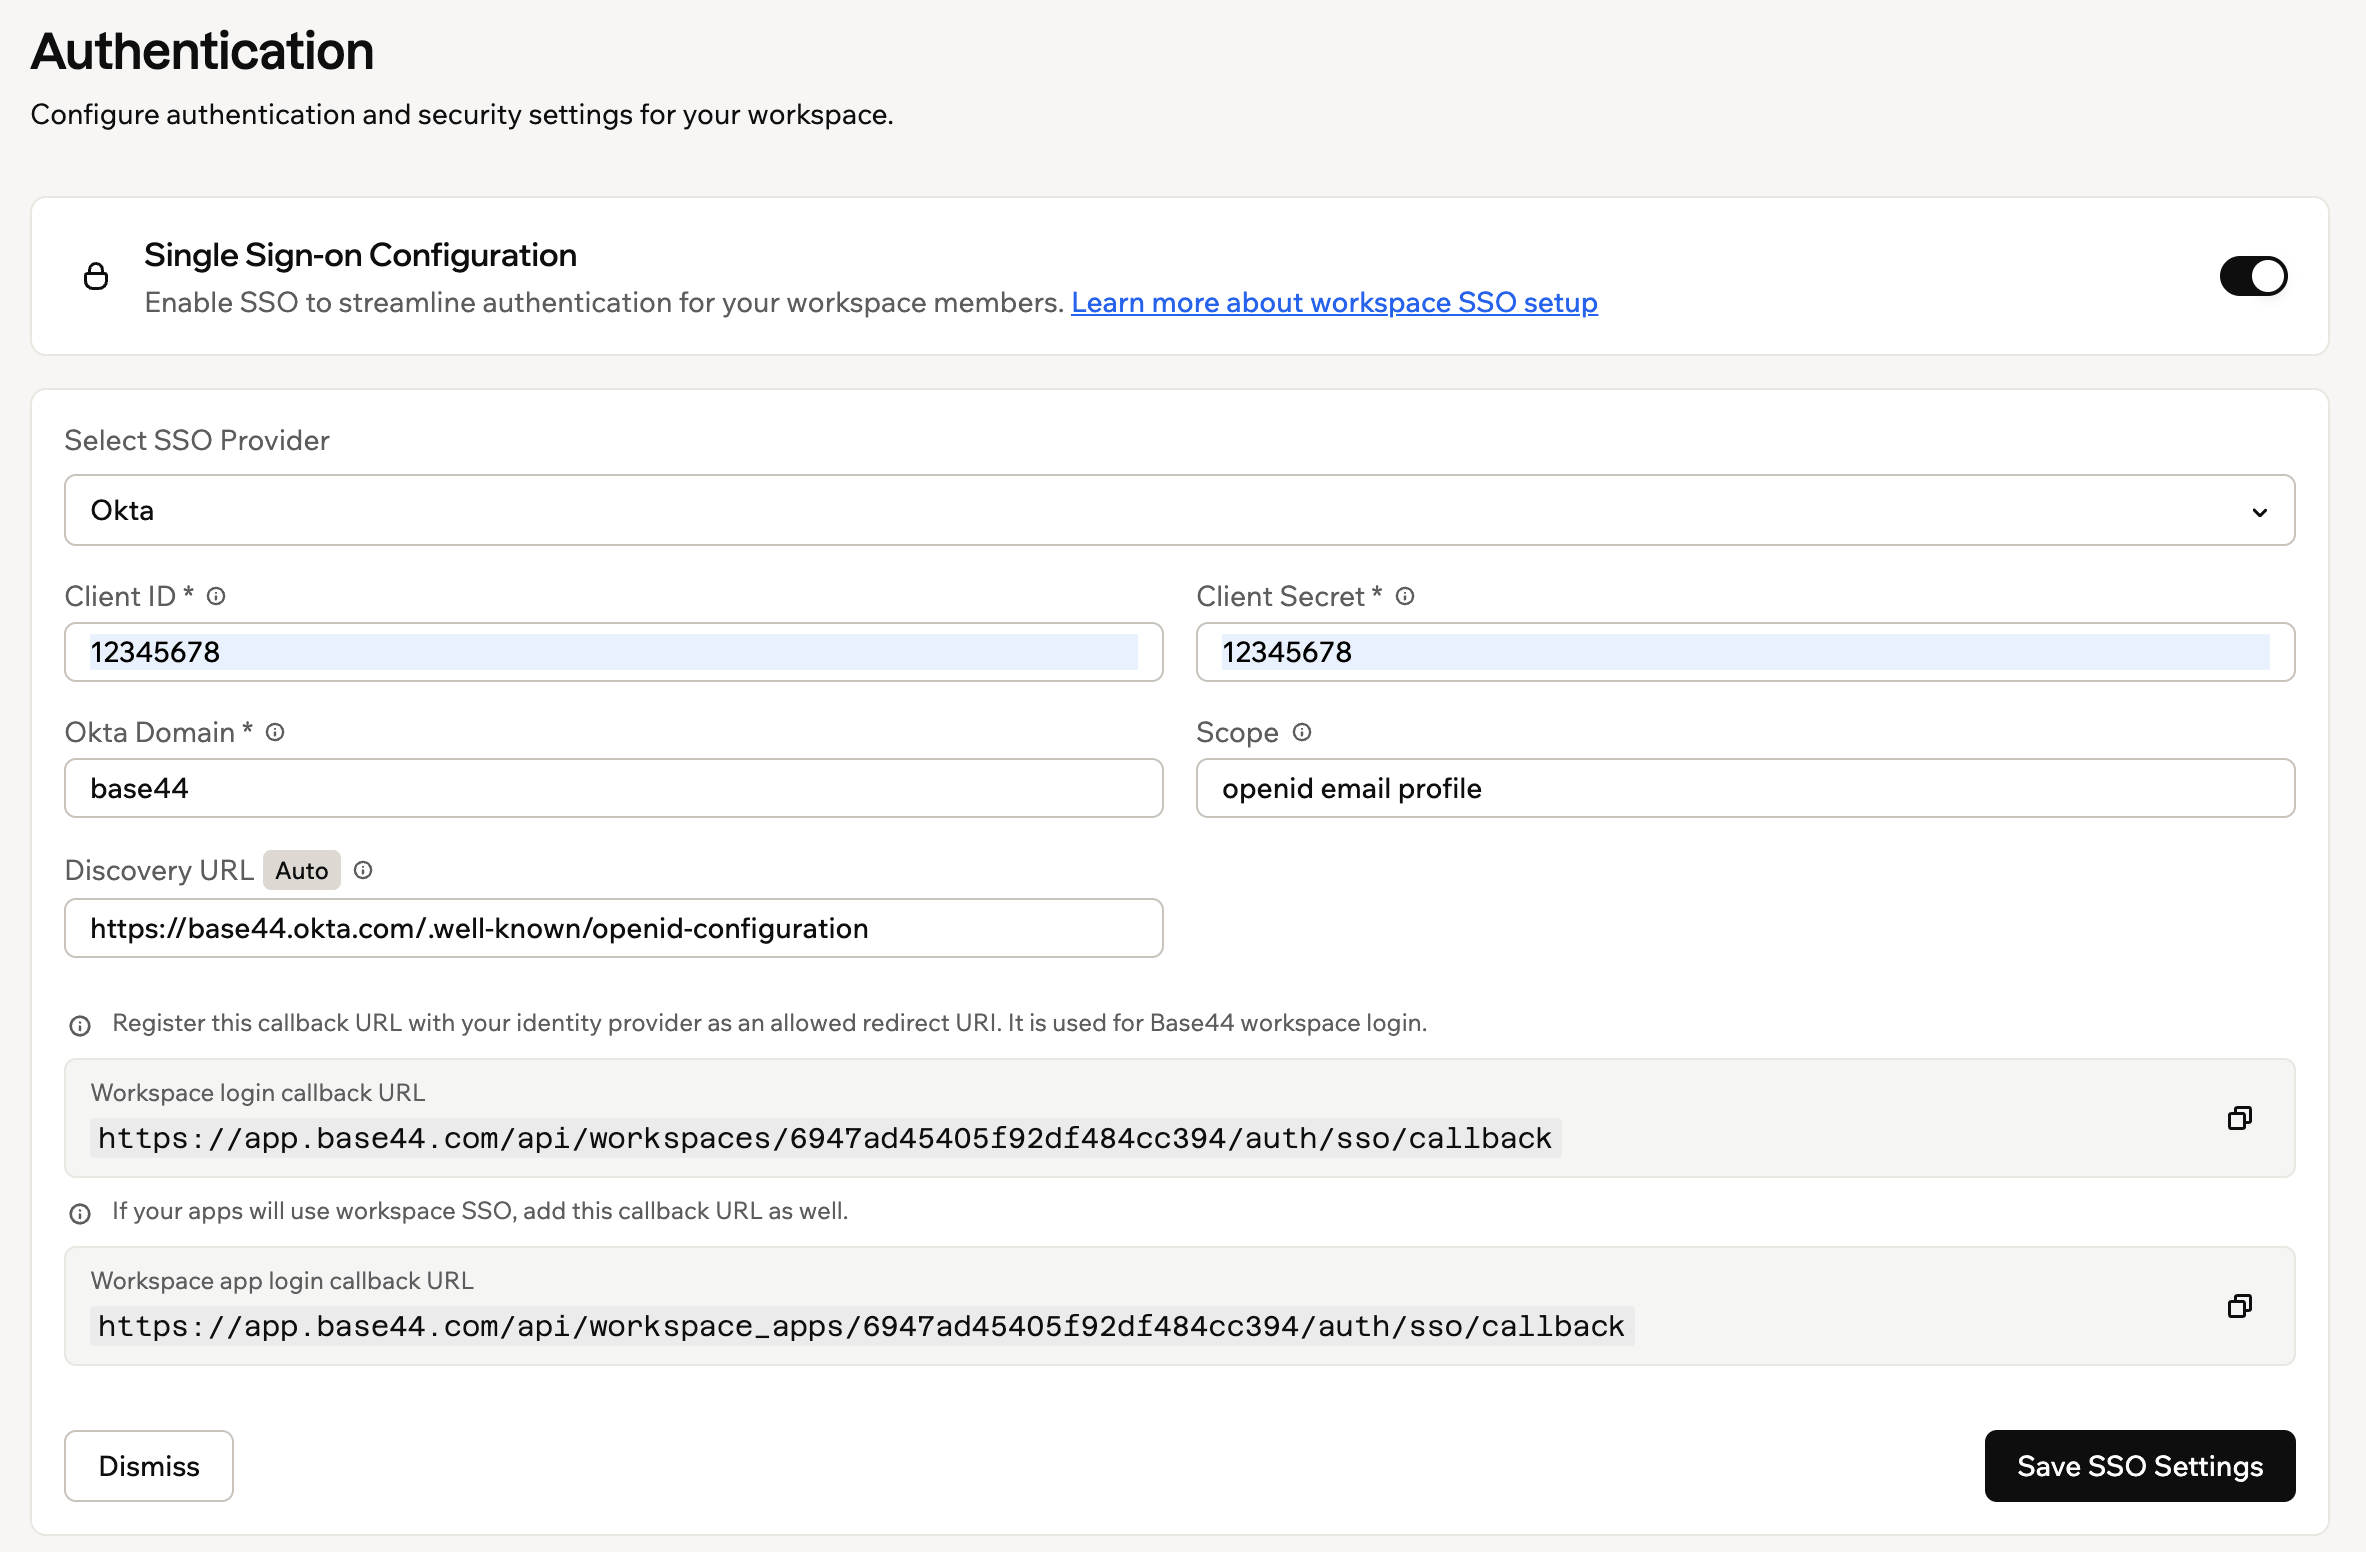
The SSO configuration form in Base44's Authentication settings
Setting up single sign-on
Follow these steps to create the Okta app, allow Base44 to use it, and connect it to your Base44 workspace.Step 1: Create an OIDC app
Create the OIDC application that represents Base44 sign-in. To create the app:- In the Okta Admin Console, go to Applications > Applications, then click Create App Integration.
- Set Sign-in method to OIDC - OpenID Connect.
- Set Application type to Web Application.
- Click Next.
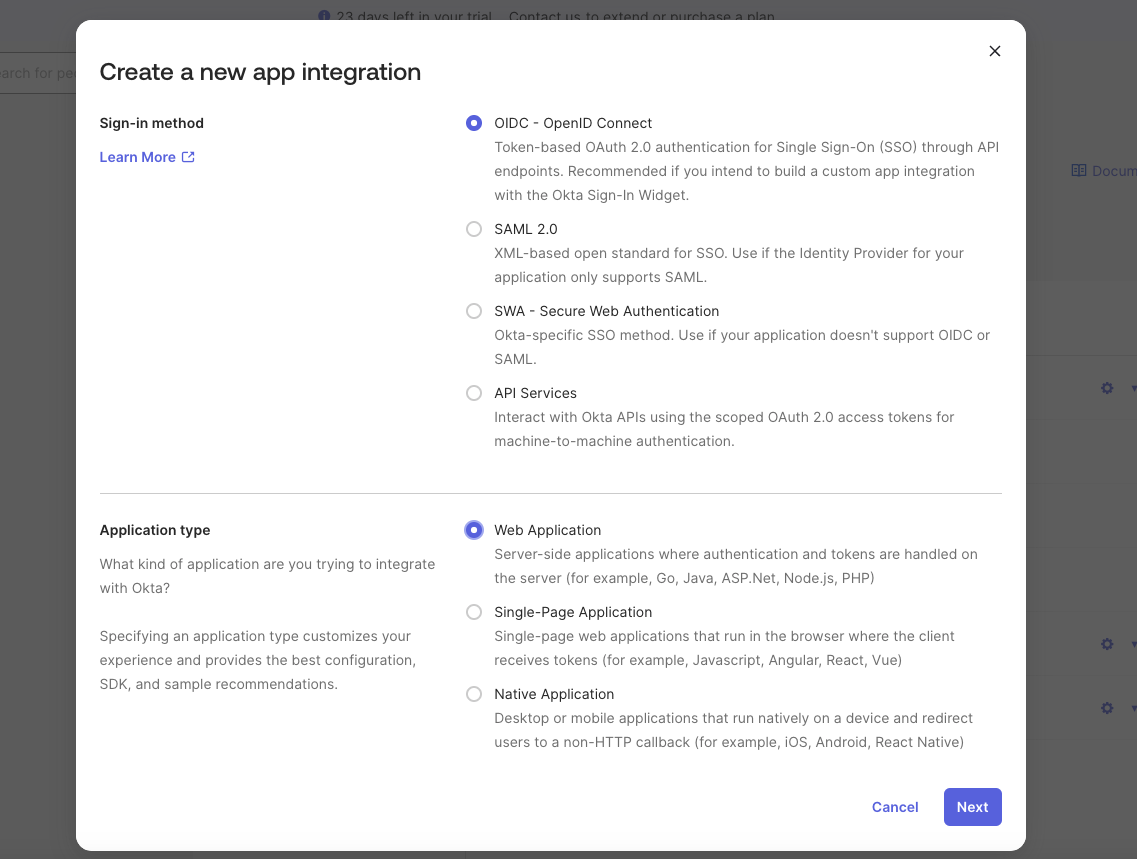
Creating an OIDC app integration in Okta
Step 2: Configure the app
Set the app name, redirect URIs, and who can use it. To configure the app:- Enter an App name, for example
Base44 - your workspace name. - Under Sign-in redirect URIs, add your workspace login callback URL, replacing
{{WORKSPACE_ID}}with your workspace ID:https://app.base44.com/api/workspaces/{{WORKSPACE_ID}}/auth/sso/callback. If your apps also use workspace SSO, add the workspace app login callback URL too:https://app.base44.com/api/workspace_apps/{{WORKSPACE_ID}}/auth/sso/callback. Base44 shows both URLs in the SSO configuration panel so you can copy them. - Under Sign-out redirect URIs, add
https://app.base44.com. - Under Controlled access, choose who can use the app, for example Allow everyone in your organization to access.
- Click Save.
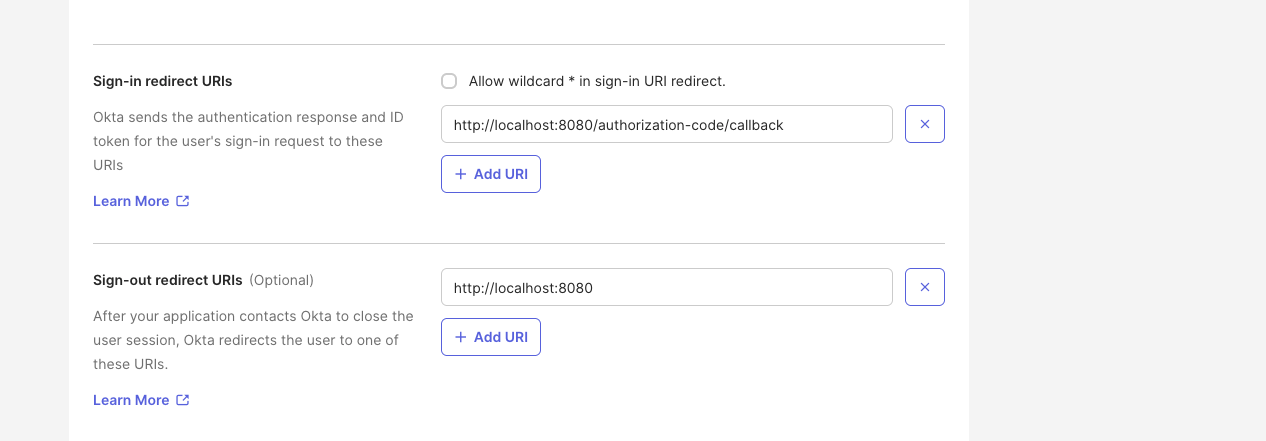
Setting the sign-in and sign-out redirect URIs in Okta
Step 3: Get your credentials
Base44 needs 3 values to connect to your Okta app.- Client ID: On the app’s General tab.
- Client Secret: On the app’s General tab.
- Okta domain: Your Okta subdomain (for example,
your-company). If your team signs in through a custom Okta URL domain, enter that full domain instead (for example,login.your-company.com).
Step 4: Allow Base44 in your authorization server
Okta only issues tokens to apps that an authorization server policy allows. To add an access policy rule:- Go to Security > API > Authorization Servers, then open the default server.
- On the Access Policies tab, click Add Rule, or edit an existing rule.
- Name the rule (for example,
Allow Base44), set the grant type to Authorization Code, and apply it to your Base44 app (or all clients), all users, and any scopes. - Click Create Rule.
In your Base44 app’s General tab in Okta, turn Federation Broker Mode off. With it on, sign-in can fail with “You are not allowed to access this app.”
Step 5: Add your details in Base44
Add the OIDC app credentials to your workspace. To configure SSO in Base44:- Click your workspace name at the bottom left of your account.
- Click Settings.
- Click Authentication.
- Enable the toggle next to Single Sign-On Configuration.
- In Select SSO Provider, choose Okta.
- Enter your Client ID, Client Secret, and Okta Domain. Use your subdomain (for example,
your-company), or your full custom Okta URL domain if you have one (for example,login.your-company.com). If your Okta org uses API Access Management with custom authorization servers, enter the issuer URL including the authorization server path, such ashttps://login.your-company.com/oauth2/default. - Keep Scope as
openid email profile. - The Discovery URL fills in automatically from the Okta Domain you entered and is marked Auto. You can edit it if you need to point Base44 somewhere else, and it then shows as Modified. To go back to the generated value, click Reset to auto.
- Click Enable SSO.
Step 6: Assign users
Your team can sign in once you assign them to your Okta app. To assign users:- In your Okta app, go to the Assignments tab.
- Click Assign, then Assign to People or Assign to Groups.
- Select the users or groups that should be able to sign in, then click Assign and Save and Go Back.
FAQs
Select a question below to learn more about Okta SSO.Why does sign-in fail with 'You are not allowed to access this app'?
Why does sign-in fail with 'You are not allowed to access this app'?
Add an access policy rule on the default authorization server (Step 4), turn off Federation Broker Mode in the app’s General tab, and confirm the user is assigned to the app.
Why does sign-in fail with an email error?
Why does sign-in fail with an email error?
Okta’s default authorization server does not always return the
email claim. Add the authorization server path to your Okta Domain, such as https://your-domain.okta.com/oauth2/default, so the email is returned. See the warning in Step 5.Can I use a custom Okta URL domain?
Can I use a custom Okta URL domain?
Yes. If your team signs in through a custom Okta URL domain (for example,
login.your-company.com), enter that full domain in the Okta Domain field instead of your .okta.com subdomain. Base44 builds the Discovery URL from it automatically.Do I need separate Okta apps for SSO and SCIM?
Do I need separate Okta apps for SSO and SCIM?
Yes. Okta OIDC apps do not support SCIM, so SSO uses an OIDC app and SCIM uses a separate SCIM 2.0 app. See SCIM provisioning for Okta.