

Managing the apps in your workspace
Searching and filtering your apps
Use the search bar and filters at the top of the Apps page to find exactly what you need. You can also switch between a grid view and a list view. To search, filter, or sort your apps:- Go to Apps in your Base44 workspace.
- Use the options at the top of the page:
- Search: Enter an app name in the search bar. Search also matches an app’s description, its creator, an owner’s email address, and an app ID you paste in.
- Filter by ownership: In a shared workspace, workspace admins and owners may be able to switch between Created by me and All apps. This filter does not appear in every workspace or role.
- Sort: Order apps by Last edited, Last created, App name A-Z, or Most visitors. Under Most visitors, choose Last 24 hours, Last 7 days, or Last 30 days.
- Switch view: On desktop, select Grid view or List view.
Organizing your apps into folders
Group your apps into folders to keep your workspace organized. Folders are visible to everyone in your workspace. Apps that are in a folder no longer appear in the main apps list.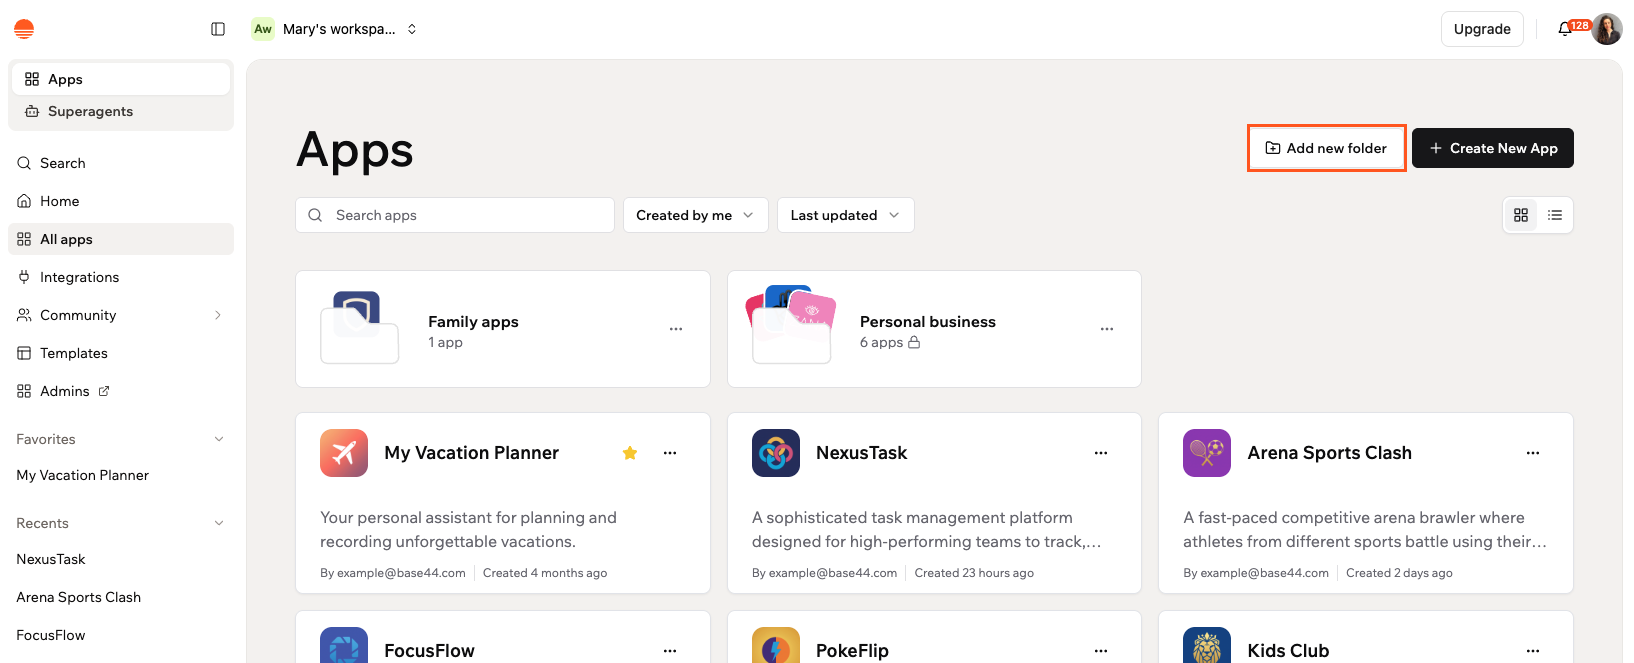
Using folders to manage your apps
Creating a folder
Folders appear at the top of your Apps page, so your most important groups are always easy to find. Once created, you can add any of your apps to a folder from the Apps page. To create a folder:- Go to Apps in your Base44 workspace.
- Click New folder at the top right.
- Enter a name in the Folder name field.
- Click Create.
Adding apps to a folder
You can add apps to a folder from the Apps page or from inside the folder itself. To add apps to a folder:- Go to Apps in your Base44 workspace.
- Click the More actions icon on the folder card, or open the folder and click the More actions icon next to the folder name.
- Click Add apps.
- Search for or select the apps you want to add.
- Click Move.
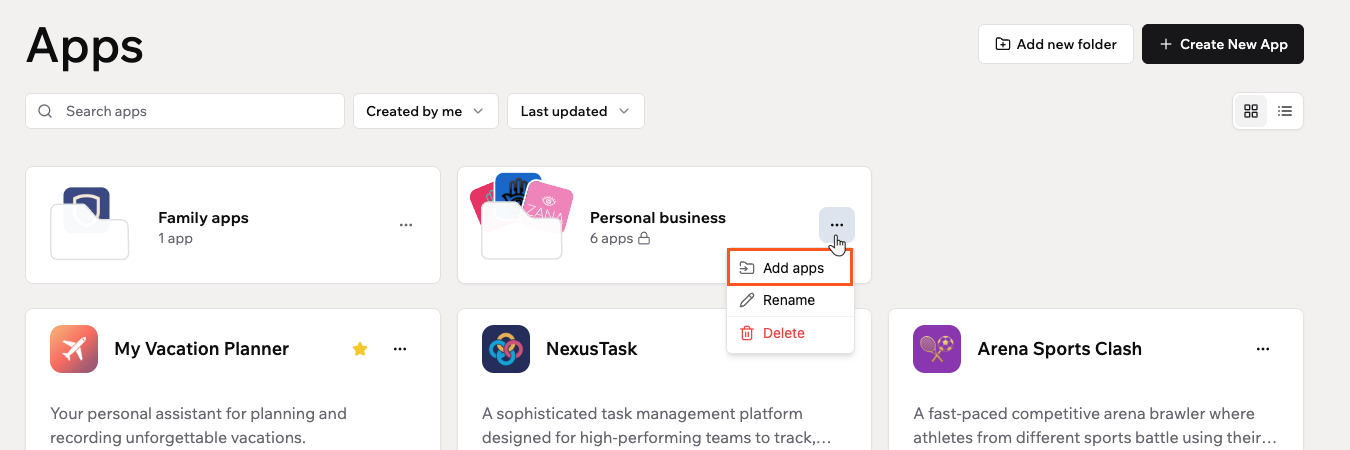
Adding apps to a folder
Removing an app from a folder
Move an app out of a folder at any time without deleting it. The app returns to the main apps list. To remove an app from a folder:- Go to Apps in your Base44 workspace.
- Click the folder that contains the app.
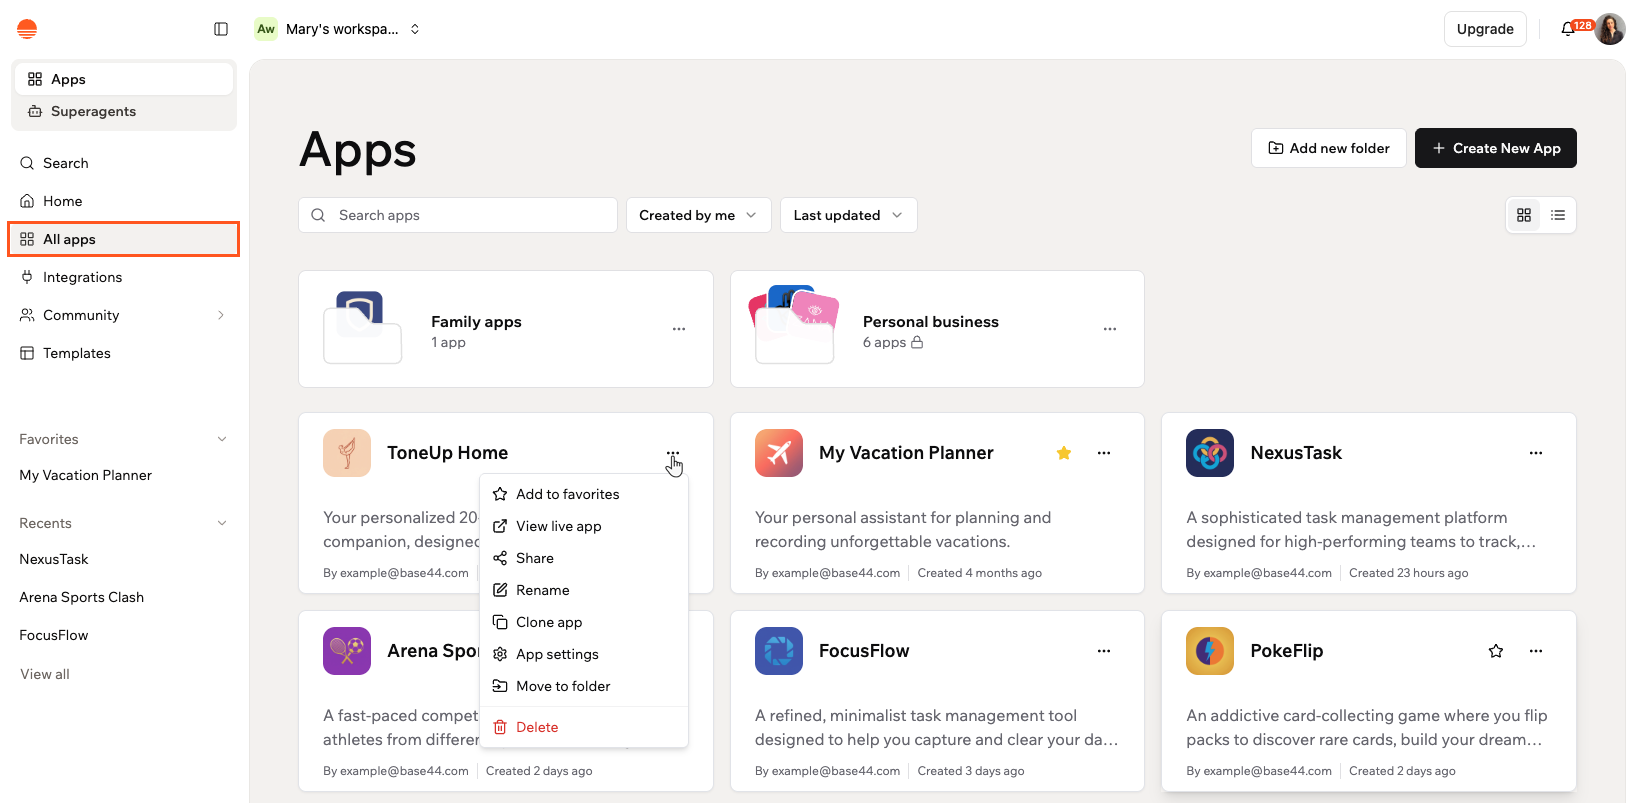
- Click the More actions icon on the app card.
- Click Remove from folder.
Managing your folders
You can rename or delete a folder at any time from the folder’s actions menu.Renaming a folder
Renaming a folder
- Go to Apps in your Base44 workspace.
- Click the More actions icon on the folder card.
- Click Rename.
- Enter a new name and click Save.
Deleting a folder
Deleting a folder
- Go to Apps in your Base44 workspace.
- Click the More actions icon on the folder card.
- Click Delete.
- Click Delete again to confirm.
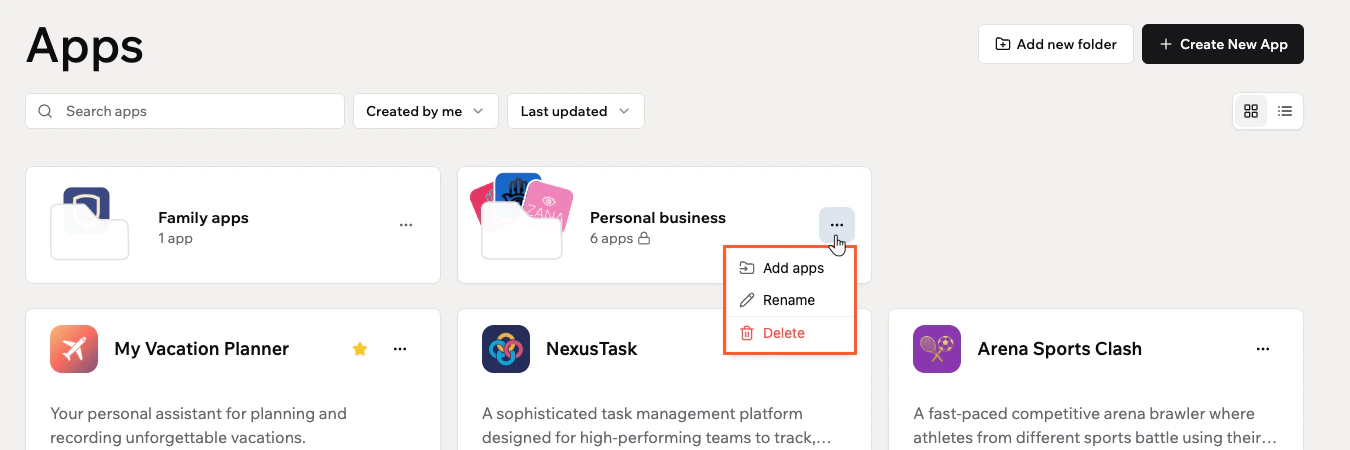
Managing your app folders
Viewing your live app
Open your published app directly from the Apps page to see how it looks and behaves for your app users. To view your live app:- Go to Apps in your Base44 workspace.
- Click the More actions icon on the app card.
- Click View live app.
Sharing your app
You can share your app by sending an invitation to a specific person or by copying a shareable link. To share your app:- Go to Apps in your Base44 workspace.
- Click the More actions icon on the app card.
- Click Share.
- Enter one or more email addresses in the field, choose Admin or User from the Select role drop-down, and click Send invitation.
Renaming your app
Update your app’s name at any time. Keep in mind that renaming an app also updates its URL, so make sure to share the new link with anyone who had the old one. To rename your app:- Go to Apps in your Base44 workspace.
- Click the More actions icon on the app card.
- Click Rename.
- Enter a new name in the field.
- Click Save.
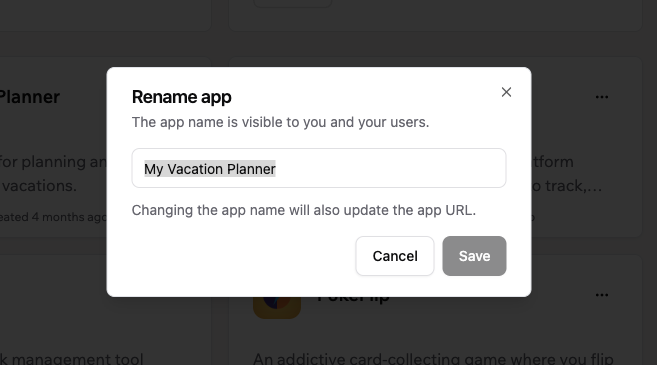
Renaming an app
Cloning your app
Make a full copy of an app’s layout, pages, and design to use as a starting point for a new project.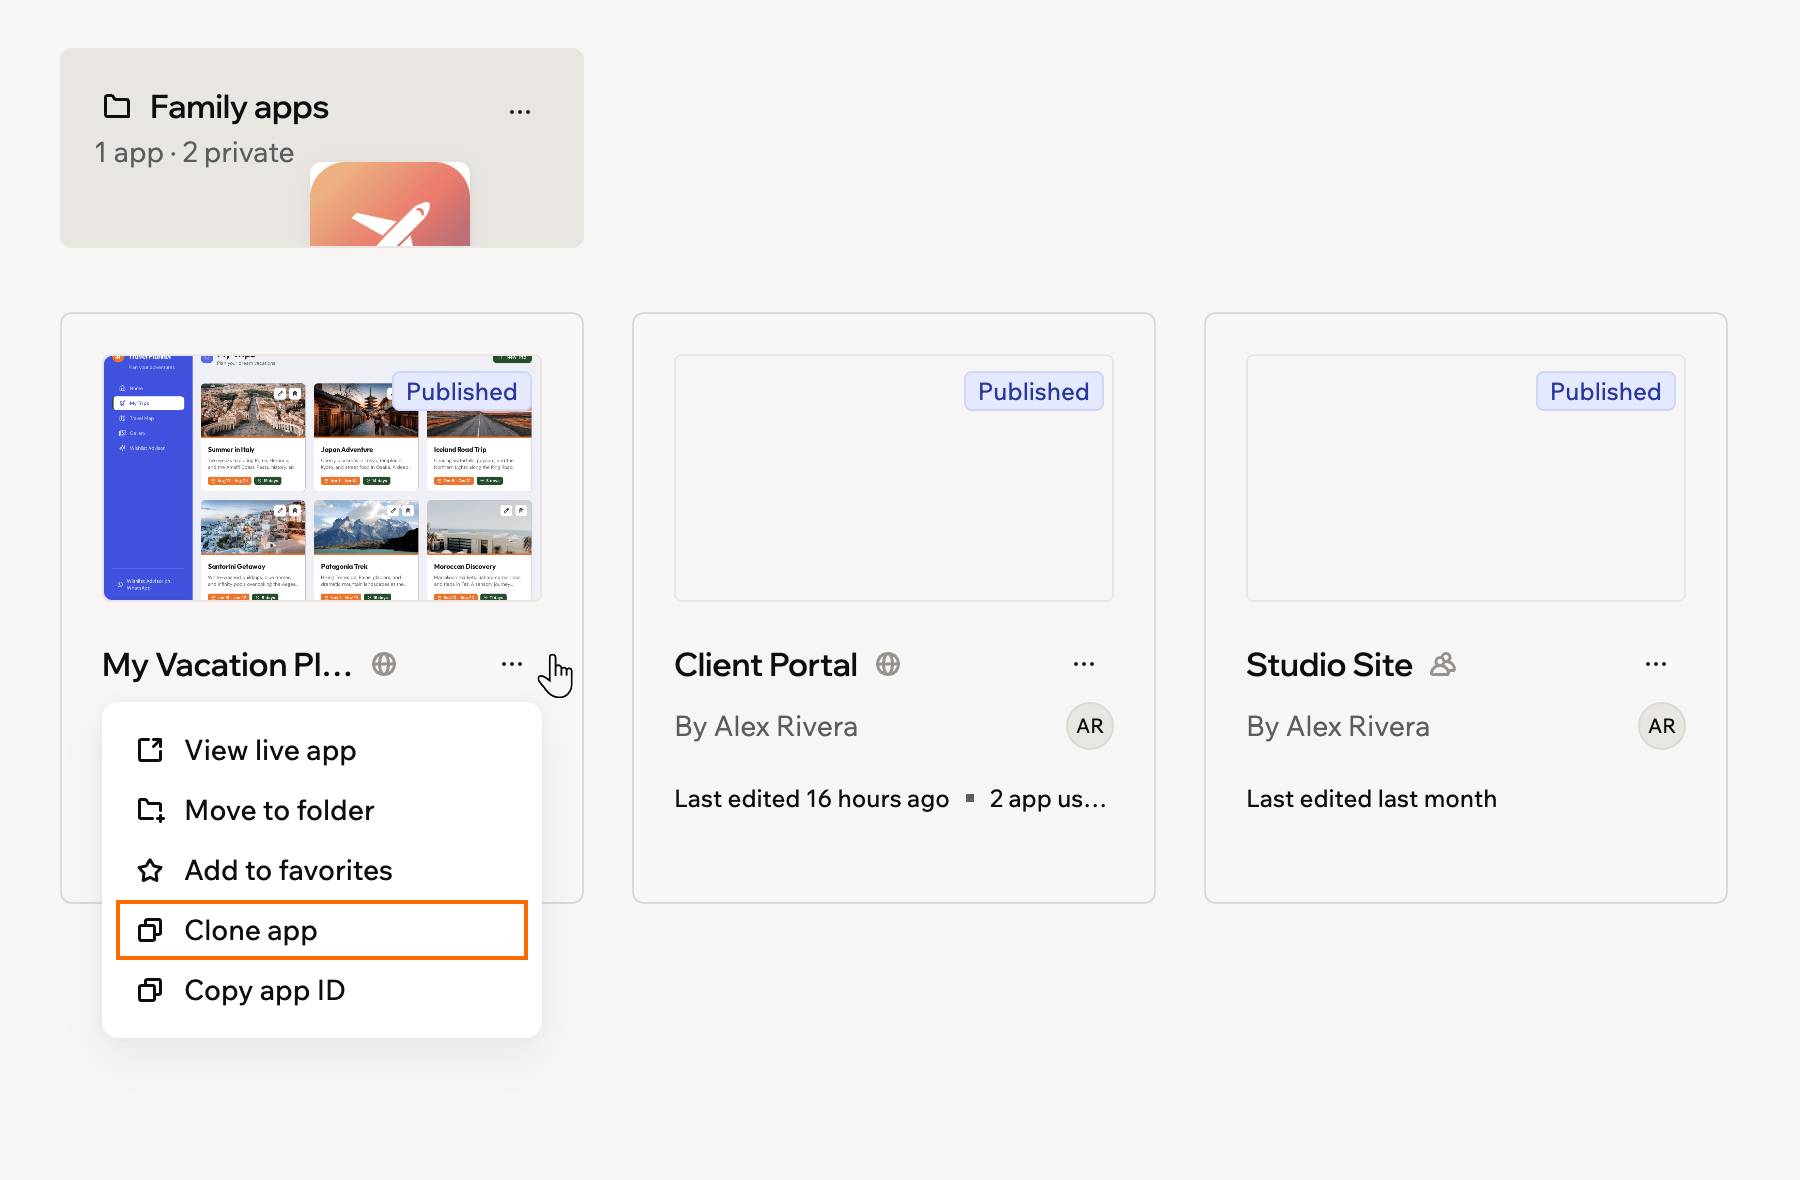
Cloning an app from your Apps page
- Go to Apps in your Base44 workspace.
- Click the More actions icon on the app card.
- Click Clone app.
Accessing app settings
Open your app’s settings to manage its logo, description, visibility, authentication, and more. To open your app’s settings:- Go to Apps in your Base44 workspace.
- Click the More actions icon on the app card.
- Click Go to App Settings.
Setting your app logo
Your app logo is the icon that represents your app across Base44, including on your Apps page and in your app’s dashboard. You can upload your own image and crop it, or generate a logo with AI. To upload and crop a logo:- Go to your app’s dashboard.
- Click Overview.
- Click your app logo to open the Edit App Logo window.
- On the Upload Logo tab, drag and drop an image or click Upload to choose one from your computer. You can use a PNG or JPG up to 5MB.
- In the crop view, drag the image to reposition it and use the slider to zoom in or out until the logo is framed the way you want.
- Click Apply, then click Save.
Moving an app between workspaces
Move an app when it belongs in a different workspace, such as your team’s workspace or a client’s. The app keeps its data, settings, and owner, and from then on it uses the new workspace’s plan and credits. To hand the app to another person instead, see Transferring app ownership. If you can’t find Move app or the move doesn’t go through, check the cases at the end of this section. To move an app:- Go to your app’s dashboard.
- Click Overview.
- Click the More actions icon next to View usage.
- Click Move app.
- Select a workspace from the Target Workspace drop-down.
- Click Move App.
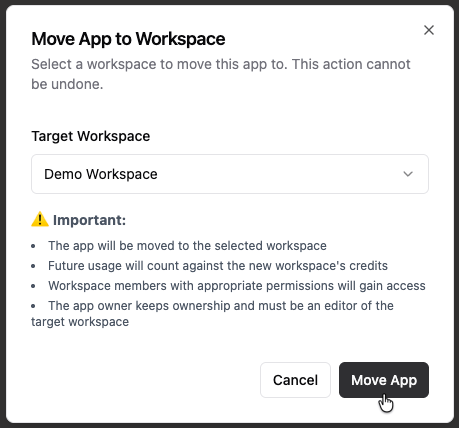
Moving an app to another workspace
- Your app’s Base44 address doesn’t change, and you don’t need to publish again.
- The app uses the new workspace’s credits, and members there with the right role can open it.
- Collaborators keep their access. Any who aren’t members of the new workspace join it as guests.
- A connected custom domain stays with the app as long as the new workspace’s plan includes custom domains.
- GitHub sync, custom connectors, and bank account connections disconnect, so you connect them again in the new workspace.
- A Google Ads account on the app closes and its campaigns pause. Moving the app back doesn’t restore them.
I can't see the option to move my app
I can't see the option to move my app
- You don’t belong to any other workspace. Create a workspace or join one first.
- You don’t own the app’s current workspace. On most plans, only the workspace owner can move apps out, so ask them to move it for you.
- App transfers are turned off for the workspace. Learn how to choose who can move apps.
- You’re a viewer or guest in the workspace.
My app can't move to that workspace
My app can't move to that workspace
- The app owner isn’t an editor or higher in that workspace. Invite them to the workspace as an editor, then try again.
- The workspace is on the Free plan and has no room for another app. Upgrade its plan or delete an app there.
- The app has an unpaid Google Ads balance. Use the link in the window to pay it, then try again.
I want to move an app to my other account
I want to move an app to my other account
- Sign in to your other account and invite your first account’s email to its workspace as an editor.
- Sign in to your first account and accept the invitation.
- Move the app to your other account’s workspace.
- Add your other account as a collaborator on the app and make it the app owner.
Transferring app ownership
Transfer ownership to hand an app to someone else, such as a teammate taking over or a client you built it for. The new owner takes over the app, and you can choose to stay on as a collaborator. How you transfer depends on who the new owner is.- Someone in your workspace: Make them the app owner from your collaborators list. This works on every plan, and the app stays in your workspace.
- Someone outside your workspace: Send a transfer from your app’s settings. This needs an Enterprise plan (Business or Enterprise) or approved Base44 Partner status, and the app moves to the new owner’s workspace when they accept.
Making a collaborator owner
Make one of your app’s collaborators the owner when they work in the same workspace as you. The app stays in your workspace and keeps using its plan and credits. The new owner gets an email and accepts the transfer from there. To make a collaborator the app owner:- Go to your app editor.
- Click the Add collaborator icon at the top.
- Click Invite collaborators.
- Click the More actions icon next to the collaborator.
- Click Make app owner.
- Choose what happens to each integration and secret the app uses.
- Turn Stay on as collaborator on to keep editor access, or off to lose access once they accept.
- Select the checkbox to confirm.
- Click Send transfer.
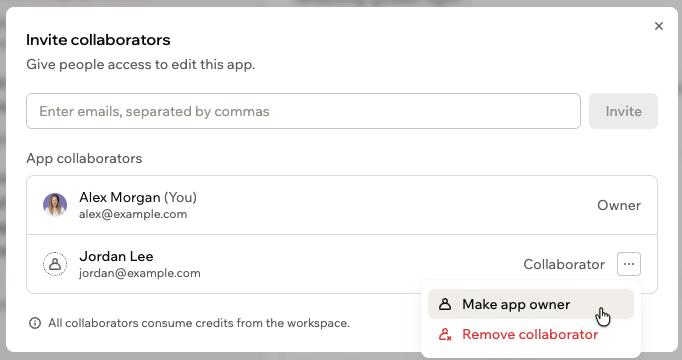
Transferring app ownership to another collaborator
Transferring from settings
Transfer ownership from your app’s settings to hand the app to anyone, inside or outside your workspace. A transfer to someone outside your workspace moves the app into a workspace they choose when they accept. To transfer ownership from settings:- Go to your app’s dashboard.
- Click Settings.
- Click Danger Zone to expand it.
- Click Transfer Ownership.
- Do one of the following:
Transfer to someone in your workspace
Transfer to someone in your workspace
- Click Someone in your workspace.
- Select the new owner and click Continue.
- Choose what happens to each integration and secret, and whether to stay on as a collaborator.
- Click Transfer now.
Transfer to someone outside your workspace
Transfer to someone outside your workspace
- Click Someone outside your workspace.
- Enter their email address in Recipient email and click Continue.
- Choose what happens to each integration and secret, and whether to stay on as a collaborator.
- Click Send transfer.
Accepting a transfer
When someone transfers an app to you, you get an email from Base44 with a link to accept it. The invitation expires after 7 days. To accept an app transfer:- Open the link in the transfer email.
- Sign in with the email address the transfer was sent to.
- If you’re asked to choose a Destination workspace, select a workspace where you’re an owner or admin.
- Click Accept Ownership.
- The app stays live on the same address, so there’s nothing to republish.
- If the app moved to the new owner’s workspace, it uses that workspace’s plan and credits. Otherwise it keeps using the same workspace’s credits.
- If the previous owner chose Stay on as collaborator, they keep editor access.
- A connected custom domain stays with the app as long as the new owner’s plan includes custom domains.
- Integrations the previous owner disconnected, and secrets marked as needing a new value, need to be set up again.
Solving transfer problems
If you’re having problems transferring an app, find your situation below.I can't make a collaborator the app owner
I can't make a collaborator the app owner
I can't find the option to transfer ownership
I can't find the option to transfer ownership
I want to hand an app to someone outside my workspace
I want to hand an app to someone outside my workspace
- Ask the new owner to invite you to their workspace as an editor, then accept the invitation.
- Move the app to their workspace.
- Add the new owner as a collaborator on the app and make them the app owner.
I need to resend or cancel a transfer
I need to resend or cancel a transfer
- Go to your app editor.
- Click the Add collaborator icon at the top.
- Click Invite collaborators.
- Click the More actions icon next to the new owner.
- Click Resend ownership request, Get ownership link, or Cancel ownership request.
I get an error when I accept a transfer
I get an error when I accept a transfer
Deleting an app
Remove an app from your workspace when you no longer need it. Deleted apps move to Recently deleted, where you can restore them for 30 days.Deleting your own app
You delete an app from its card on the Apps page. Only the app’s owner and your workspace owners and admins can delete it. To delete an app:- Go to Apps in your Base44 workspace.
- Click the More actions icon on the app card.
- Click Delete.
- Type the app address shown in the dialog to confirm. This is the app’s slug, not its display name.
- Click Delete.
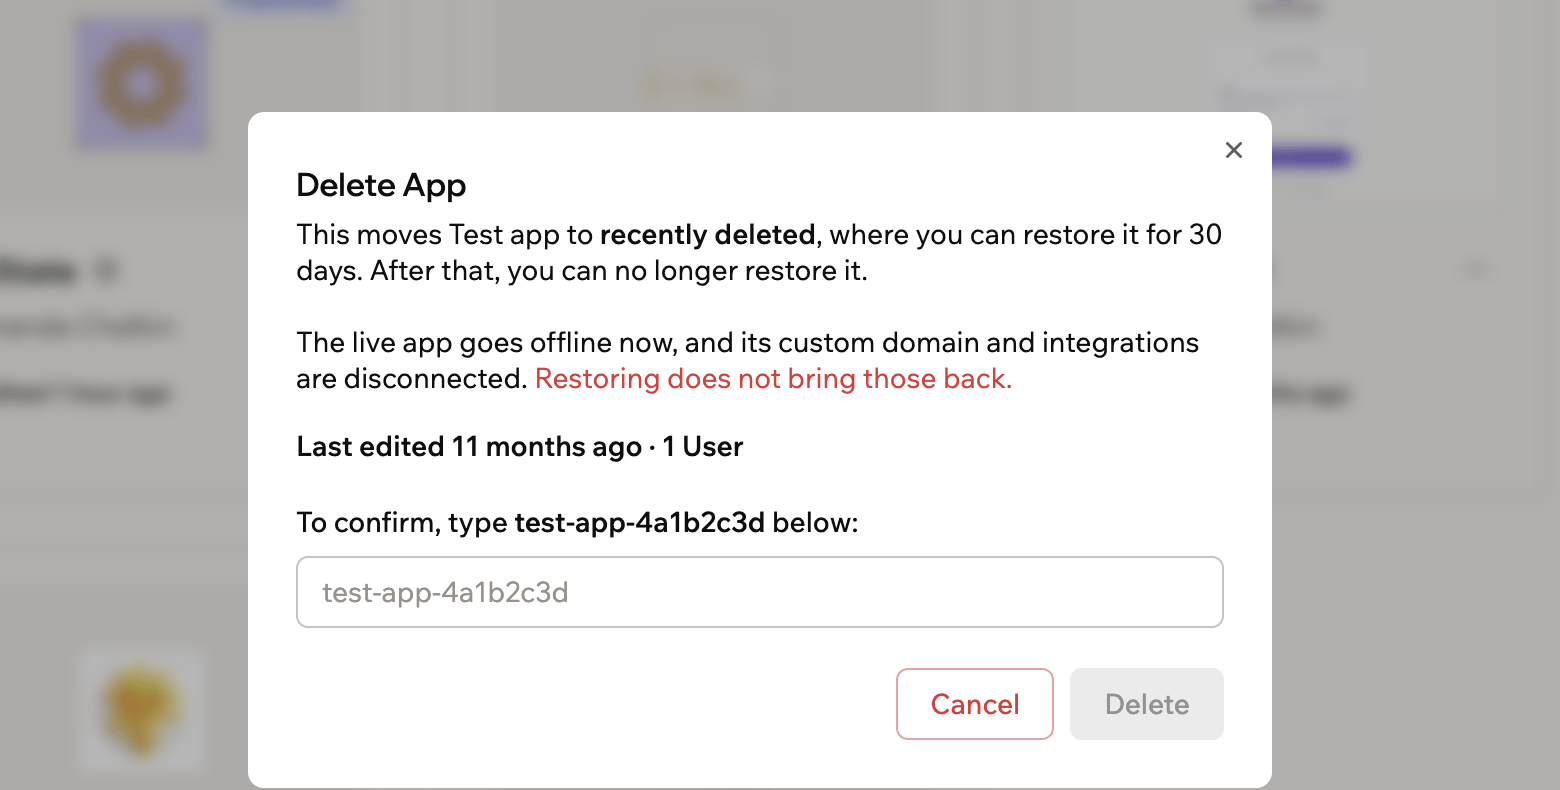
Confirming an app deletion
Deleting an app you don’t own
Workspace owners and admins can delete any app in their workspace, even if they are not the app’s creator. When you delete an app you don’t own, the delete dialog shows a warning with the app owner’s email address. The app owner automatically receives an in-app notification and email letting them know their app was deleted and by whom.Restoring a deleted app
Recently deleted holds every app you deleted in the last 30 days, so you can bring one back yourself. Each app there shows who deleted it, when they deleted it, and how many days you have left to restore it.Bringing an app back
Anyone who can delete an app can also restore it, so the app’s owner and your workspace owners and admins can all bring it back. You need to still be an active member of the workspace the app belongs to, even if you own the app. Workspace owners and admins see every app deleted from their workspace, including apps deleted by members who have since left. If your workspace is at its app limit, the restore fails until you make room, so delete another app or upgrade your plan first. To restore a deleted app:- Go to Apps in your Base44 workspace.
- Click the Recently deleted icon .
- Find the app you want and click Restore.
- Click Restore again to confirm.
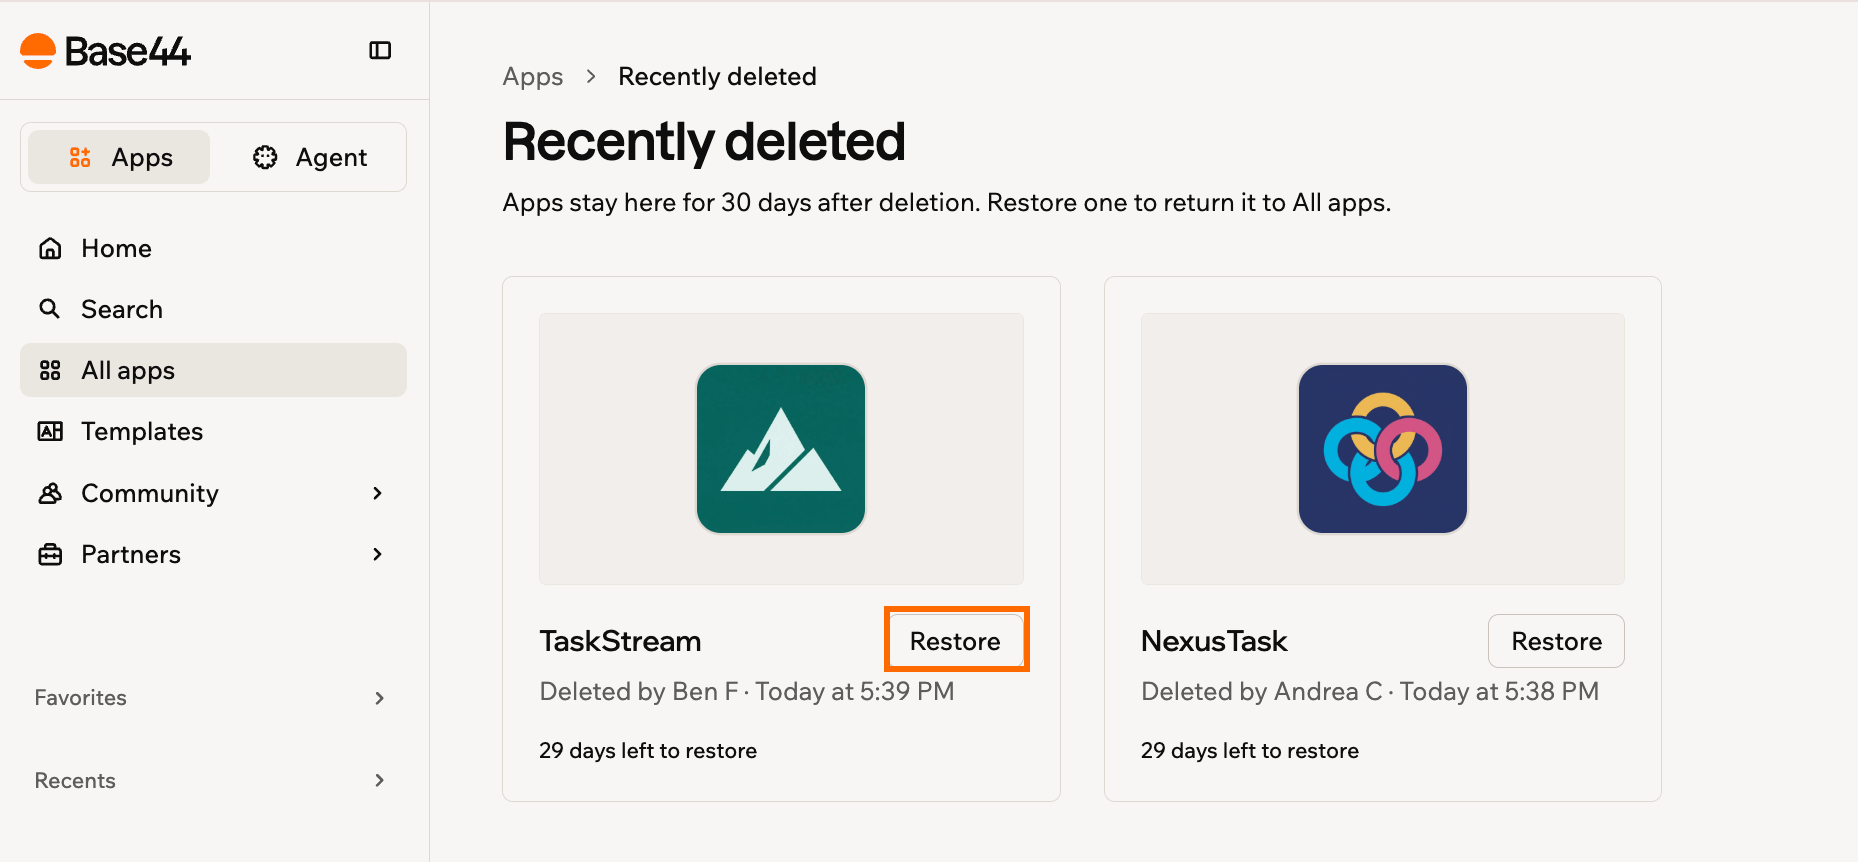
Restoring an app from Recently deleted
What you get back
Restoring brings back your app’s data, pages, source files, chat history, and checkpoints, and rebuilds its backend functions. Some parts are released when you delete the app, so you set these up again after you restore:- Custom domains
- Integration and connector connections
- Automations and page redirects
- Workflows, archived until you turn them back on
- Google Ads campaigns, paused until you resume them
- Published templates, which you publish again to relist them
- Folder membership
- Files an in-app agent uploaded, which you upload again
- Follow-up checklist: Base44 flags which of the released items need your attention.
- Ownership: If the app’s owner has left the workspace since the delete, the app transfers to the workspace owner.
- Launchpad: To relist your app, contact Customer Care.
- App address: If another app took your app’s address while it was in Recently deleted, your app comes back on a new address, which you can change in app settings.