Setting up your app’s security settings
Protecting your app’s data helps keep information private and makes sure only the right people can access it. Base44 gives you flexible security settings so you can decide who can view, edit, or delete anything in your app. With the right setup, you avoid data leaks, mistakes, and people seeing things they shouldn’t.Step 1 | Set your app’s visibility
Start by choosing who can access your app as a whole. This is called app visibility. Decide if your app is only for you, for your team, or open to the public.
Choosing who can access your app in Base44
- Click Dashboard in your app editor.
-
In Overview, select an option from the App Visibility drop-down:
- Private: Only invited users can access the app.
- Workspace: Anyone in your workspace can access your app.
- Public: Anyone with the link can access your app.
If you set your app to Private, you need to invite users so they can log in and use your app. Click Send Invites to send invitations or share your app’s link. If a user tries to access a private app without being invited, they will get an error message. - (Optional) Select the Require login to access checkbox to force people to sign in before using your app.
Step 2 | Review your data access
After setting your app’s visibility, check each data entity to see who can access its information. This helps you spot anything that should not be public, such as sensitive tables or collections. When you first create a data entity, it may be set to public by default. Always review each entity’s access settings and update them if you need to keep private data protected or control who can see and change information.- Click Dashboard in your app editor.
- Click Security.
- Under Data Entities review the access to the entities in your app:
- Public: All users can access every record in the entity.
- Restricted: Only users matching the access rules can access records.
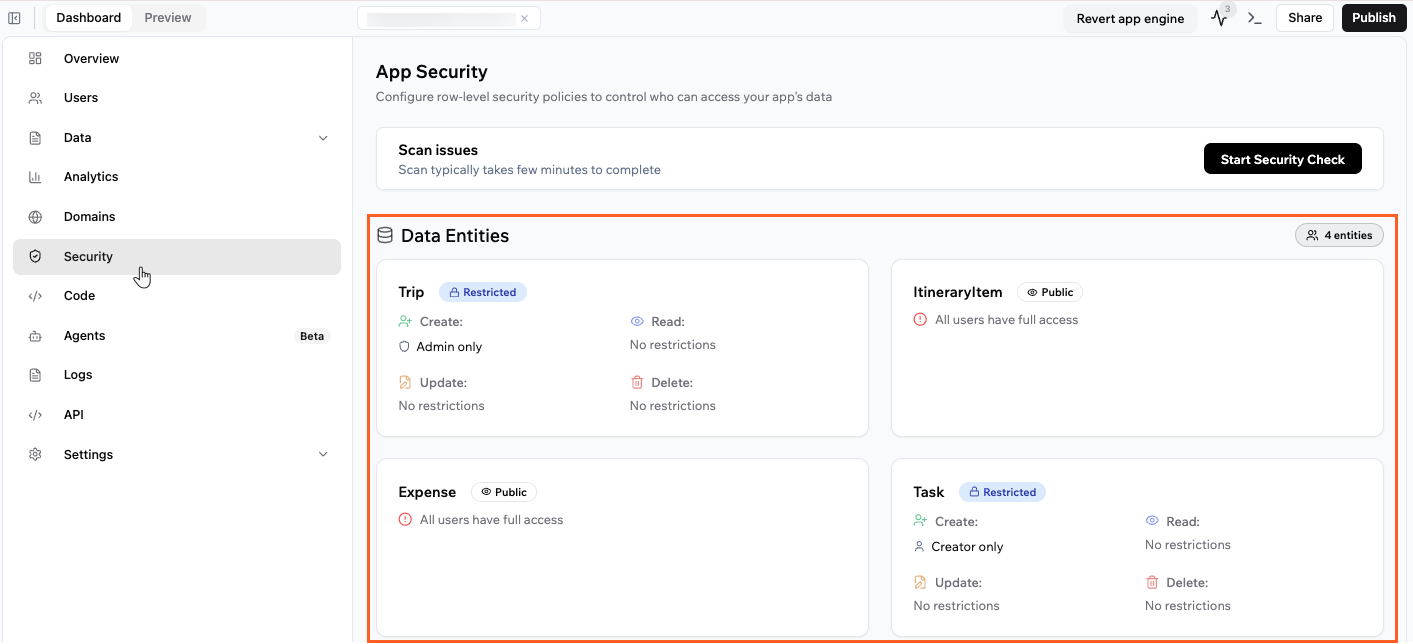
Security settings on your data entities in your app
Step 3 | Create access rules for your data
If you want to control who can view, add, edit, or delete records in your data entities, you can set up access rules. Access rules let you decide exactly who can access or change specific data in your app. By setting security for each entity, you help protect sensitive information and make sure only the right people have the right access.Example
- Store contact info (Read): You want everyone to see your store’s address, phone number, and email. Select the Read tab and use the No restrictions setting so anyone can view your contact info, even if they are not logged in.
- Store orders (Read): You want customers to see only their own orders. Select the Read tab and use the Entity-user field comparison setting to match the order’s customer ID with the logged-in user’s ID.
- Products (Create/Update): You want only managers to add or update products. Select the Create or Update tab and select the User property check setting to allow create and update access for users with a manager role.

Setting up access rules for your data entities
- Click Dashboard in your app editor.
- Click Security.
- Click the entity you want to secure (for example, Store orders, Products, or Store contact info).
- Click Create Access Rules.
- Select the action tab for the type of access you want to control:
- Create: Control who can add new records
- Read: Control who can view records
- Update: Control who can edit records
- Delete: Control who can delete records
- Choose a rule type and fill in the required details:
- No restrictions: Anyone can access records for this action.
- Creator only: Only users who created a record can access it.
- Entity-user field comparison: Match a value in the record with a property of the logged-in user.
- User property check: Allow access for users with a specific property, such as a staff or manager role.
- Click Save Security Rules.
- You can create multiple rules by clicking Add Rule on a tab. You can set up as many rules as you need for Create, Read, Update, or Delete. If a user matches any of your rules, access is allowed (it uses “OR” logic).
- Test your rules by logging in as different roles (such as customer and manager) to make sure each role sees or edits only what they should. You can also ask the AI chat to help you test it.
- After setting up your rules, you’ll see a Generated Create Access Rules (JSON) box. This shows your rules in read-only JSON format for transparency. You do not need to edit this field.
- To remove all rules and make the entity public again, click Remove All Rules at the top of the entity’s access rules.
Using the security check
The security check tool helps you spot hidden security risks in your app before they become a problem. If you’re not sure which entities need security rules or want to double-check your setup, you can run the built-in security check at any time. The security check automatically reviews your app for missing access rules, unsafe backend function exposure, and secrets left in frontend code. Running the security check helps prevent accidentally exposing private data, catches misconfigurations (such as broken webhooks), and lets you ship your app with confidence. The recommendations are not applied automatically. The checker highlights issues and suggests fixes, but you choose when to apply them. For every issue, you’ll get clear instructions and can apply safe default settings with a single click if you want.
Accessing the Base44 security check
Running the security check
- Click Dashboard in your app editor.
- Click Security.
- Click Start Security Check
- Click Apply Fixes to instantly apply recommended rules, or review and adjust them manually.
Fixing security issues
If the security check finds issues, you will see them with recommendations.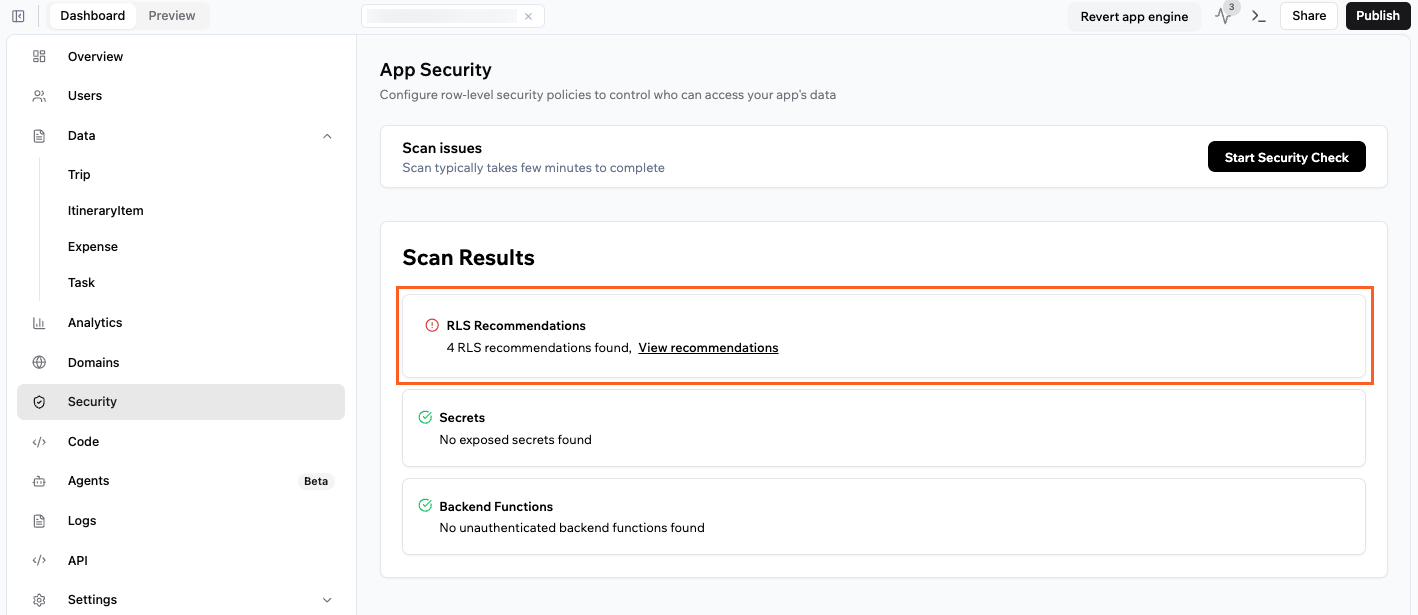
Security issues found in the security checker
Public data access (RLS issues)
Public data access (RLS issues)
⚠️ RLS Recommendation – Apply Fixes
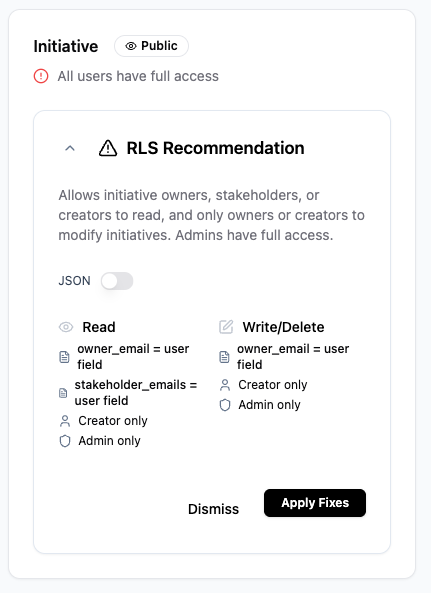
- Only the record creator can view or edit it
- Access is limited to specific users based on their email, role, or department
- Only admins can make changes
Exposed secrets
Exposed secrets
- API keys
- Tokens
- Sensitive credentials
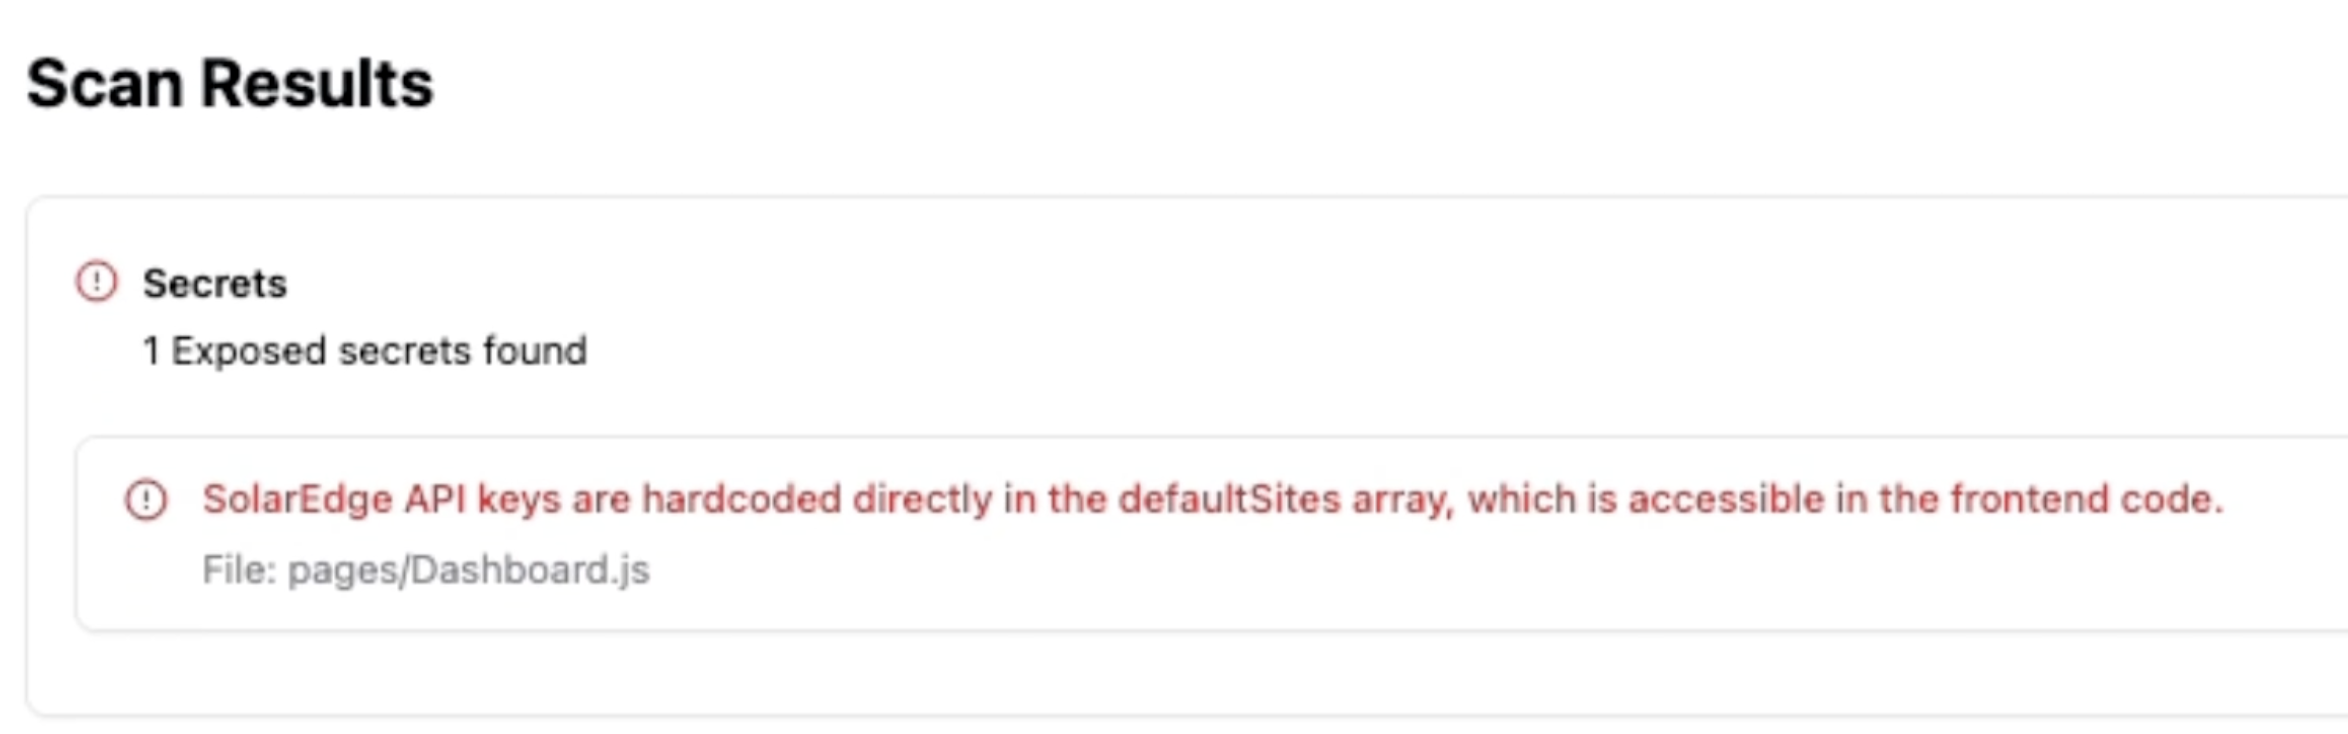
- You need to remove the key from your frontend code (which is written manually),
- And move the logic to a secure place, usually a backend function that you’ll either create or update.
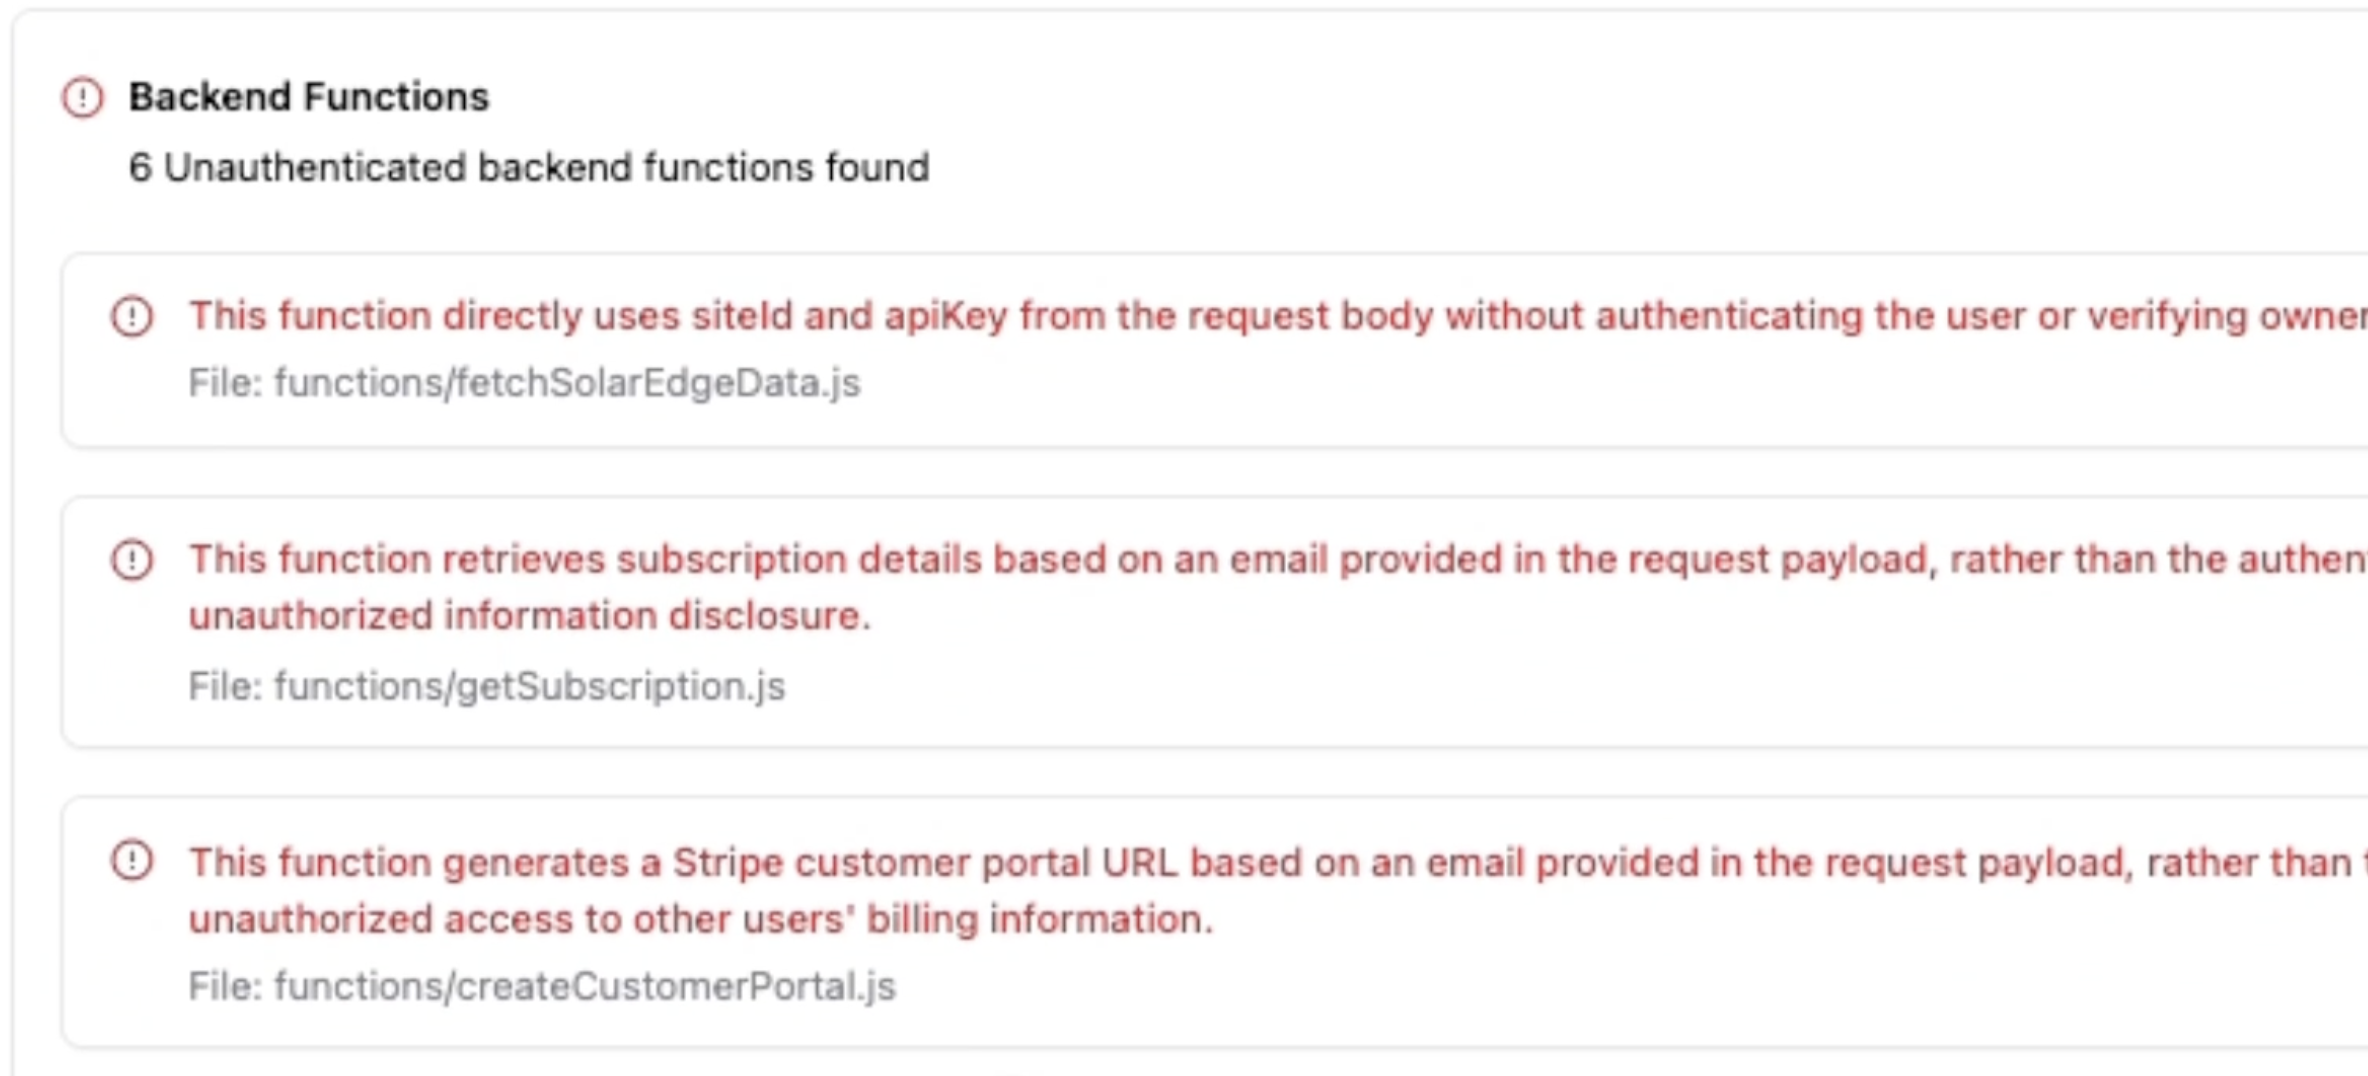
Backend function issues
Backend function issues
- Open to anyone (when they shouldn’t be), or
- Set up in a way that doesn’t actually work
Security check flags backend functions that accept sensitive data (like emails, API keys, or IDs) without checking who the user is.
- The user is signed in
- The request is for their own data
App examples and their settings
Check out these common scenarios to help you design the right app security and row-level security rules in Base44. If you’re unsure about your access settings, set the entity to “Creator only” or restrict access to your specific role. Then open your app in a private or incognito window to confirm what’s visible.Personal or family app (e.g. shared calendar, home tasks)
Personal or family app (e.g. shared calendar, home tasks)
Public site with contact form (e.g. business or event landing page)
Public site with contact form (e.g. business or event landing page)
- App examples: Company homepage, event promo site, product marketing page.
- App users: Anyone with the link (public).
- Security settings:
- App visibility: Public. No invite required.
- Require login: No, unless you want to add protected pages.
- Data entity access: For contact form submissions, set Read to “Admin/Staff only” or restrict by role so only team members can view or manage incoming messages.
Internal company dashboard (e.g. HR or team project tracker)
Internal company dashboard (e.g. HR or team project tracker)
- App examples: HR dashboard, sales tracking, project management, employee portal.
- App users: Only people in your workspace or specific teams.
- Security settings:
- App visibility: Workspace. Only those in your workspace can access.
- Require login: Yes. Everyone must log in with their workspace account.
- Data entity access: Use role-based rules. For sensitive resources, set Read/Update/Delete to managers or specific roles, and broader access for general info like announcements.
User portal (e.g. to-do list, accounts)
User portal (e.g. to-do list, accounts)
- App examples: Personal to-do lists, expense trackers, workout logs, user dashboards, activity journals. Everyone sees only their own records.
- App users: Registered users or anyone managing their own info.
- Security settings:
- App visibility: Public or Workspace, depending on if you want to allow general registration or only workspace members.
- Require login: Yes. Users must log in to view or edit their dashboard.
- Data entity access: Always set “Creator Only” for user-specific records. Each person can access, edit, and manage only their own data; no one else can view their private entries.
Admin-only pages (e.g. staff info, finance)
Admin-only pages (e.g. staff info, finance)
- App examples: Admin portal, back office management, sensitive setup pages.
- App users: Admins or staff only.
- Security settings:
- App visibility: Private (invite-only) or Workspace (for staff).
- Require login: Yes.
- Data entity access: Set Read, Write, and Delete to Admin or Manager role only. No access for regular users.
Blog or public site with private editing
Blog or public site with private editing
- App examples: Blog, resource library, documentation site, FAQ hub. Anyone can view, only admins or editors manage content.
- App users: The public can view content. Only admins or editors can add, update, or delete it.
- Security settings:
- App visibility: Public. Anyone with the link can see public pages.
- Require login: Required for management features only. Set up a protected admin or editor section where only logged-in users with the right role (admin/editor) can access and make changes. This keeps editing controls hidden from the public.
- Data entity access:
- Read: Set to Public or all users so everyone can view content.
- Create/Update/Delete: Set to Admin or Editor only, so only trusted users can add, edit, or remove content.
App for multiple groups (e.g. schools, companies)
App for multiple groups (e.g. schools, companies)
- App examples: SaaS platforms supporting different companies, schools, or customer groups; internal tools with department-based permissions.
- App users: Users grouped by company, school, or department.
- Security settings:
- App visibility: Workspace or Private. Choose based on tenant model.
- Require login: Yes. Each user logs in; data is segmented by group, department, or tenant.
- Data entity access: Use advanced row-level security. Set rules so each tenant, company, or department only sees and edits their own data. Admins or managers in each group can access all records in their group.
FAQs
Click a question below to learn more about security.Why isn’t row-level security (RLS) restricting data access correctly?
Why isn’t row-level security (RLS) restricting data access correctly?
- Run the security check to scan for missing or misconfigured RLS rules.
- Review the issues found and click Apply Fixes to use the recommended safe defaults, or adjust rules for each data entity manually.
- Sign in with different user roles to confirm only authorized people can access each type of data.
If I change the security settings, does it affect users already using my app?
If I change the security settings, does it affect users already using my app?
What if I don’t understand a warning?
What if I don’t understand a warning?
How can I make sure my app’s security is set up correctly?
How can I make sure my app’s security is set up correctly?
- Set all your app and data security rules in Base44.
- Use a third-party scanning tool like SaveVibes to test what data is exposed.
- Test the app yourself by trying to access different areas with your account.
- Log in as a different user and check if you can view or change other users’ data.
- Ask the AI to create or run test scenarios to confirm you get errors if you try to access restricted actions or data.
How do backend functions help enforce complex security, and how can I secure them?
How do backend functions help enforce complex security, and how can I secure them?
Are my data tables encrypted and can admins see my data?
Are my data tables encrypted and can admins see my data?
Can I create more roles than just user and admin?
Can I create more roles than just user and admin?
How do I secure connections to third-party APIs?
How do I secure connections to third-party APIs?
- Handle all API requests in backend functions.
- Store all API keys and credentials using secrets management.
- Backend functions guarantee requests come from a secure, server environment, and never from public-facing client code.
What is secrets management and why is it important?
What is secrets management and why is it important?
Can I restrict access to specific fields in a record (Field Level Security)?
Can I restrict access to specific fields in a record (Field Level Security)?
Can I access the source code or cryptographic hash algorithms used in Base44?
Can I access the source code or cryptographic hash algorithms used in Base44?