


Connecting your app to external tools
You need a Builder plan or higher to use connectors.
About connectors
Connect the tools your team already works in, then build app flows on top of them.Send reports and alerts
Email reports, alerts, or summaries through Gmail or Outlook.
Generate documents and files
Create documents, spreadsheets, presentations, or files using Google Workspace tools.
Manage events and availability
Create and manage events or availability using Google Calendar or Outlook.
Notify your team
Send notifications or updates to teams through Slack.
Track code and issues
Track code activity, issues, and pull requests with GitHub API.
Query data and build dashboards
Query external data and build dashboards with Snowflake or Databricks.
Connector types
Every connector has a type, which decides whose account the connection uses. You choose the type when you add the connector.Shared connector
You connect one account once, and everyone who uses your app shares that connection and its data.Best for a team account or a data platform, like Slack alerts to your team’s channel or a Snowflake dashboard.
App user connector
Each person connects their own account, so your app can work with the data that account can access.Best for per-person actions, like a CRM where each sales rep sends email from their own Gmail.
Only workspace owners and admins can set up an app user connector. If you’re not one, the option is turned off when you add a connector, so ask an owner or admin to set it up.
Adding a connector
You add a connector from the Connectors page in your workspace, from an app, or by asking the AI chat.From the Connectors page
Add a shared connector so everyone using your app can use the same connected account. To add an app user connector instead, select App user connector in step 4, then follow Using your own OAuth client. Google Calendar can also use Let Base44 manage OAuth on the Pro plan or higher, so you don’t need your own client. See Connecting a Google service. To add a shared connector:- Click Connectors in your workspace sidebar.
- Click Add connector.
- Search for the connector and click it.
- If the connector offers both types, select Shared connector, then click Next.
- Enter a Connection name.
- Choose where the connection can be used in Who can access. The default is Apps and Super agent.
- (Optional) Select Read-only or Read & write under Permissions. This appears only for connectors that offer the choice.
- Click Add connector, then authorize the account you want to share in the provider’s window.
From your app
Add a shared connector without leaving the app you’re working on. To add a shared connector from an app:- Go to your app dashboard.
- Click Integrations.
- Click Add connector.
- Search for the connector and click it.
- If the connector offers both types, select Shared connector, then click Next.
- (Optional) Select Read-only or Read & write under Permissions. This appears only for connectors that offer the choice.
- Click Add connector, then authorize the account in the provider’s window.
From the AI chat
Tell the AI chat what you want to connect and how you want to use it, and it suggests connectors based on your app’s structure, pages, and data. When a flow needs access, the chat shows a card asking you to approve the connection before it carries on building. To browse the full list with categories and example prompts, see the connectors catalog.How connectors work in your app
Once you connect a tool, you can reuse it across pages, flows, and backend functions. Ask the AI chat to build pages, tables, dashboards, or automations that read from or write to the connector. When you include a connector in a flow, Base44 creates a backend function. To review its code, go to your app’s dashboard, click Code, and open the function underbase44 > functions. You can edit it yourself or prompt the AI chat to update it. For example:
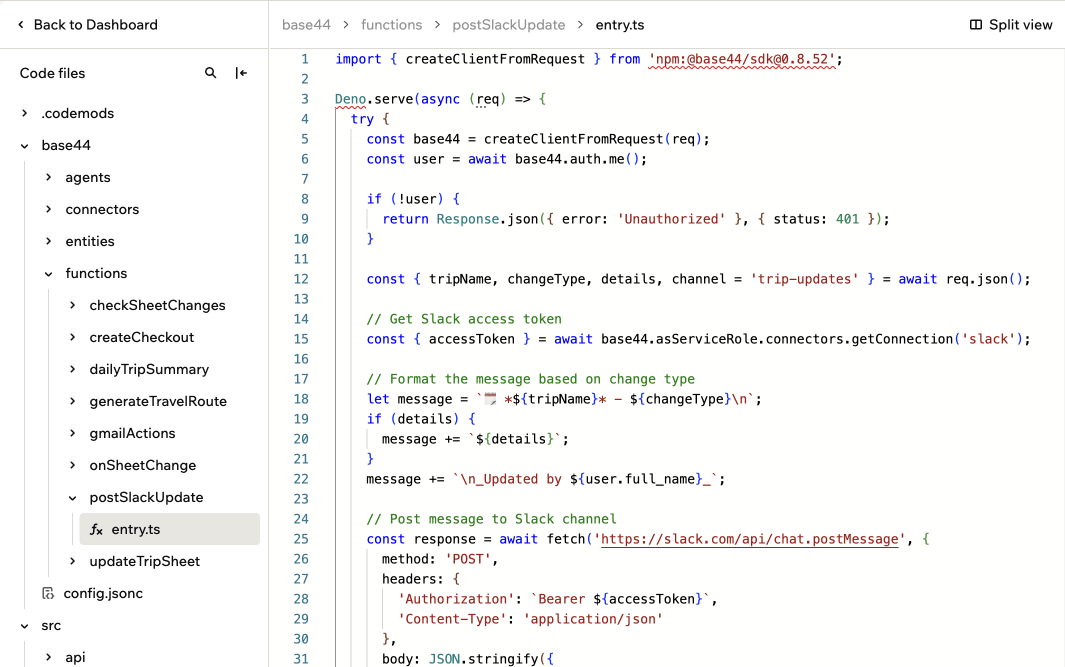
Slack connector in backend functions
Using your own OAuth client
Some connectors run on your own OAuth client instead of Base44’s. You register the client with the provider, then add its credentials in your workspace, and the connector uses them from then on. The scopes you request from Google determine how much verification your app needs before it goes live. To choose the narrowest scopes and plan for verification, see Google Workspace connectors.Before you begin: You need to be a workspace owner or admin. Register an OAuth application with the provider and get its credentials. Add the callback URL to the provider’s allowed redirect URIs.
- Click Connectors in your workspace sidebar.
- Click Add connector.
- Search for the connector and click it.
- If the connector offers both types, select App user connector, then click Next. Some connectors, such as Snowflake and Databricks, open this form directly.
- Enter a Connector name to identify this configuration.
- Enter your Client ID and, if required, Client Secret. Complete any other fields shown for your connector.
- Review the required scopes under Scopes and select any optional scopes your app needs. For scopes not listed, enter one per line in Additional scopes.
- Click Add Connector.
Registering callback URLs
When you set up a connector with your own OAuth client, you register a callback URL with your OAuth provider so it knows where to send people back after they authorize.Using the single callback URL
Every connector you add uses one callback URL for all of your apps, so you register it with your OAuth provider once and it keeps working as you build more apps and connect custom domains. Add this URL to your OAuth provider’s allowed redirect URIs:Viewing your callback URLs
A connection still on per-app URLs lists them per app, split into Builder and Live app. Use the single callback URL when you register your OAuth application. To view per-app callback URLs:- Click Connectors in your workspace sidebar.
- Next to the connector, click View.
- Next to the connection, click View connection.
- Click View redirect URIs.
- In OAuth Redirect URIs, expand Per-app URLs (for legacy connectors) if it’s shown.
- Select an app under App, then find the URLs under Builder and Live app.
Switching an older connection
Connections you added before August 17, 2026 register a separate URL for each app host, and they show a Per-app URLs badge next to their name. Each connection is switched over on its own, so one connector can have some connections on the single callback URL and others still on per-app URLs. Switching is worth doing if you’re adding apps or custom domains and keep registering a new URL for each one. If your setup is stable and working, there’s no need to switch. Existing connections keep working on their per-app URLs for as long as you leave them there. To switch a connection to the single callback URL:- Click Connectors in your workspace sidebar.
- Next to the connector, click View.
- Next to the connection, click View connection.
- If Callback URLs shows Uses per-app callback URLs, click Switch to a single URL.
- Add the URL shown to your OAuth provider’s allowed redirect URIs. Select I’ve added the URL to my OAuth provider, then click Switch.
To move a connection back later, open it again and click Switch back to per-app URLs. Check that your provider still has the per-app URLs registered first, because a connection created on the single callback URL may never have had them.
Managing your connectors
Keep each app’s connections working: reconnect one that expired, or remove one you no longer need. For an app user connector, each person reconnects their own account from inside your app. To manage a connection:- Go to your app dashboard.
- Click Integrations.
- Find the connection under App connections.
- Click the Integration actions icon and select an option:
- Reconnect to restore a connection that expired or was revoked.
- Remove to delete the connection from this app.
Managing workspace OAuth configurations
Workspace OAuth configurations are separate from the accounts connected inside an app. You can edit their credentials and scopes, add another connection, or delete a configuration. To manage a workspace OAuth configuration:- Click Connectors in your workspace sidebar.
- Next to the connector, click View.
- Choose what to do:
- To edit a configuration, next to the connection click View connection. Update the name, credentials, or scopes, then click Save Changes. Leave Client Secret empty to keep the existing secret.
- To add another connection to the same connector, such as the other connector type, click Add another connector.
- To delete a configuration, next to the connection click View connection, then click Delete Connector and confirm.
Controlling workspace availability
On a Business or Enterprise plan, workspace owners and admins can choose which connectors people in the workspace can use. See Managing connector availability for your workspace.FAQs
Why do I need to reconnect a connector?
Why do I need to reconnect a connector?
You may need to reconnect if the account was disconnected, its access was revoked, or the connected service requires you to sign in again. For the steps, see Managing your connectors above.
Why does connecting fail with a redirect URI error?
Why does connecting fail with a redirect URI error?
When you use your own OAuth client, the callback URL registered with the service has to match the one Base44 sends, exactly. Check that
https://connectors.base44.com/api/oauth/callback is registered in your OAuth app. If the connection is still on per-app URLs, every URL it lists has to be registered instead. To find them, see Viewing your callback URLs above.Why can't some people connect their own account?
Why can't some people connect their own account?
An app user connector only works for the people your own OAuth app admits. Most providers hold a new OAuth app to a test or internal audience until you publish or distribute it, so check the audience setting on your OAuth app with the provider.