
What can I use automations for?
You can use automations for any backend work you want to happen automatically. Common examples include:
- Sending emails or messages, such as daily welcome emails or weekly newsletters.
- Generating reports or summaries, for example a daily revenue report.
- Checking conditions and alerting only when something changes, such as low inventory.
- Reacting to changes in your data, such as sending admins a message when a new product is added.
- Scheduling posts on social media.
- Running recurring maintenance or housekeeping tasks, like archiving old records or refreshing caches.
- Backing up your app’s data (e.g. to Google Drive) every week.
- Sending notifications to external tools when something happens, for example posting salon booking updates into a Slack channel when calendar events change.
How automations work
When you create an automation, you choose how it starts. It can run on a schedule you define, in response to a data event such as a record being created, updated, or deleted, when an app user starts a conversation with an in-app agent, or when a connected integration sends an event using a connector. Each automation runs a backend function in your app and records the run so you can see what happened. Every automation has logs so you can always see when it ran, whether it succeeded, and any errors that occurred. This keeps everything transparent and easy to debug.Types of automations
There are 4 types of automations you can create. When describing what you want to the AI chat, it helps to know which type fits your use case.Scheduled automations
Scheduled automations run at a time or interval you define. Use these for recurring tasks like daily digests, weekly reports, or regular maintenance jobs. Example prompts:Send me a daily summary of all new orders to my email every morning at 8:00.Archive trip records that have been completed for more than 30 days, every Sunday at midnight.
Data event automations
Data event automations run in response to changes in your app’s data, such as a record being created, updated, or deleted. Use these to react to activity in real time. Example prompts:Send a push notification whenever I add a new WishlistPlace and write any needed backend function for me.Send the admin an email whenever a new booking is created.
In-app agent automations
In-app agent automations run when an app user starts a new conversation with an in-app agent. Use these to stay on top of who is reaching out, for example to get notified when a customer starts a chat, automatically add them to your contacts, or send yourself a summary at the end of the day. Example prompts:Email me whenever someone starts a new conversation with my agent.Add the person to my Contacts list when they start a chat with my agent.
Connector automations
Connector automations run when a connected integration sends an event, such as a new email arriving in Gmail or a calendar event being updated in Google Calendar. Use these to keep your app in sync with external tools. Example prompts:When a new email arrives in Gmail with the subject "Book appointment", parse it and add a new booking to my app.When a Google Calendar event is cancelled, update the booking in my app and post a message in the #salon-general Slack channel.
Connector automations are currently available for Gmail, Google Calendar, Google Drive, Microsoft Outlook and Microsoft OneDrive.
Creating an automation
When you click New Automation, Base44 shows suggestions based on your app’s context. You can pick one of those or click Create from scratch to choose your automation type and describe what you want in the AI chat.Using a suggestion
Each suggestion includes a short description of what it does. Clicking one sends a pre-filled prompt to the AI chat, where you can review and adjust it before the AI sets it up. To create an automation from a suggestion:- Click Dashboard in your app editor.
- Click Automations.
- Click New Automation.
- Browse the suggestions under Suggested for you.
- Click a suggestion to send it to the AI chat as a pre-filled prompt.
- Review the prompt, make any changes, and send it.
- The AI sets up the automation and adds it to your Automations list.
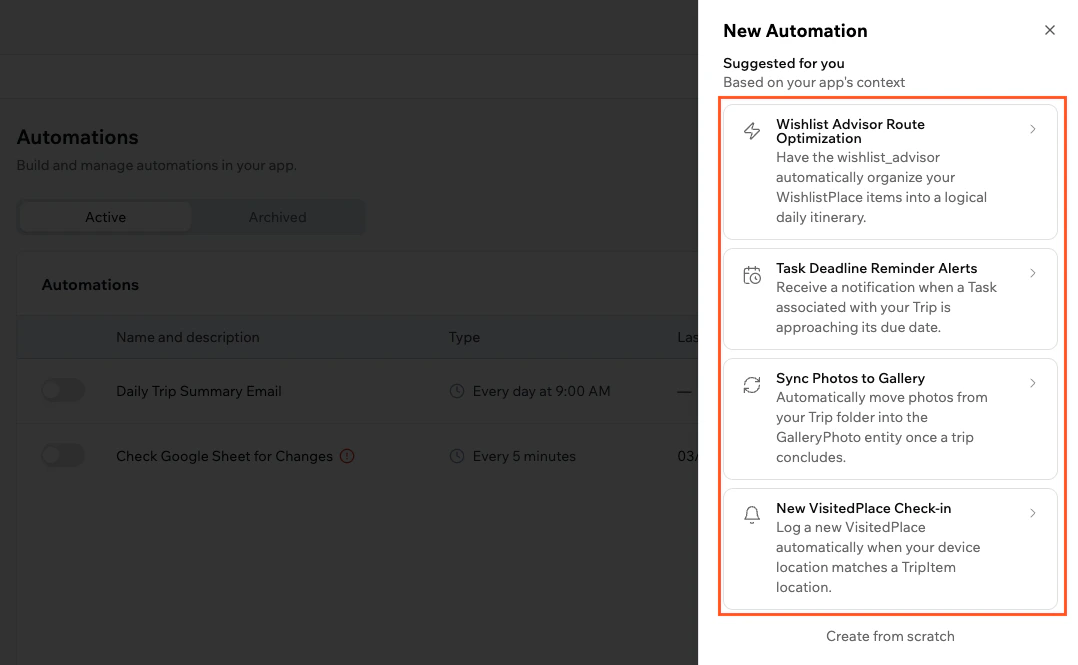
Choosing a suggested automation in Base44
Creating from scratch
If none of the suggestions fit what you need, create your automation from scratch. You choose the trigger type first, then describe what you want in the AI chat. To create an automation from scratch:- Click Dashboard in your app editor.
- Click Automations.
- Click New Automation.
- Click Create from scratch.
- Select the trigger type: Scheduled, Data event, In-app agent, or Connector.
- In the AI chat, describe the automation you want. For example:
Set up recurring email reminders to my email name@email.com for my tasks on my to-do list every Sunday at 17:00. - The AI creates the automation and adds it to your Automations list.
Managing automations
After you start using automations, you can control when they run, change their settings, trigger them on demand, or clean up automations you no longer need. You can pause automations without deleting them, and you can duplicate an existing automation when you want a similar setup with small changes.When you turn an automation off, Base44 stops scheduling future runs, but existing logs stay available. You can turn the automation back on at any time.
Turning an automation on or off
Pause an automation at any time if you want to stop it running, and turn it on again when you need it. To turn an automation on or off:- Click Dashboard in your app editor.
- Click Automations.
- Click the toggle on the left of the automation name to turn it on or off.
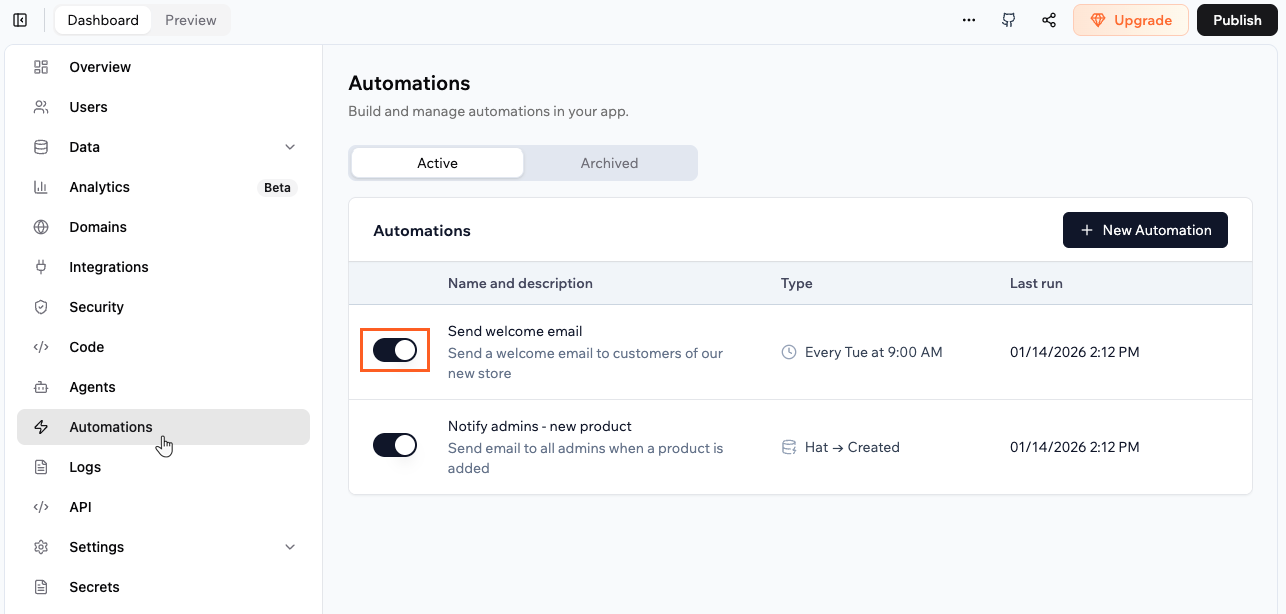
Turning an automation on and off
Automatic pause for failing automations: If a scheduled automation fails repeatedly, Base44 pauses it automatically and notifies you so you can investigate and fix the issue before re-enabling it.
Editing an automation
Make changes to an automation at any time. The changes affect future runs only. To edit an automation:- Click Dashboard in your app editor.
- Click Automations.
- Click the More Actions icon on the automation.
- Click Edit automation.
- Update the automation details.
- Click Save.
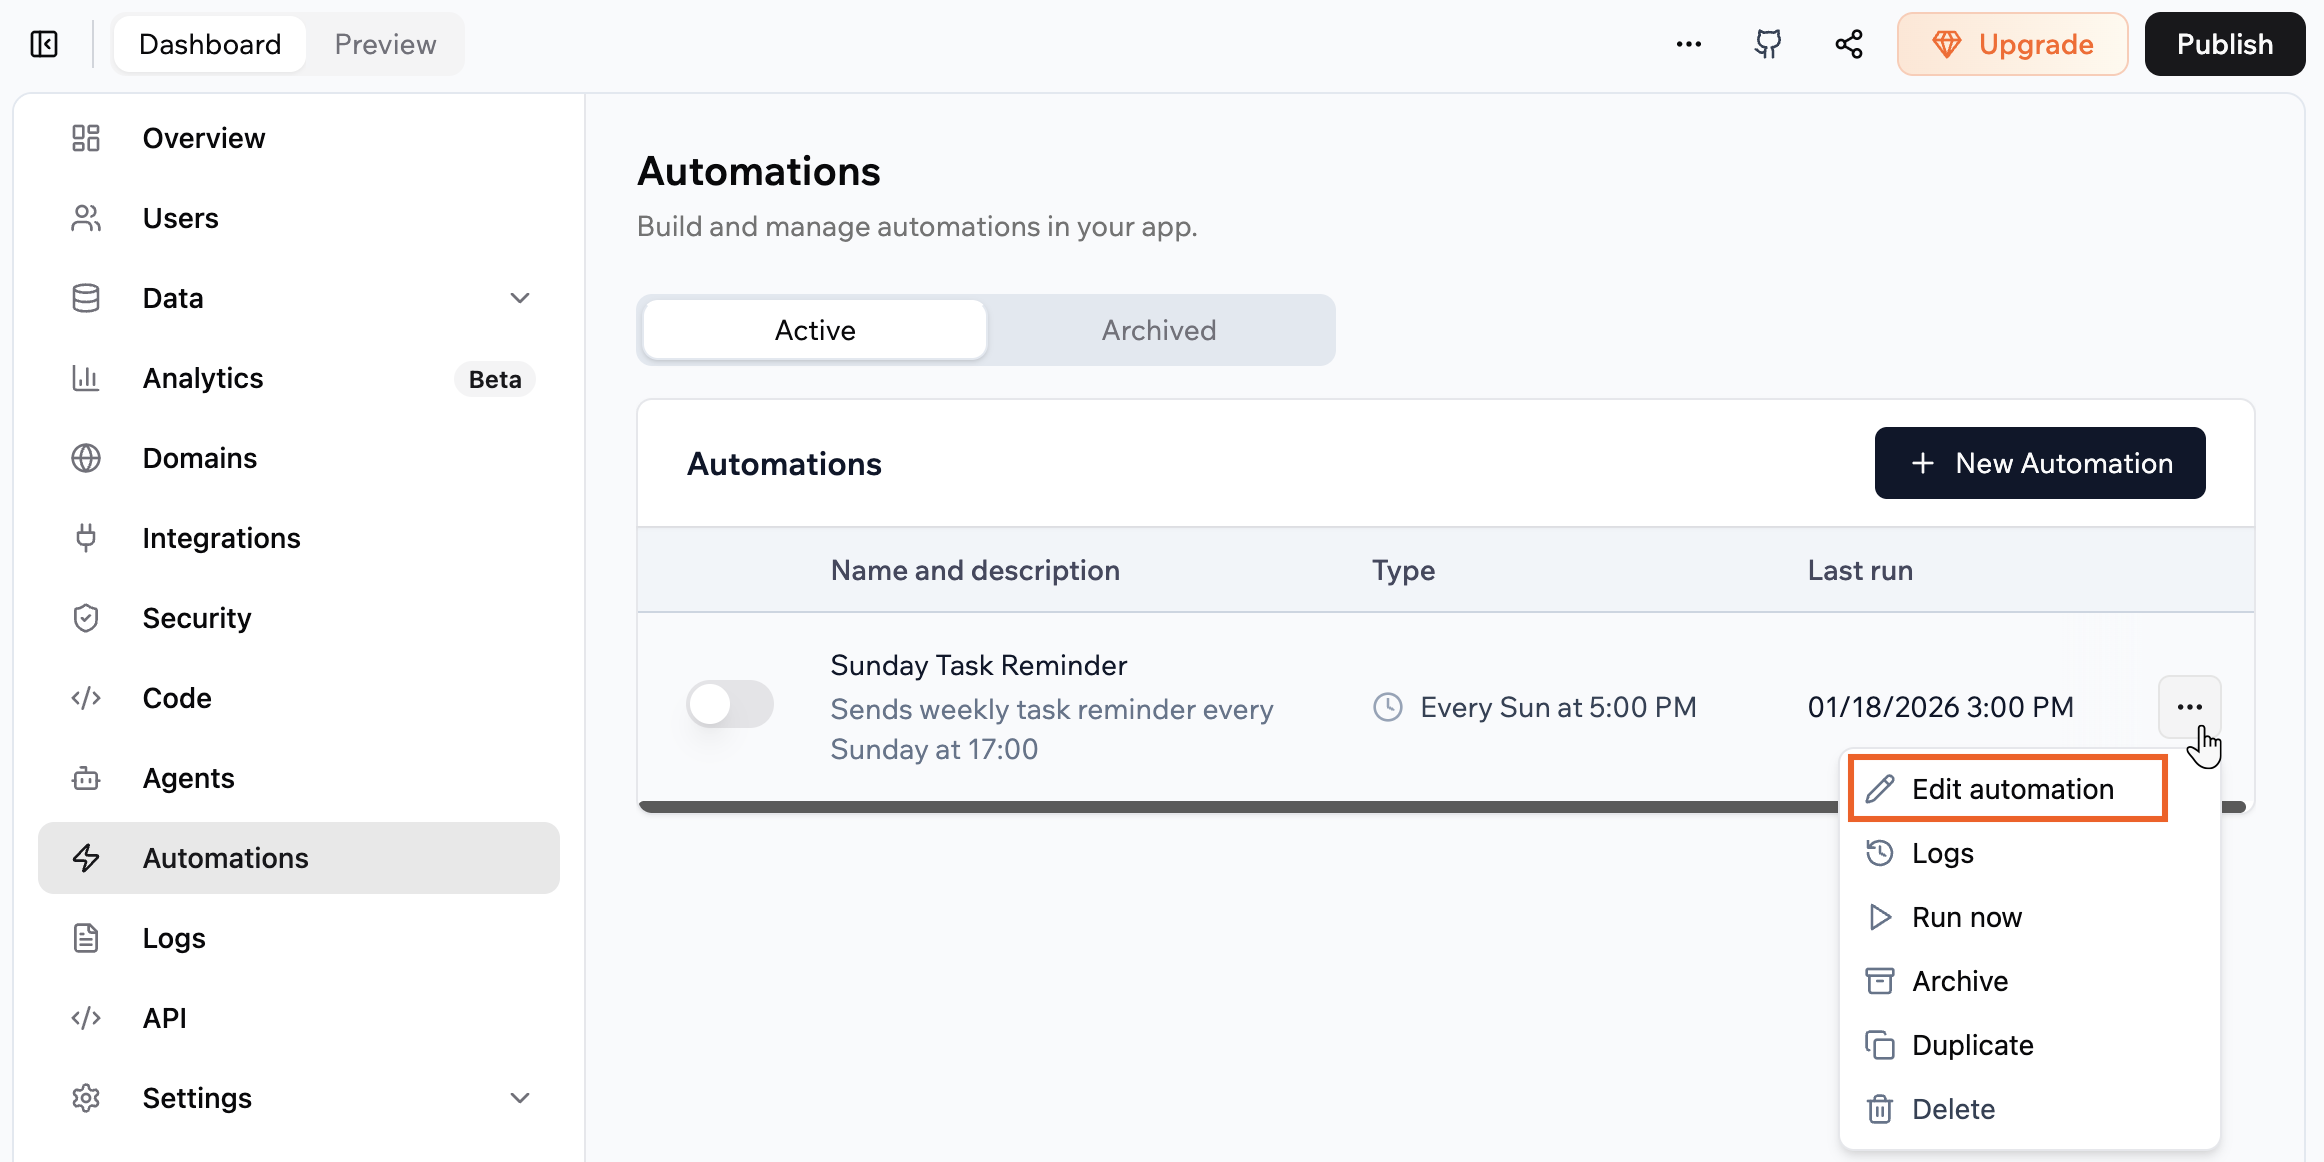
Editing an automation in your app
Duplicating an automation
Create new automations by duplicating existing ones and editing the new automation. To duplicate an automation:- Click Dashboard in your app editor.
- Click Automations.
- Click the More Actions icon on the automation.
- Click Duplicate.
- Update the new automation’s details if needed, and click Save.
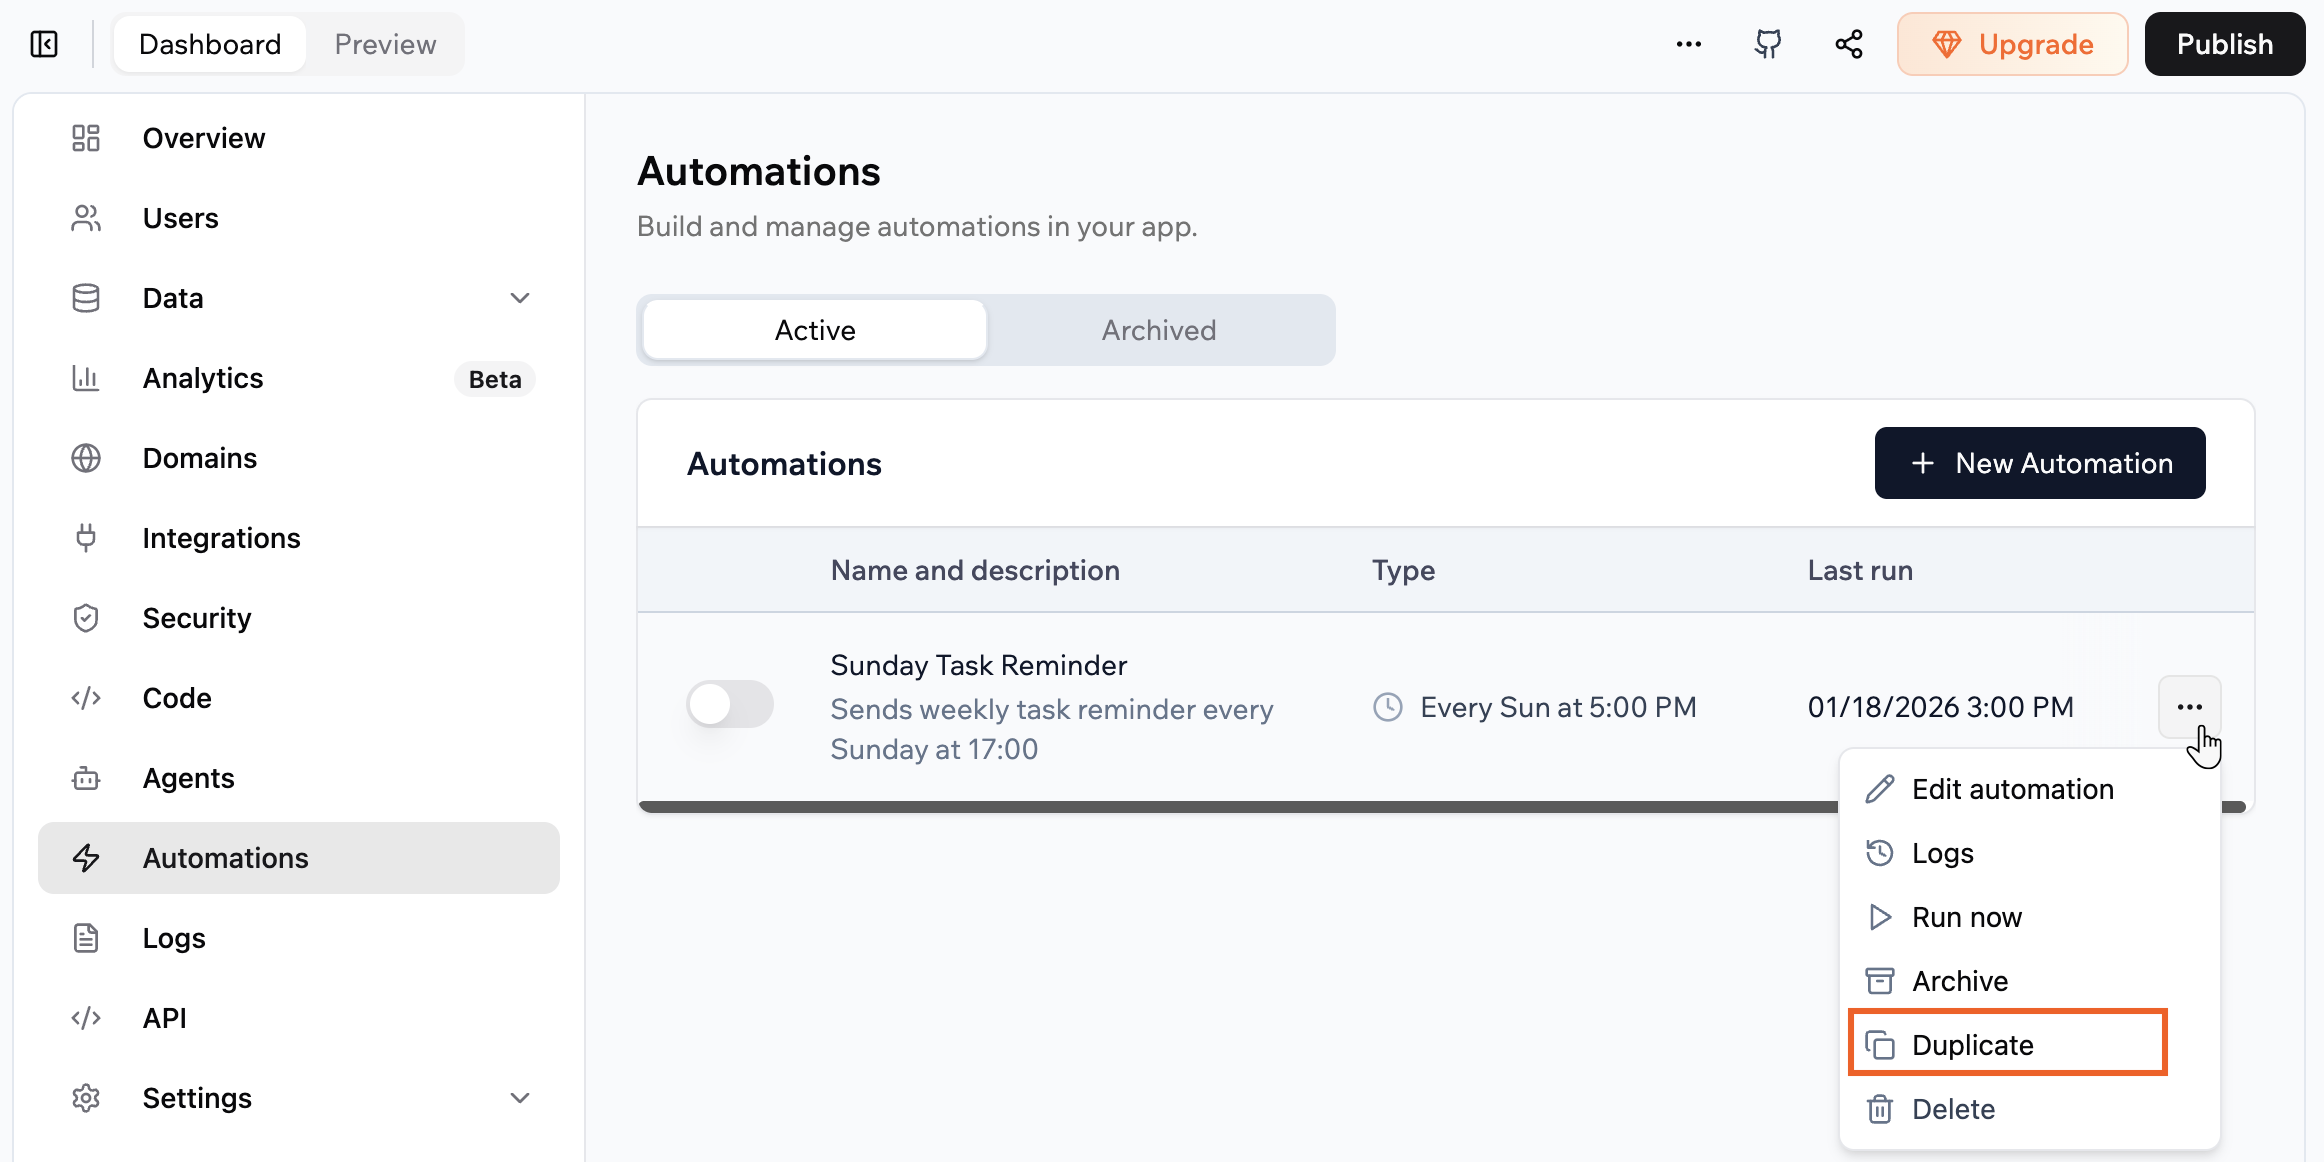
Duplicating an automation in your app
Running an automation immediately
Run an automation right away when you want to trigger its backend function on demand. This helps you test changes, confirm that your configuration works, or handle something urgent between scheduled runs.Run now triggers the backend function one time in addition to any schedule or data event you configured. The run appears in the automation logs.
- Click Dashboard in your app editor.
- Click Automations.
- Click the More Actions icon on the automation.
- Select Run now.
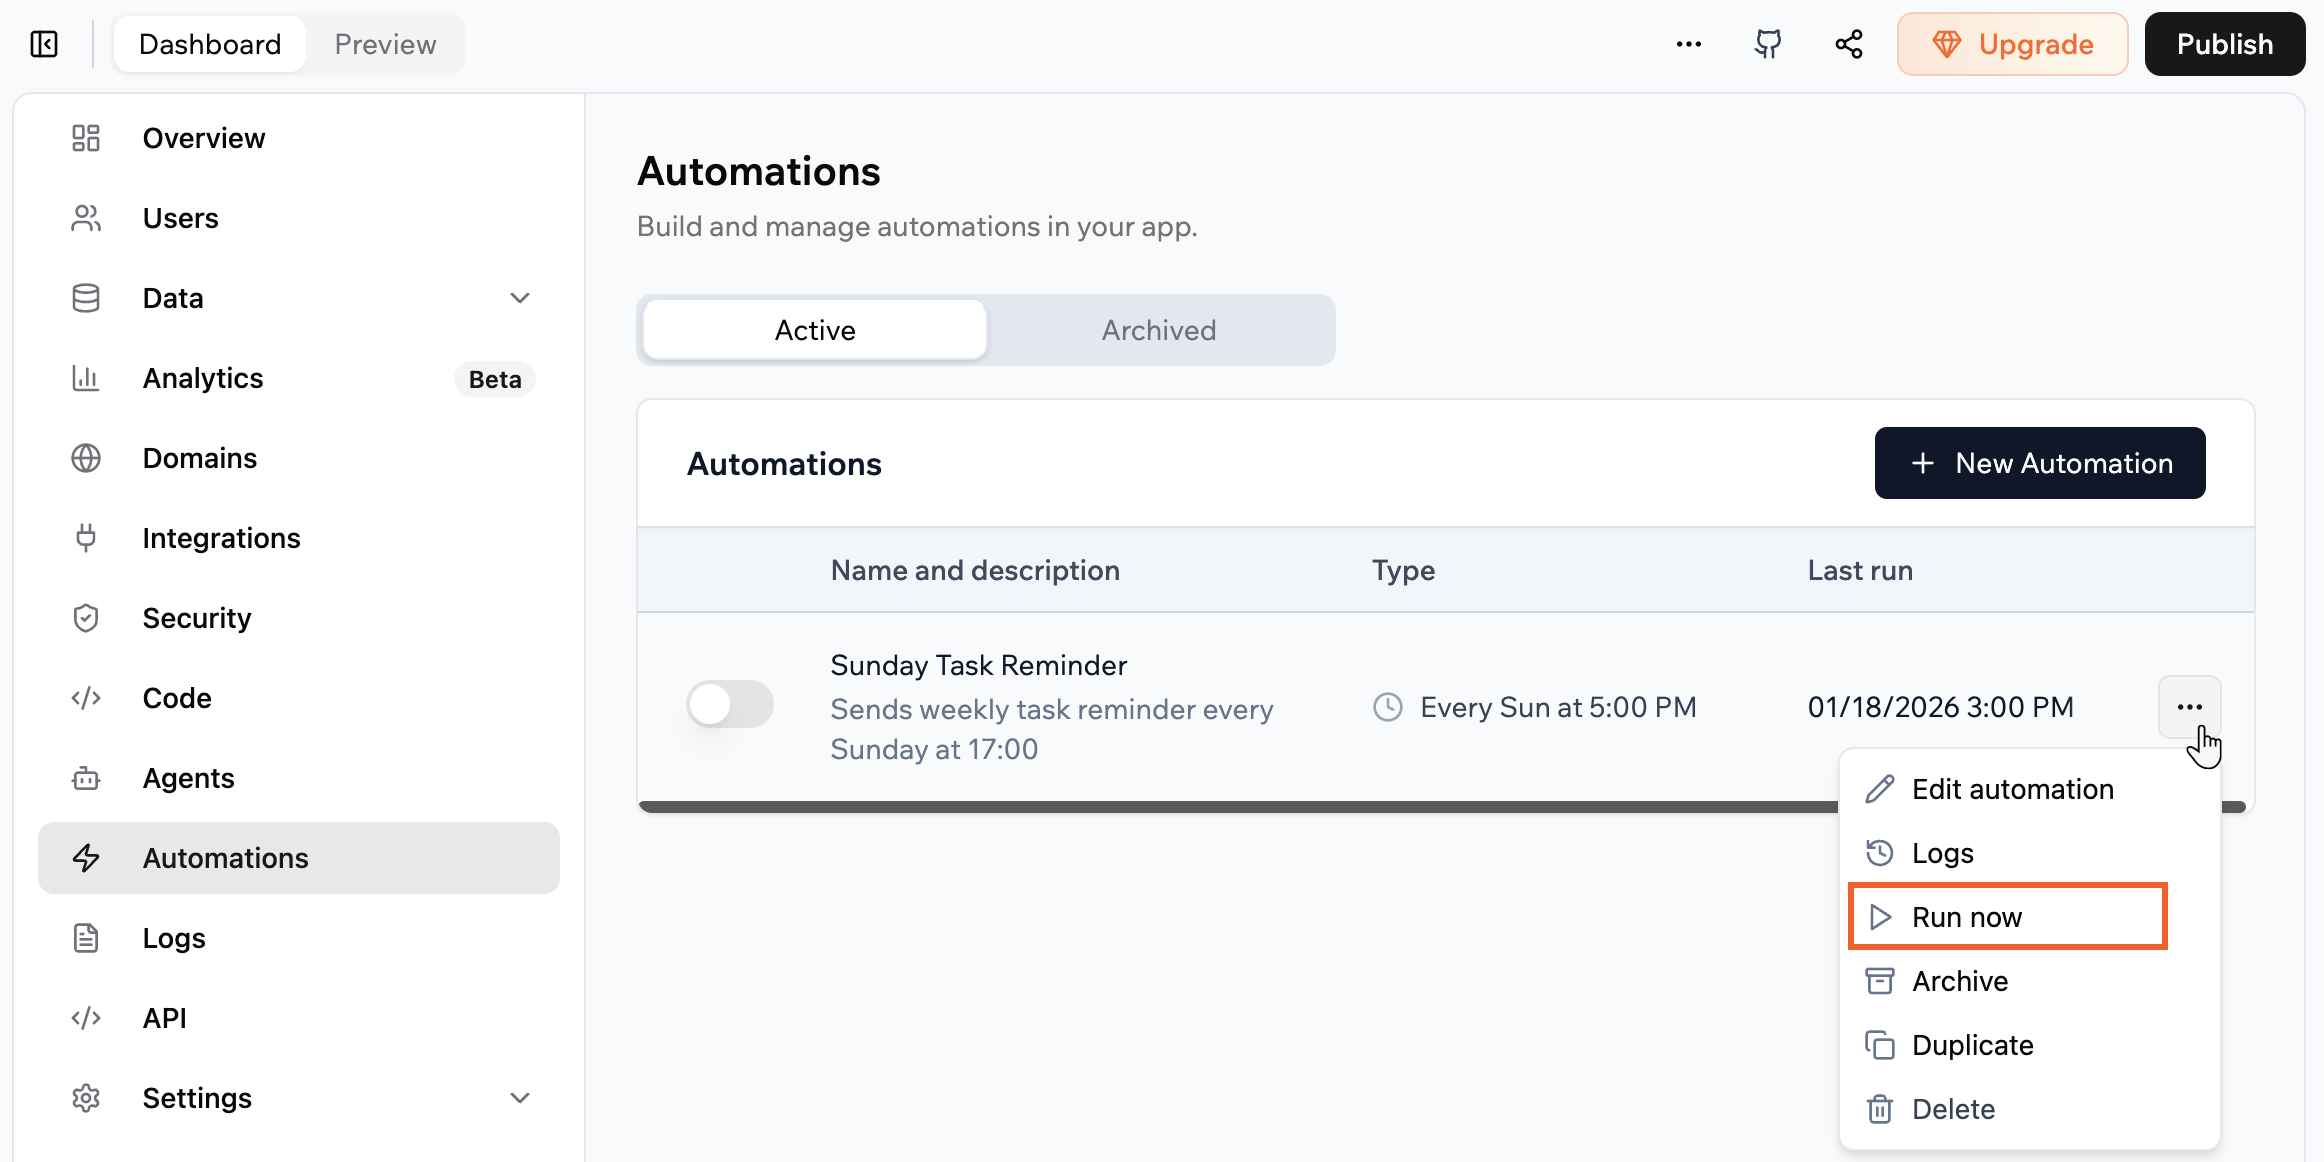
Running an automation immediately
Archiving an automation
If you do not need an automation anymore, you can move it to Archive to keep your active list clean. To archive an automation:- Click Dashboard in your app editor.
- Click Automations.
- Find the relevant automation in the list.
- Click the More Actions icon on the automation.
- Click Archive.

Archiving an automation
Monitoring runs and using logs
Every automation keeps its own log so you can see when it ran, how long it took, and whether it succeeded. When something goes wrong, logs help you understand what failed and where to look in your backend code, without guessing. To view logs for an automation:- Click Dashboard in your app editor.
- Click Automations.
- Click the automation you want to inspect.
- Click the Logs tab.
- Review the list of runs, including the timestamp, duration, and status of each run.
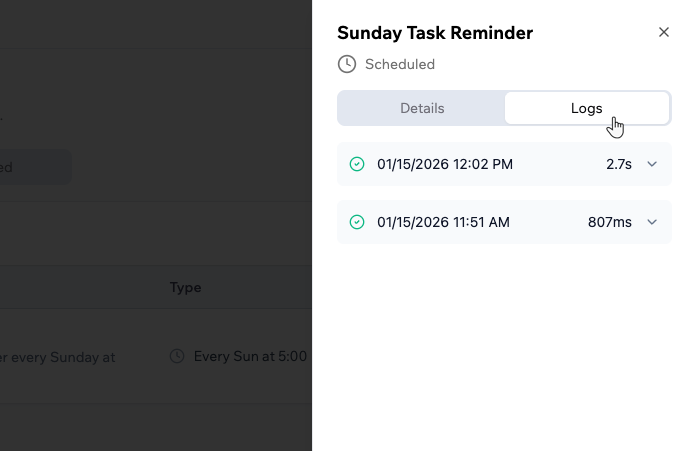
Viewing the logs of an automation
Automations and integration credits
Each automation run uses at least 1 integration credit, plus additional credits for any built-in integrations called inside it. For example, an automation that calls invokeLLM and sends an email costs the 1-credit automation run plus credits for each action it triggers. See the full credit breakdown. Automations that run frequently or chain several actions can drain your credit balance quickly. Here are some ways to keep usage under control:- Add specific trigger conditions. Narrow the criteria that cause an automation to fire so it does not run unnecessarily.
- Consolidate redundant automations. If multiple automations perform overlapping tasks, combine them into fewer, smarter workflows.
- Resolve failing automations promptly. Automations that error can still consume credits on each retry. Check your logs regularly and fix or disable problem automations as soon as you spot them.
- Review the frequency of scheduled tasks. Consider whether recurring automations, such as daily reports or reminders, need to run as often as configured.
- Minimize invokeLLM calls. Each invokeLLM call inside an automation is a separate credit charge. Only call the LLM when the result cannot be pre-determined.
- Test in a controlled environment first. Run automations manually on a small dataset and check the execution logs to estimate the per-run credit cost before enabling them at scale.
- Use Discuss mode when designing automations. Discuss mode costs roughly 0.3 message credits and lets you plan automation logic before applying changes, reducing trial and error.
FAQs
Click a question below to learn more.Can I add conditions to control when an automation fires?
Can I add conditions to control when an automation fires?
Yes. Ask the AI chat to add trigger conditions to any automation. For example:The automation then only fires when the trigger event also matches the conditions you describe. Conditions are shown in the Advanced section of the automation panel once set, and can only be changed by asking the AI chat — they cannot be edited manually.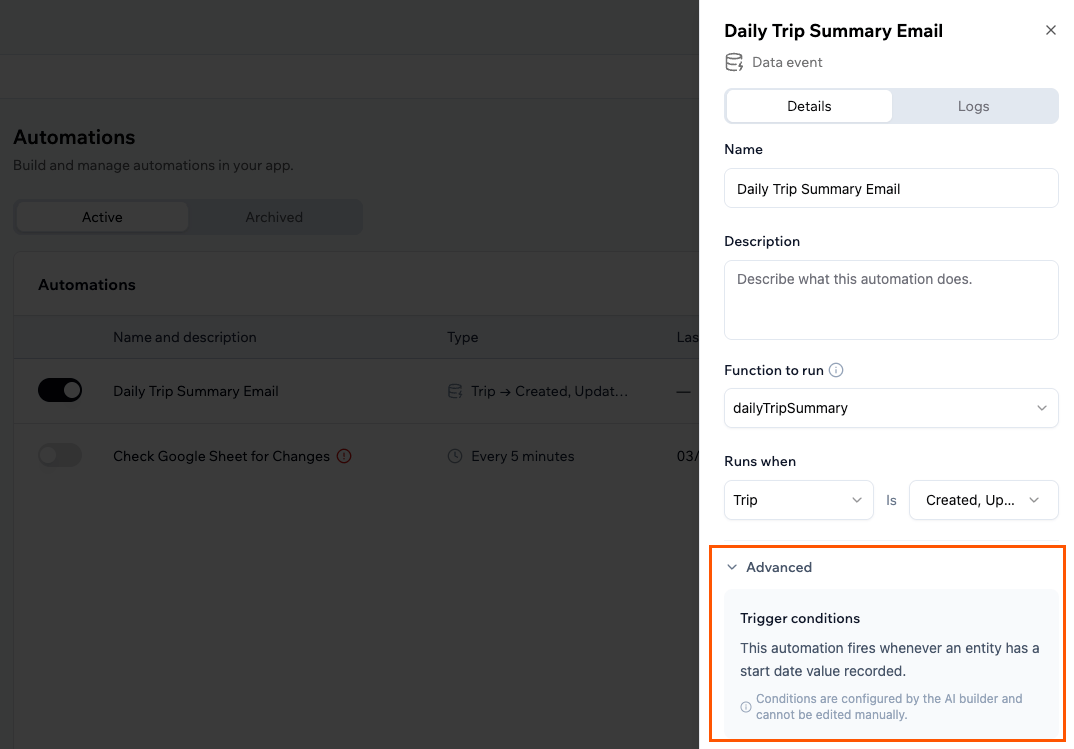
How do I investigate a failed automation run?
How do I investigate a failed automation run?
When an automation fails, you see a Failed label in the Last run column and a Fix with AI option on the same row.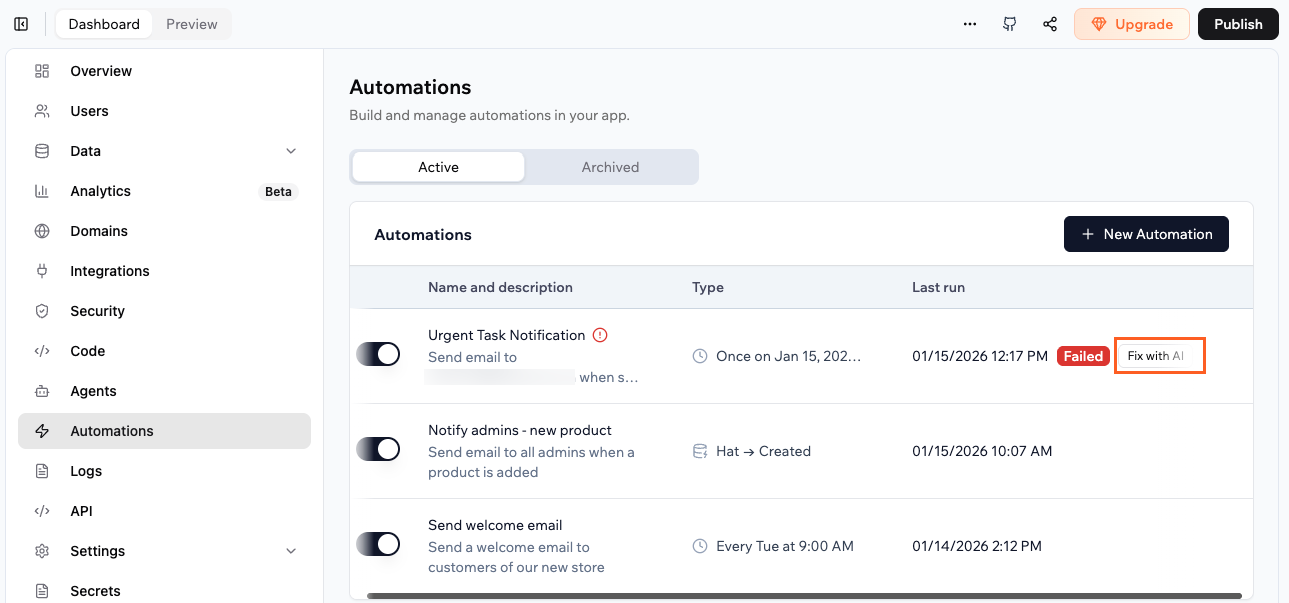
- Click Dashboard in your app editor.
- Click Automations.
- Click Fix with AI on the failed automation.
- In the AI chat, review the explanation of what went wrong and how it affects your automation. Accept the suggested fix so the AI can update your code or automation configuration.
- When the AI finishes applying the fix, use the Run now action from Automations and check the logs to confirm the automation succeeds.
Why was my automation paused automatically?
Why was my automation paused automatically?
If a scheduled automation fails several times in a row, Base44 automatically pauses it to protect your app and your credits, and notifies you. Fix the underlying issue, then turn the automation back on from the Automations page.
Which connector events can I use in connector automations?
Which connector events can I use in connector automations?
The available events depend on which connector you are using. Here is a full list:
Make sure the connector is connected and configured in Integrations in your app’s dashboard before creating a connector automation.