

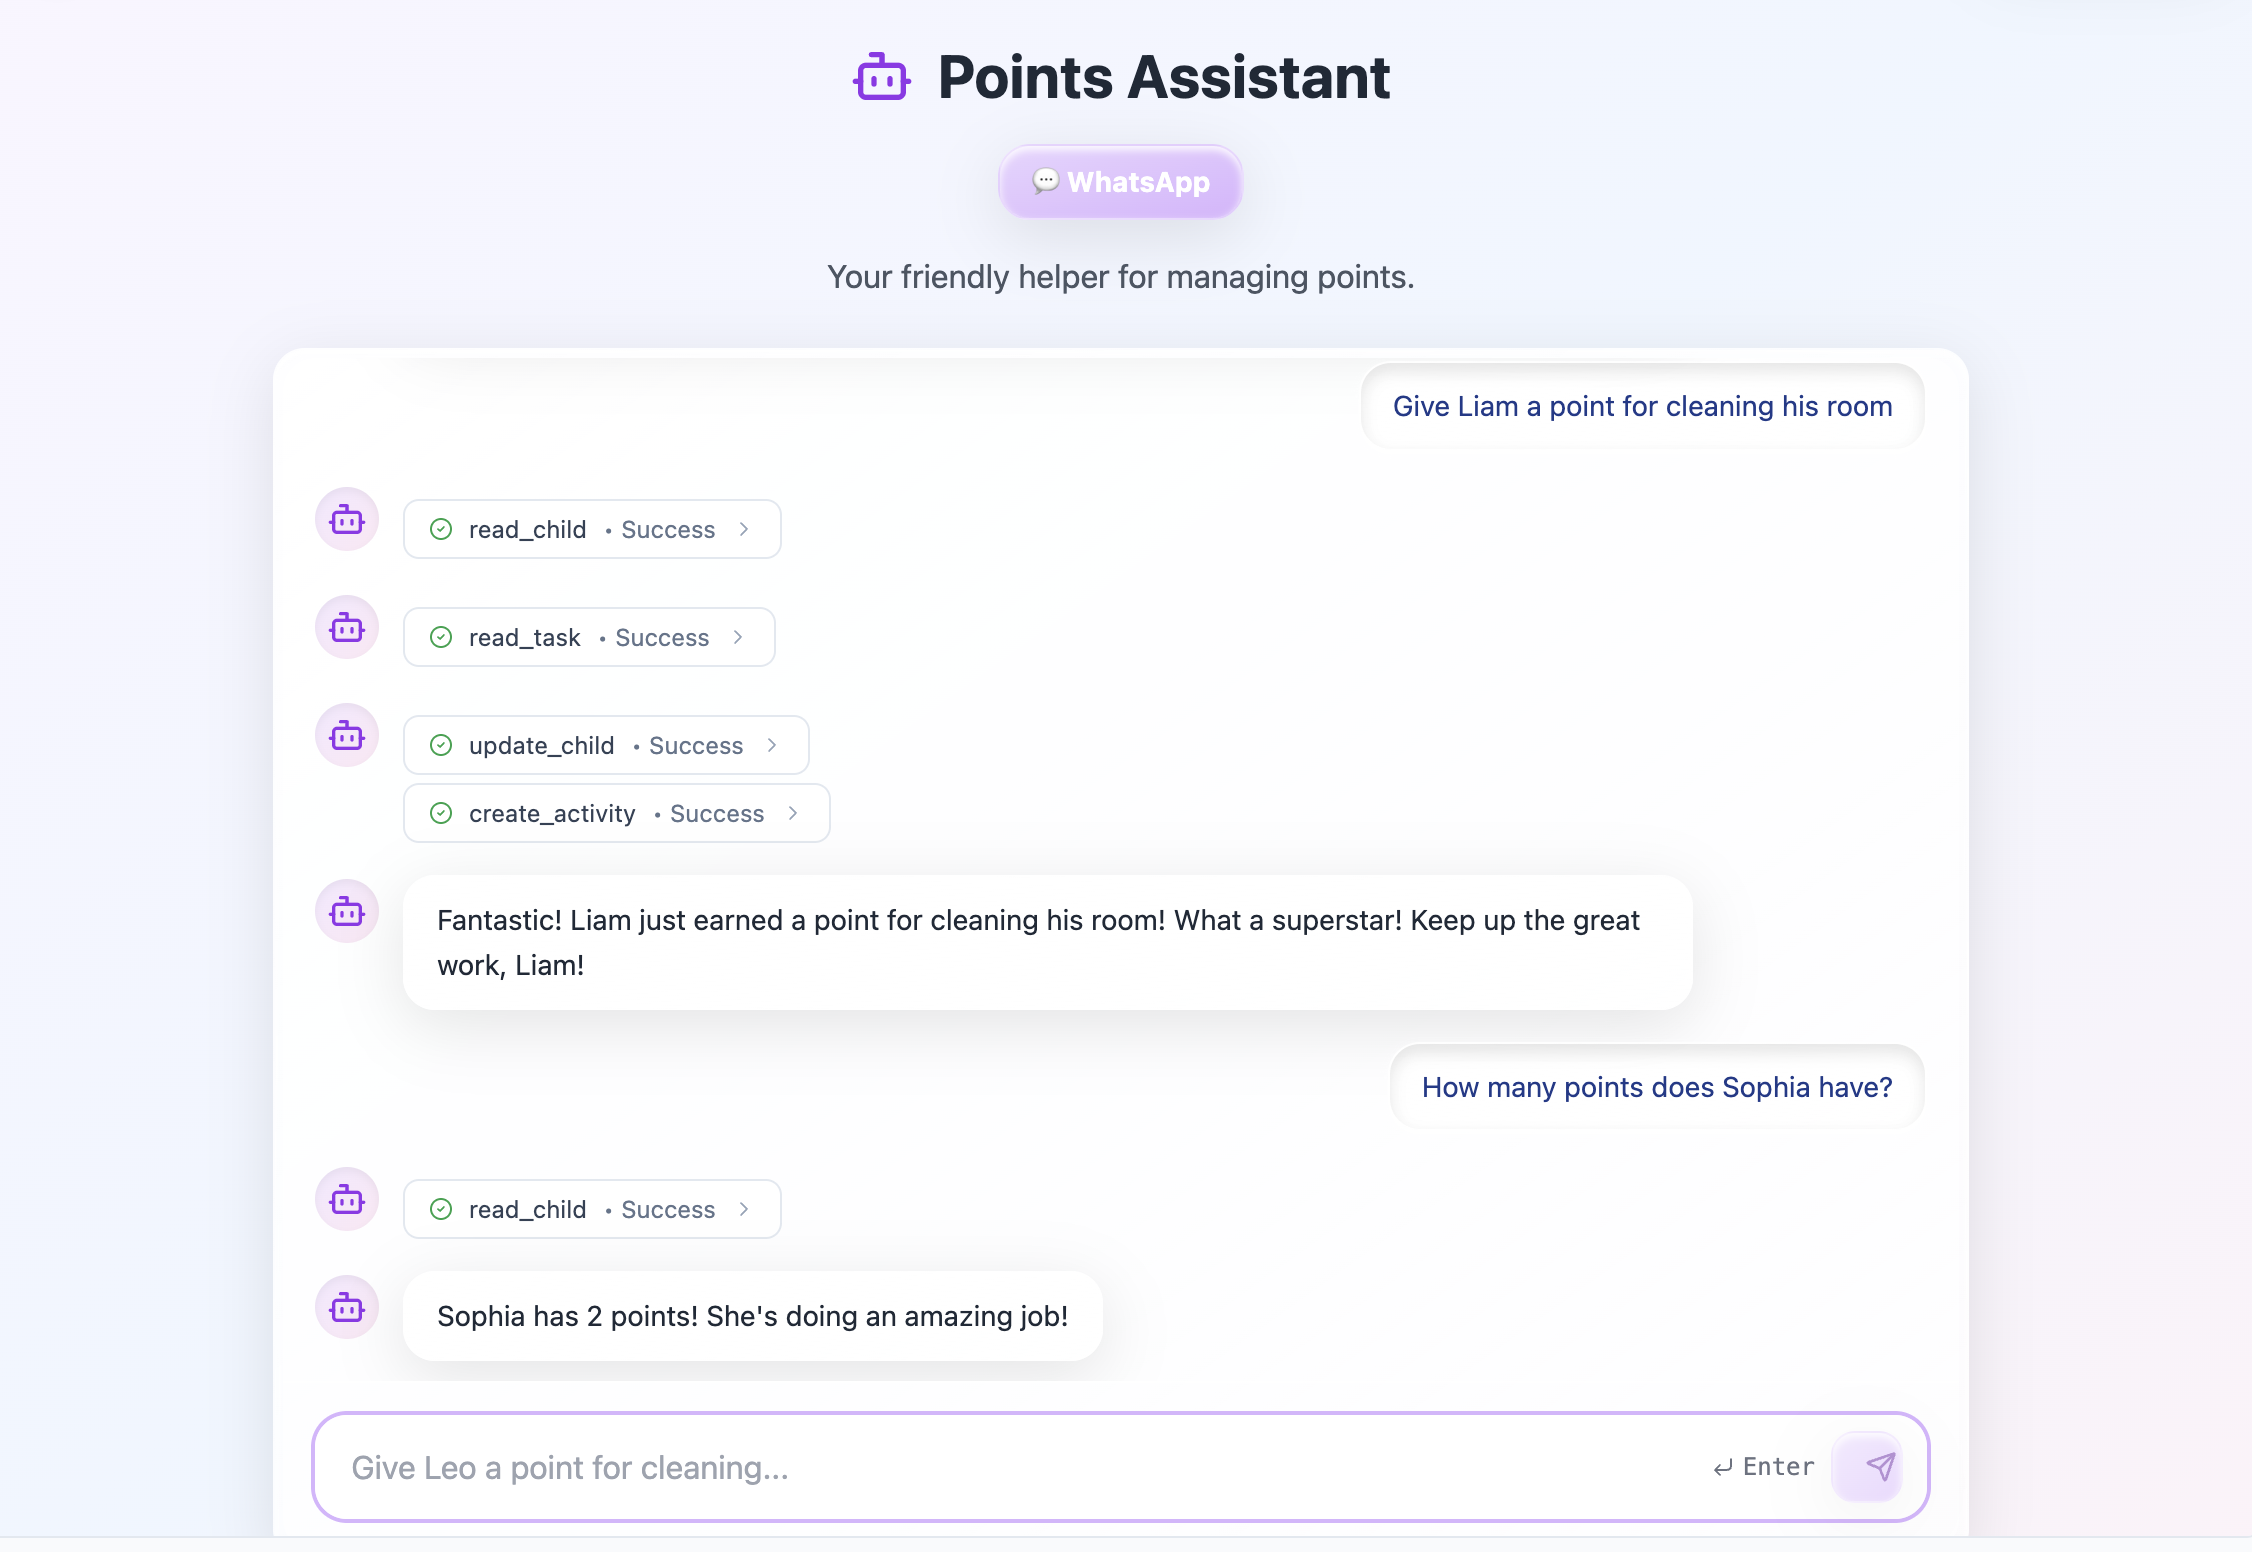
Using an AI agent to take actions and manage data in your app
Setting up an AI agent
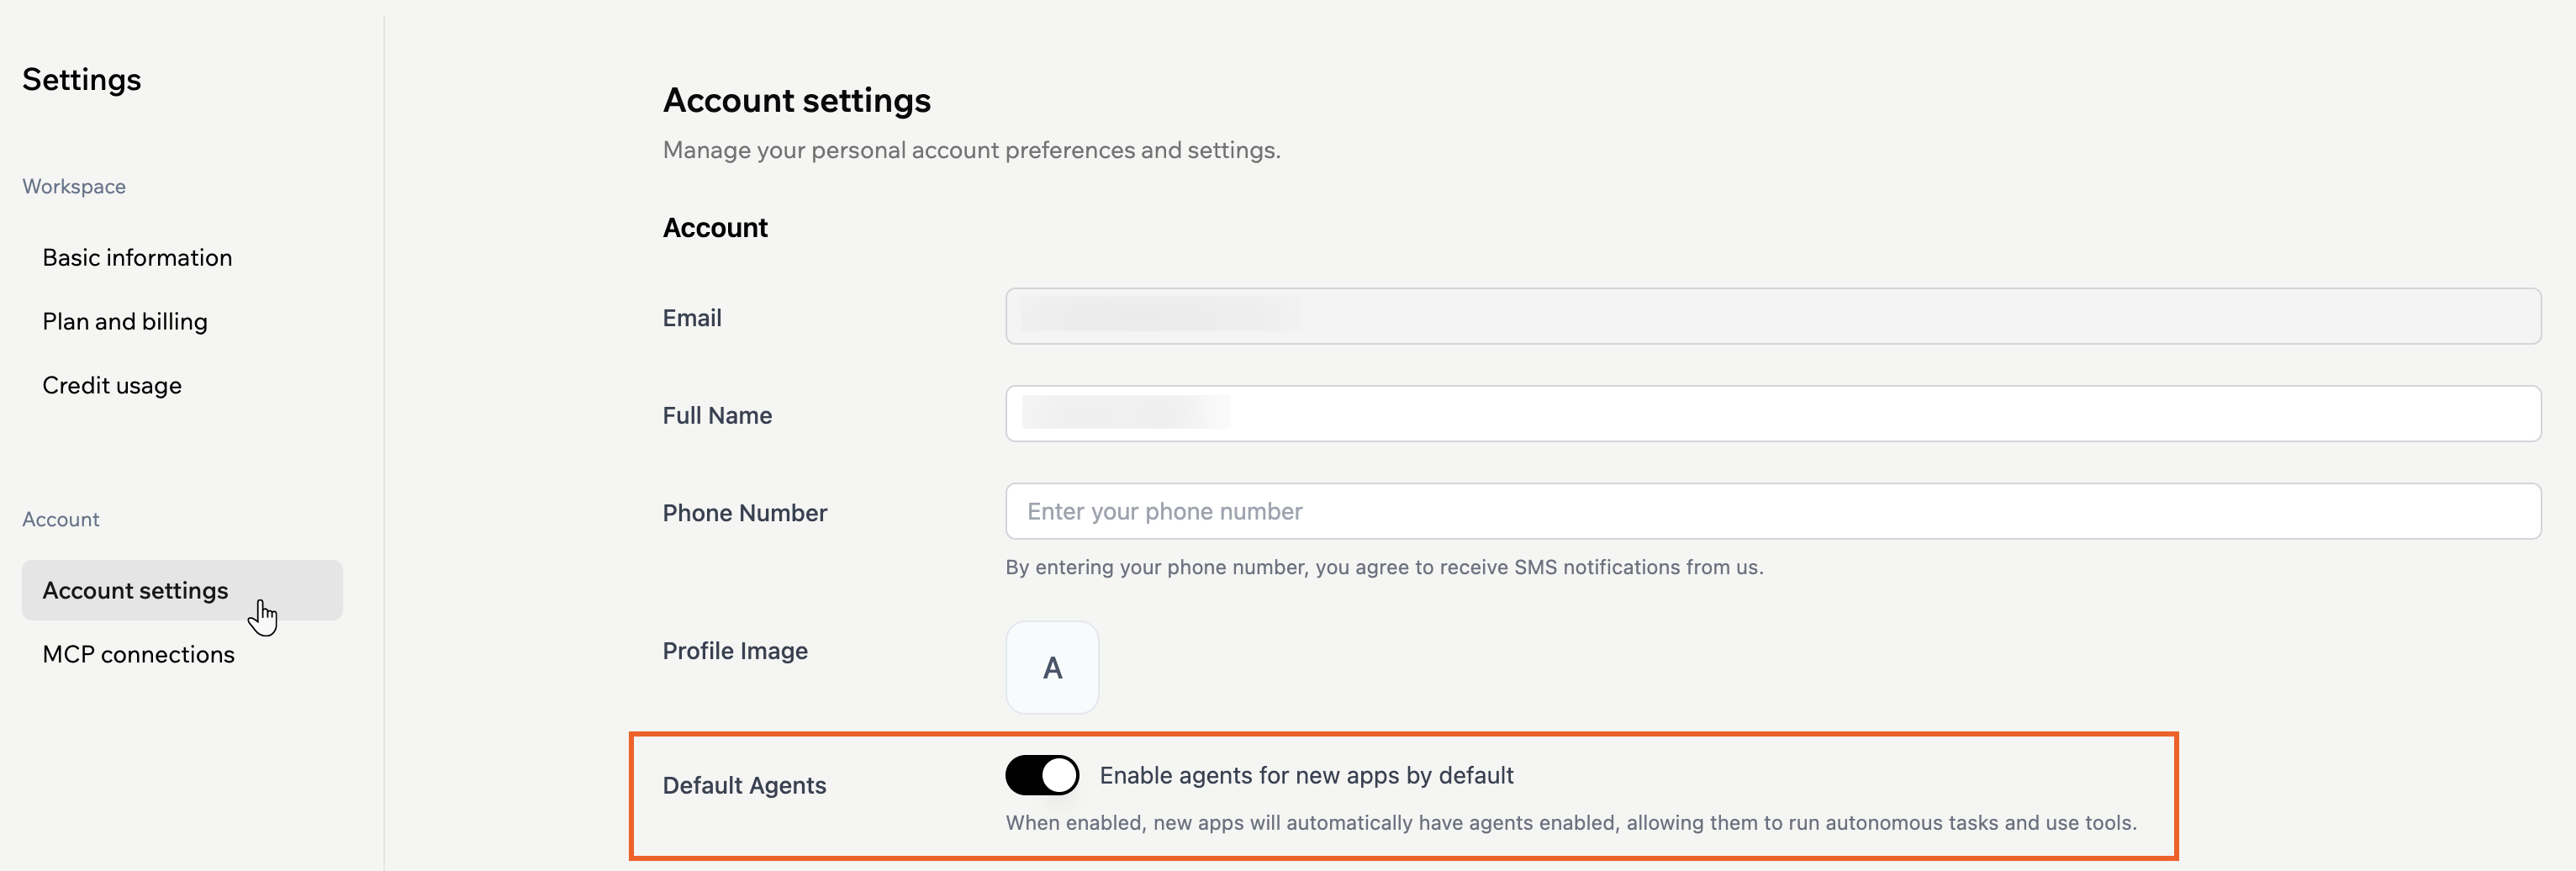
Before you can start working with AI agents, you need to enable them in your app dashboard. Then you can start creating them using the AI chat. You can enable agents for all new apps by default in your account settings in your workspace.- Go to Dashboard in your app editor.
- Click Agents.
- Choose a suggested agent template or click Create from scratch to define your own.
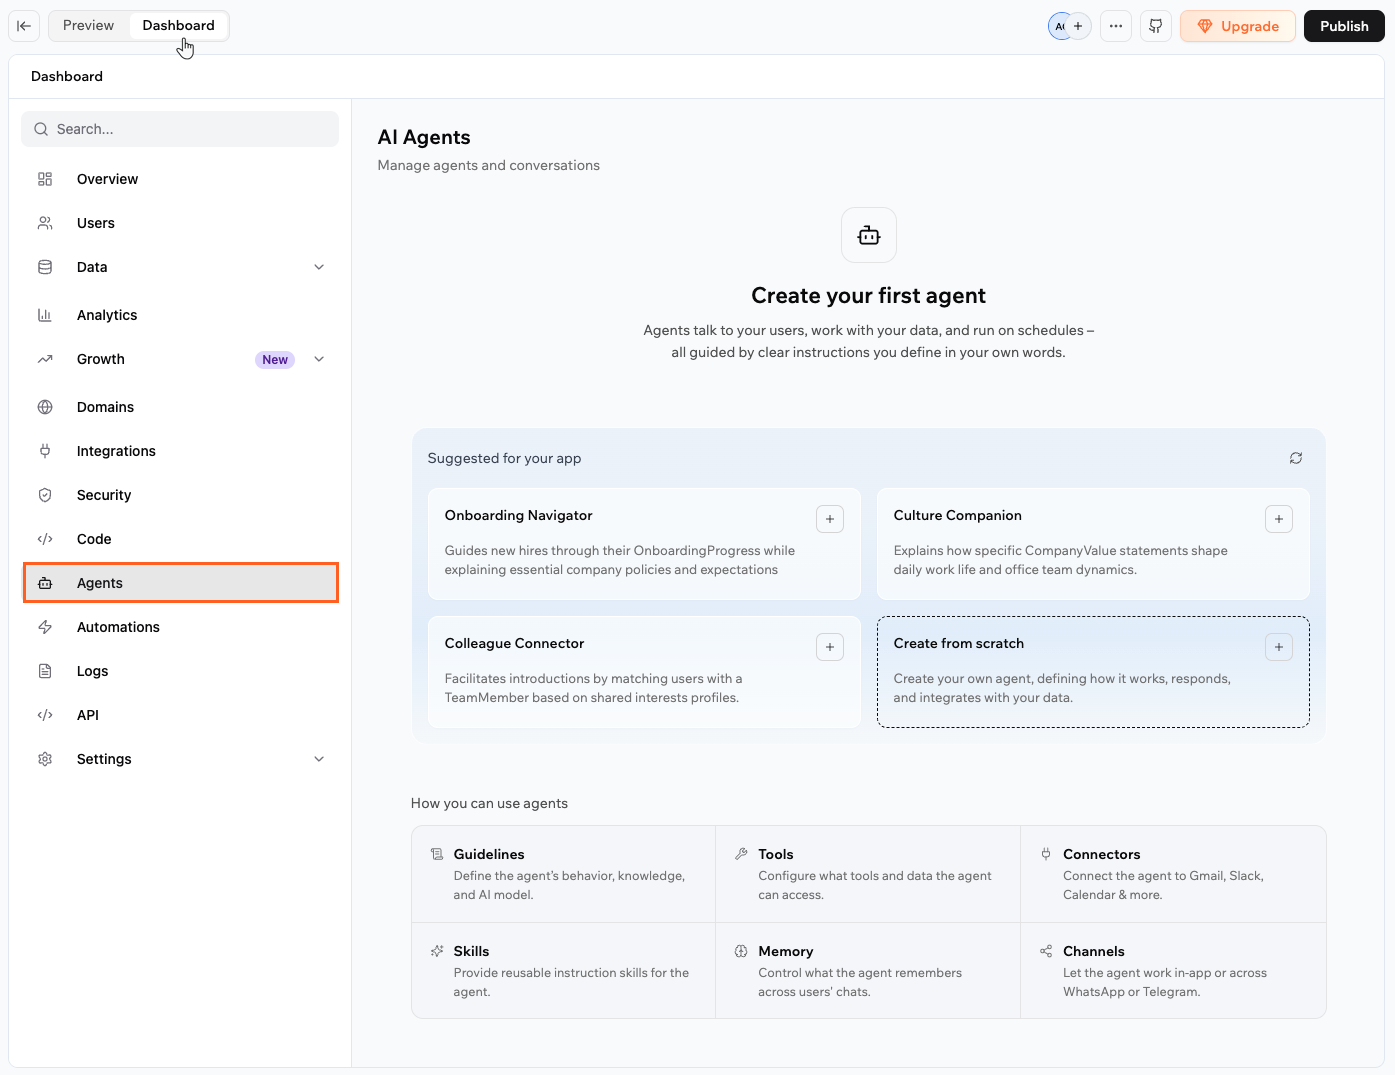
Enabling AI agents in your Base44 app
Customizing your AI agent
Each agent has its own configuration panel with the following sections:- Guidelines: Define the agent’s behavior, persona, AI model, and context files.
- Tools: Control what data and tools the agent can use.
- Connectors: Let app users connect their own external accounts to the agent via OAuth.
- Skills: Add reusable instruction sets that give the agent specific behaviors or expertise.
- Memory: Decide how the agent remembers information across conversations.
- WhatsApp: Connect the agent to WhatsApp so people can chat from their phone.
- Telegram: Connect the agent to Telegram so people can chat from anywhere.
- LINE: Connect the agent to LINE so people can chat from the LINE app.
Configuring guidelines
Use the Guidelines tab to set how your agent behaves and which AI model it uses.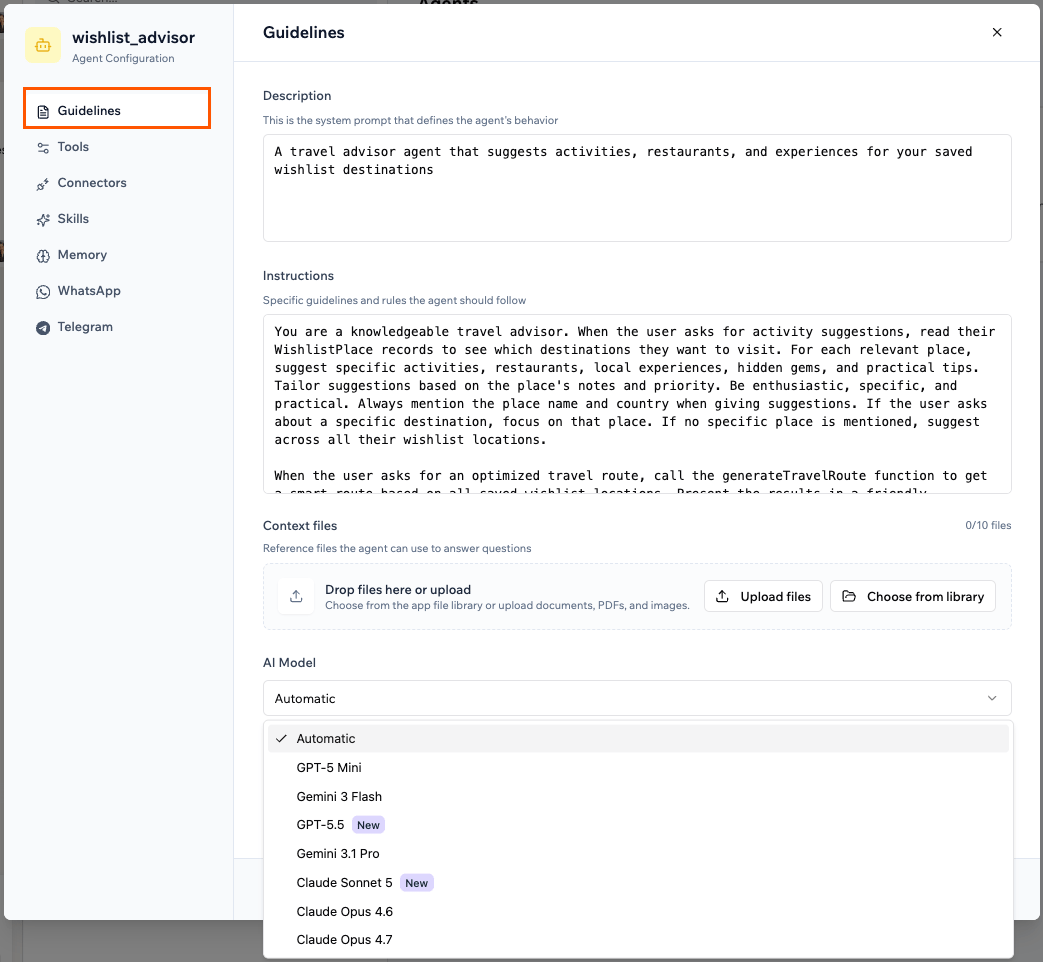
Configuring the description, instructions and AI model for your agent
- Go to Dashboard in your app editor.
- Click Agents.
- Click Edit Agent on the relevant agent.
- Click Guidelines.
- Update the Description to define the agent’s role and high-level behavior.
- Update Instructions with detailed rules your agent should follow.
- Under Context Files, click Upload files or Choose from library to add reference material the agent can use to answer questions. For example, product manuals, pricing documents, policies, or FAQs. You can add up to 10 files.
- Under AI Model, select the model that powers your agent. Keep Automatic selected for fast, cost-effective responses, or choose a model from Google Gemini, OpenAI GPT, or Anthropic Claude for more advanced reasoning.
- Click Save.
Choosing an AI model
Allowing anonymous access
By default, people need to log in to your app before they can use an agent. You can let visitors chat with an agent without signing in by turning on anonymous access for that agent, so anyone can start a conversation straight away. You can view anonymous conversations in the Users tab in your Agents dashboard, just like logged-in user conversations. See how to view agent conversations. When anonymous access is on, visitors can chat with the agent without signing in, on the web and on connected channels (WhatsApp and Telegram). Anonymous users can’t access per-user private data, so keep this off for agents that manage personal data. Anonymous conversations also draw integration credits from your workspace pool, the same as logged-in users, so only turn this on for agents you want open to everyone. The setting is off by default and you control it per agent. To allow anonymous access for an agent:- Go to Dashboard in your app editor.
- Click Agents.
- Click Edit Agent on the relevant agent.
- Click Guidelines.
- Turn on the Allow anonymous access toggle.
- Click Save.
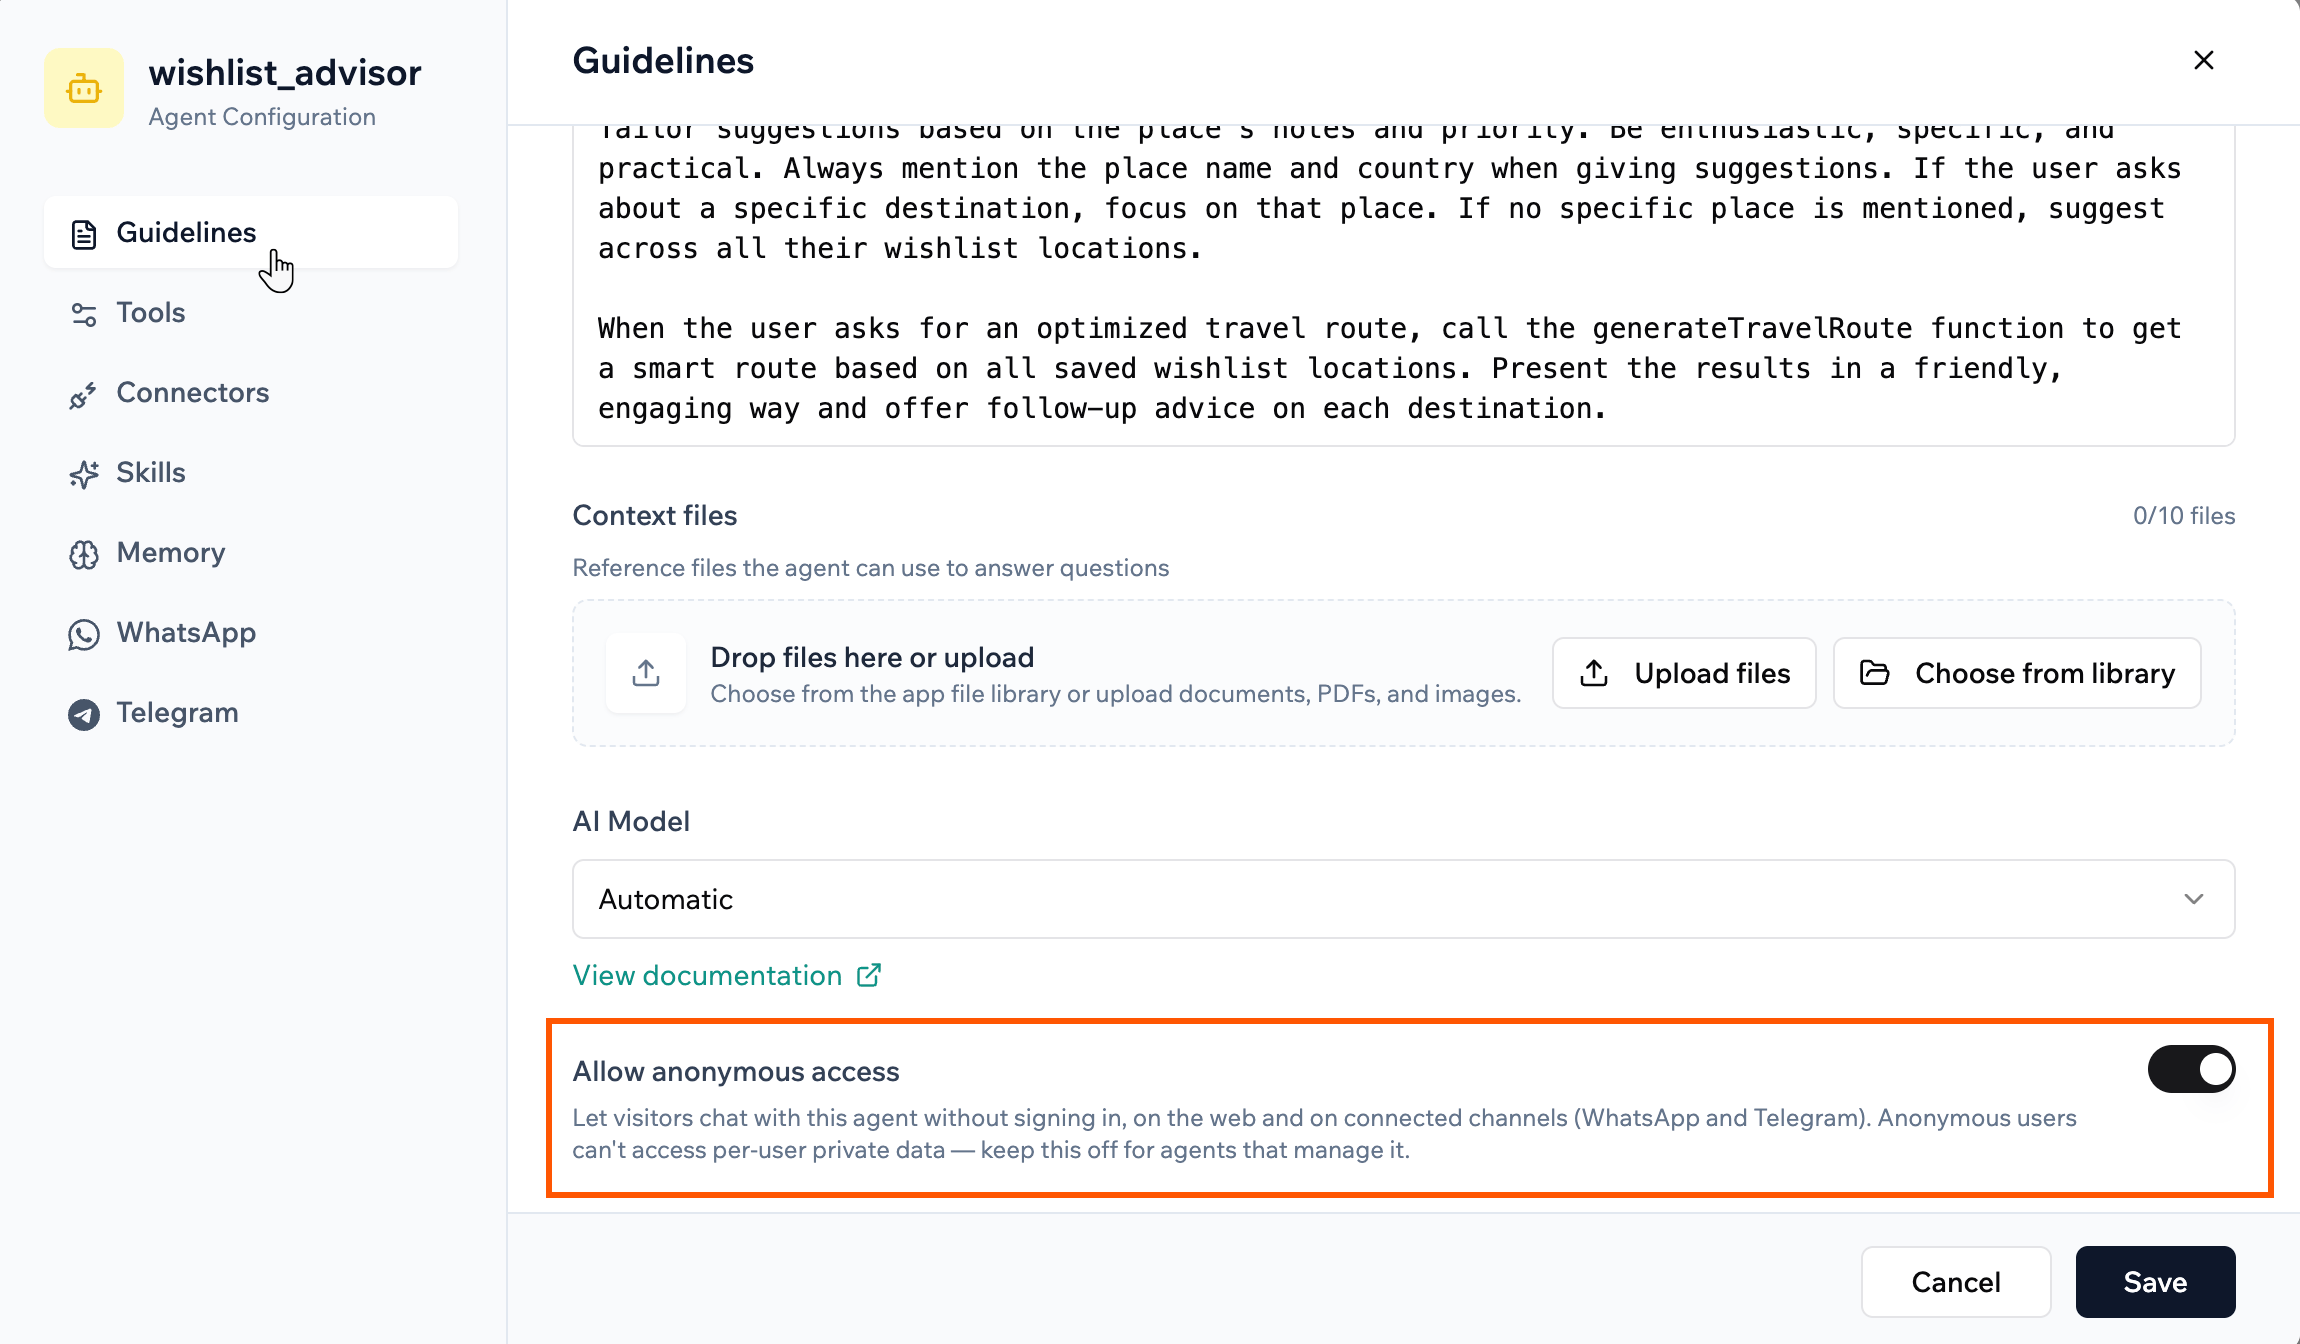
Turning on anonymous access in the agent's Guidelines tab
Managing tools and data access
Use the Tools tab to decide what your agent can do and which data it can access.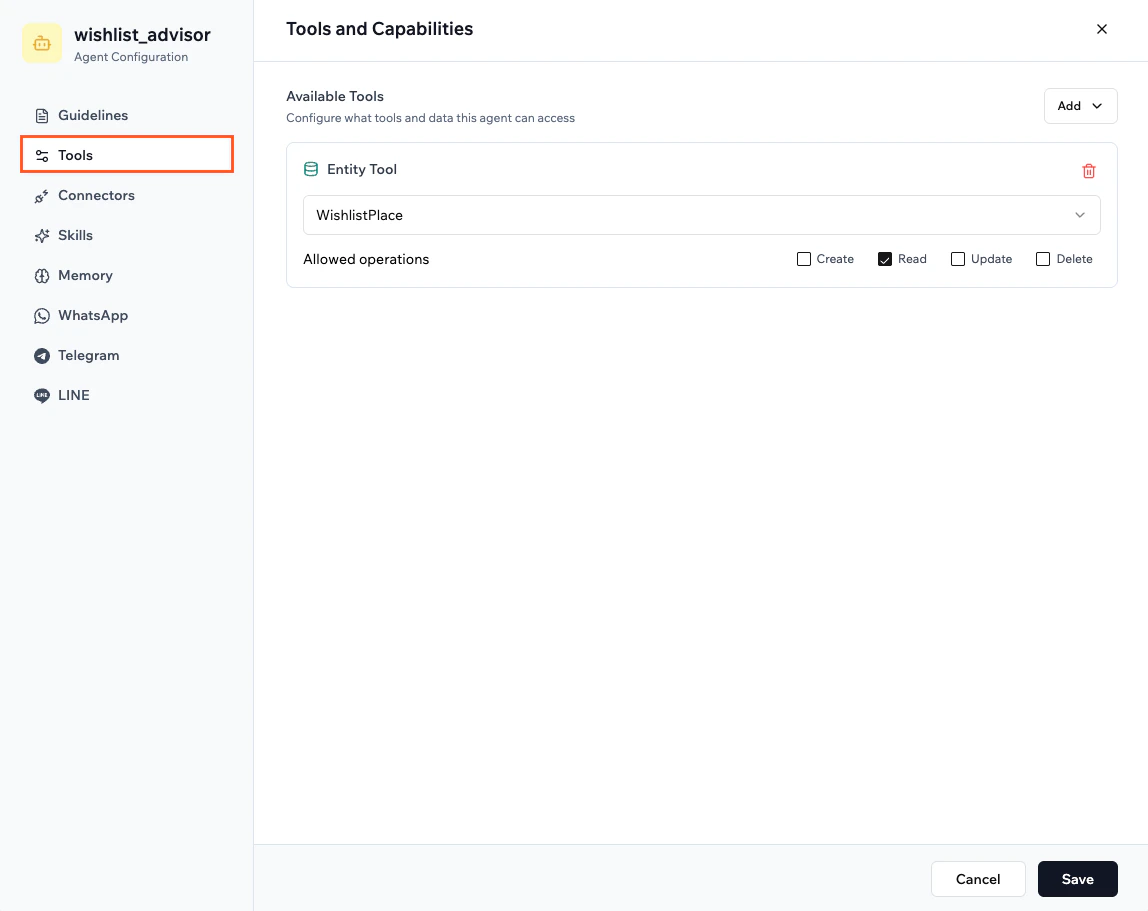
Setting the tools and capabilities of your agent
- Go to Dashboard in your app editor.
- Click Agents.
- Click Edit Agent on the relevant agent.
- Click Tools.
- Choose which tools the agent can use. For example:
- Entity tools to create, read, update, or delete records.
- Backend functions to send notifications, trigger automations, or call external APIs.
- Adjust any tool-specific permissions so the agent only accesses the data it needs.
- Click Save.
Adding user connectors
Use the Connectors tab to let your app users connect their own external accounts to the agent. When a connector is enabled, the agent can create OAuth connect links so each person can authorize access to their own account in that service directly from a conversation. For example, in a travel advisor app, each user could connect their own Google Calendar so the agent can plan and schedule itineraries on their behalf. Learn more about setting up connectors for app users. To add a user connector for your agent:- In the AI chat, ask the agent to add a user connector, for example:
I want my app users to connect their own LinkedIn account to this agent. - When the form appears, fill in the required details. These vary by provider but typically include a connector name, Client ID, Client Secret, and the scopes your app needs.
- Follow the on-screen instructions to authorize the connector and choose the permissions your app users will be asked to grant.
- Click Approve.
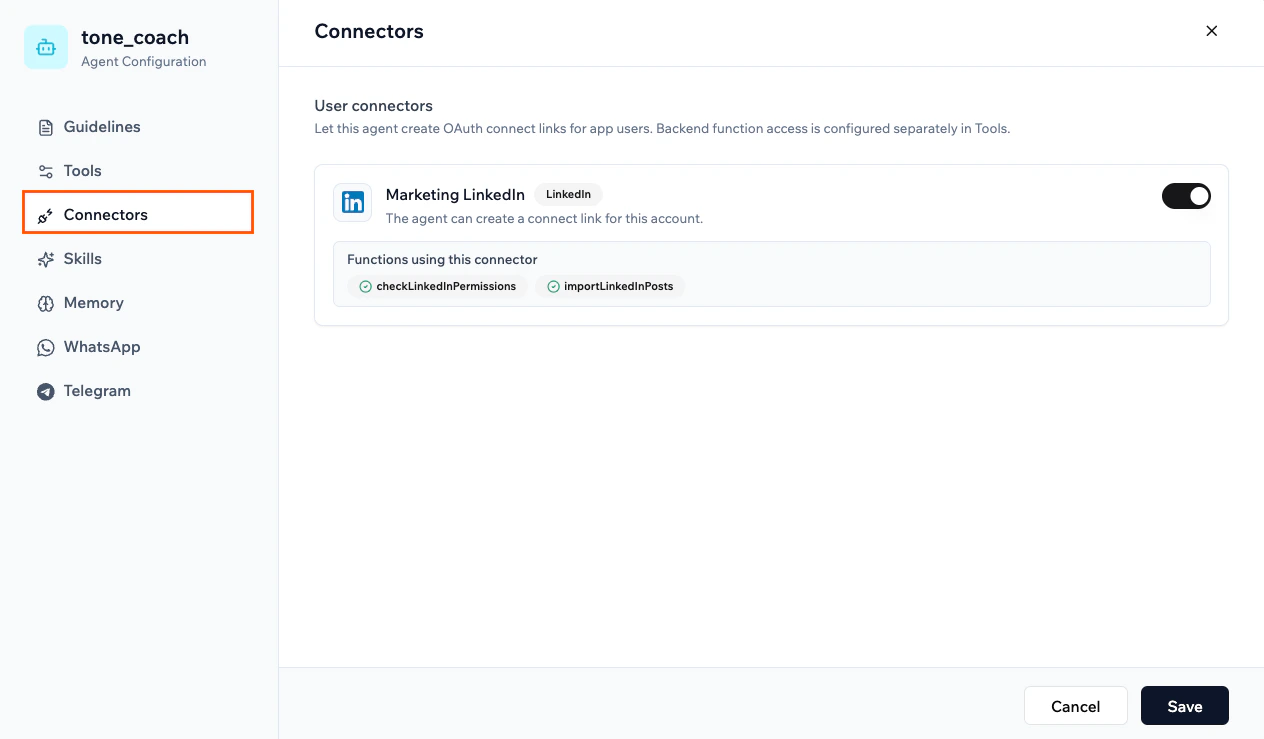
User connector configured in the Connectors tab of an agent
Adding agent skills
Skills are reusable instruction sets you attach to an agent to give it specific behaviors, expertise, or policies. You can attach up to 10 skills per agent.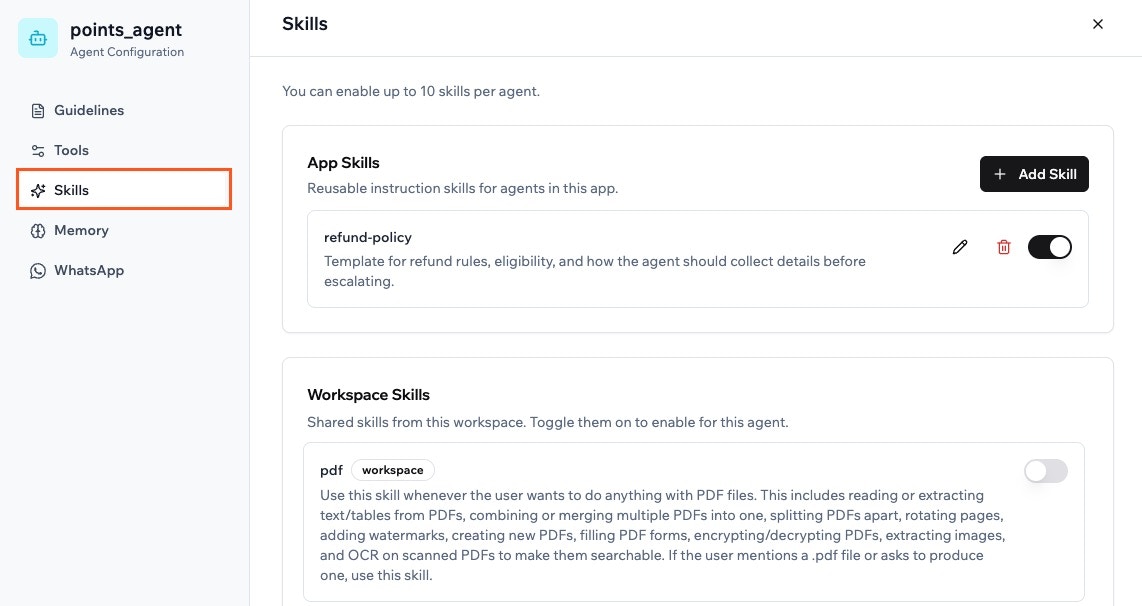
Adding skills to your app agent in Base44
- App Skills: Skills you create for a specific app. Once created, they can be reused across all agents in that app.
- Workspace Skills: Skills shared across your workspace. Learn more about managing workspace skills.
- Go to Dashboard in your app editor.
- Click Agents.
- Click Edit Agent on the relevant agent.
- Click Skills.
- Click Add Skill under App Skills.
- Choose how to create the skill:
- Select Start from scratch to write your own instructions.
- Select a template such as refund-policy, support-escalation, pricing-and-plans, or brand-voice to start from a ready-made structure.
- Enter a Skill name, an optional Description, and your Instructions.
- Turn on the Enable for current agent toggle if you want the skill to be active right away.
- Click Create Skill.
- Click Save.
Configuring memory
Agent memory lets your agent remember important information across conversations, such as preferences, key facts, or shared knowledge. You control whether memories are shared across everyone or kept specific to each person. Your agent also manages its own memory size: when its memory reaches around 50,000 characters, it automatically condenses older entries to stay within the limit, keeping the most relevant information.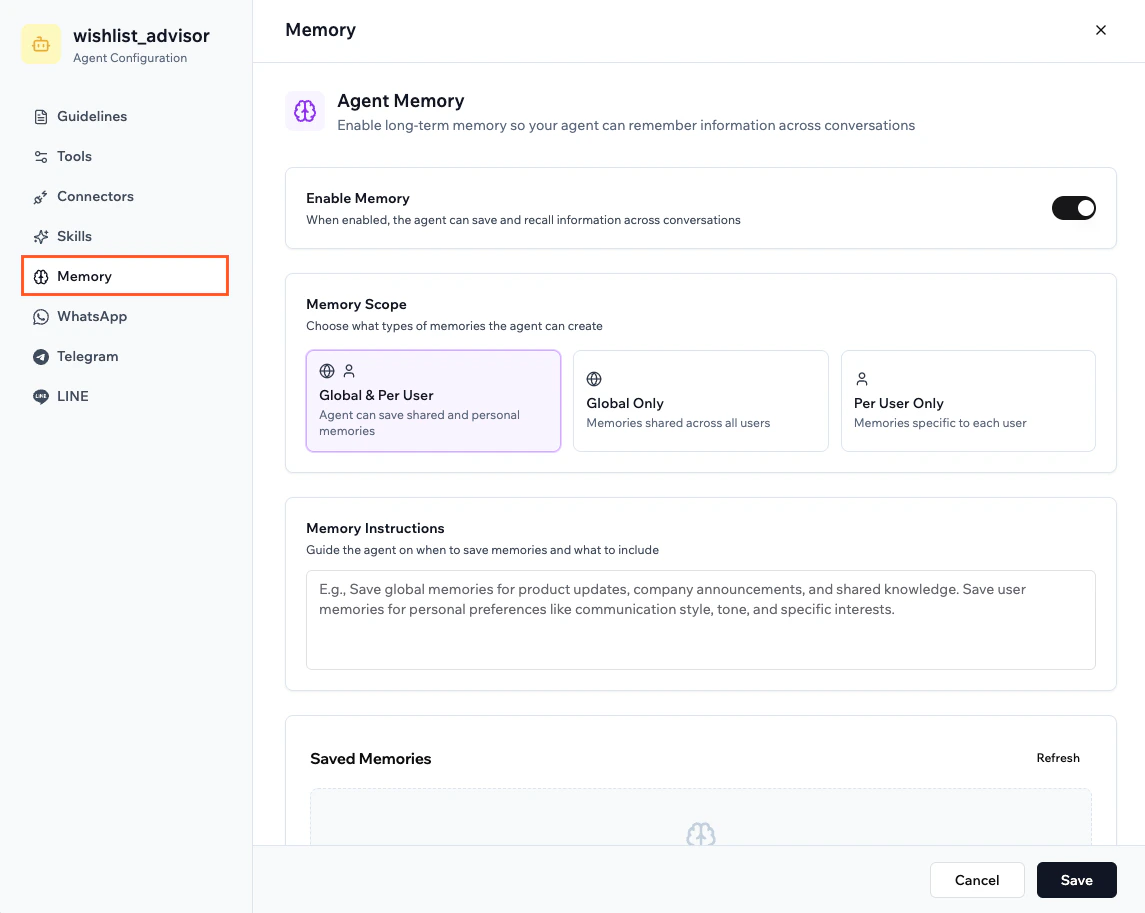
Enabling memory for your agent
- Go to Dashboard in your app editor.
- Click Agents.
- Click Edit Agent on the relevant agent.
- Click Memory.
- Click the Enable Memory toggle to turn memory on.
- Under Memory Scope, choose how this agent saves memories:
- Global & Per User: The agent can create shared memories for everyone and personal memories for each person.
- Global Only: The agent creates memories that are shared across everyone who chats with it.
- Per User Only: The agent creates memories that are specific to each person.
- In Memory Instructions, enter guidance that explains when to save memories and what to include.
- After your agent has a few conversations, review Saved Memories to see what the agent has stored. Click Refresh to load new memories.
- Click Save.
Connecting to messaging channels
Connect your agent to outside messaging apps so people can chat with it without opening your app. Each connected channel has the same capabilities as your in-app agent, and you set up and connect each one separately.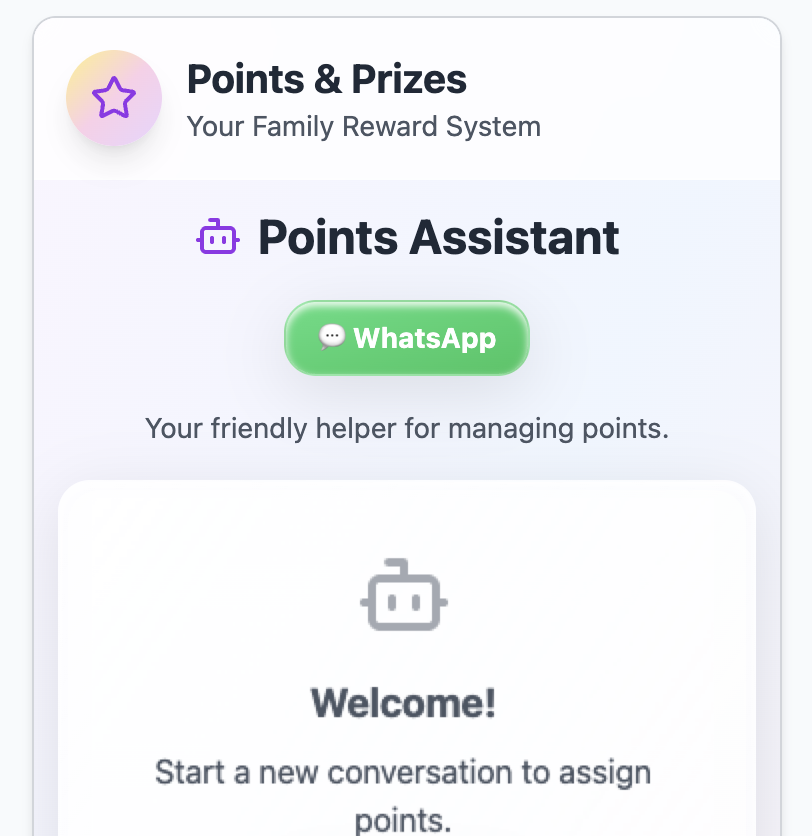
Connecting your agent to WhatsApp
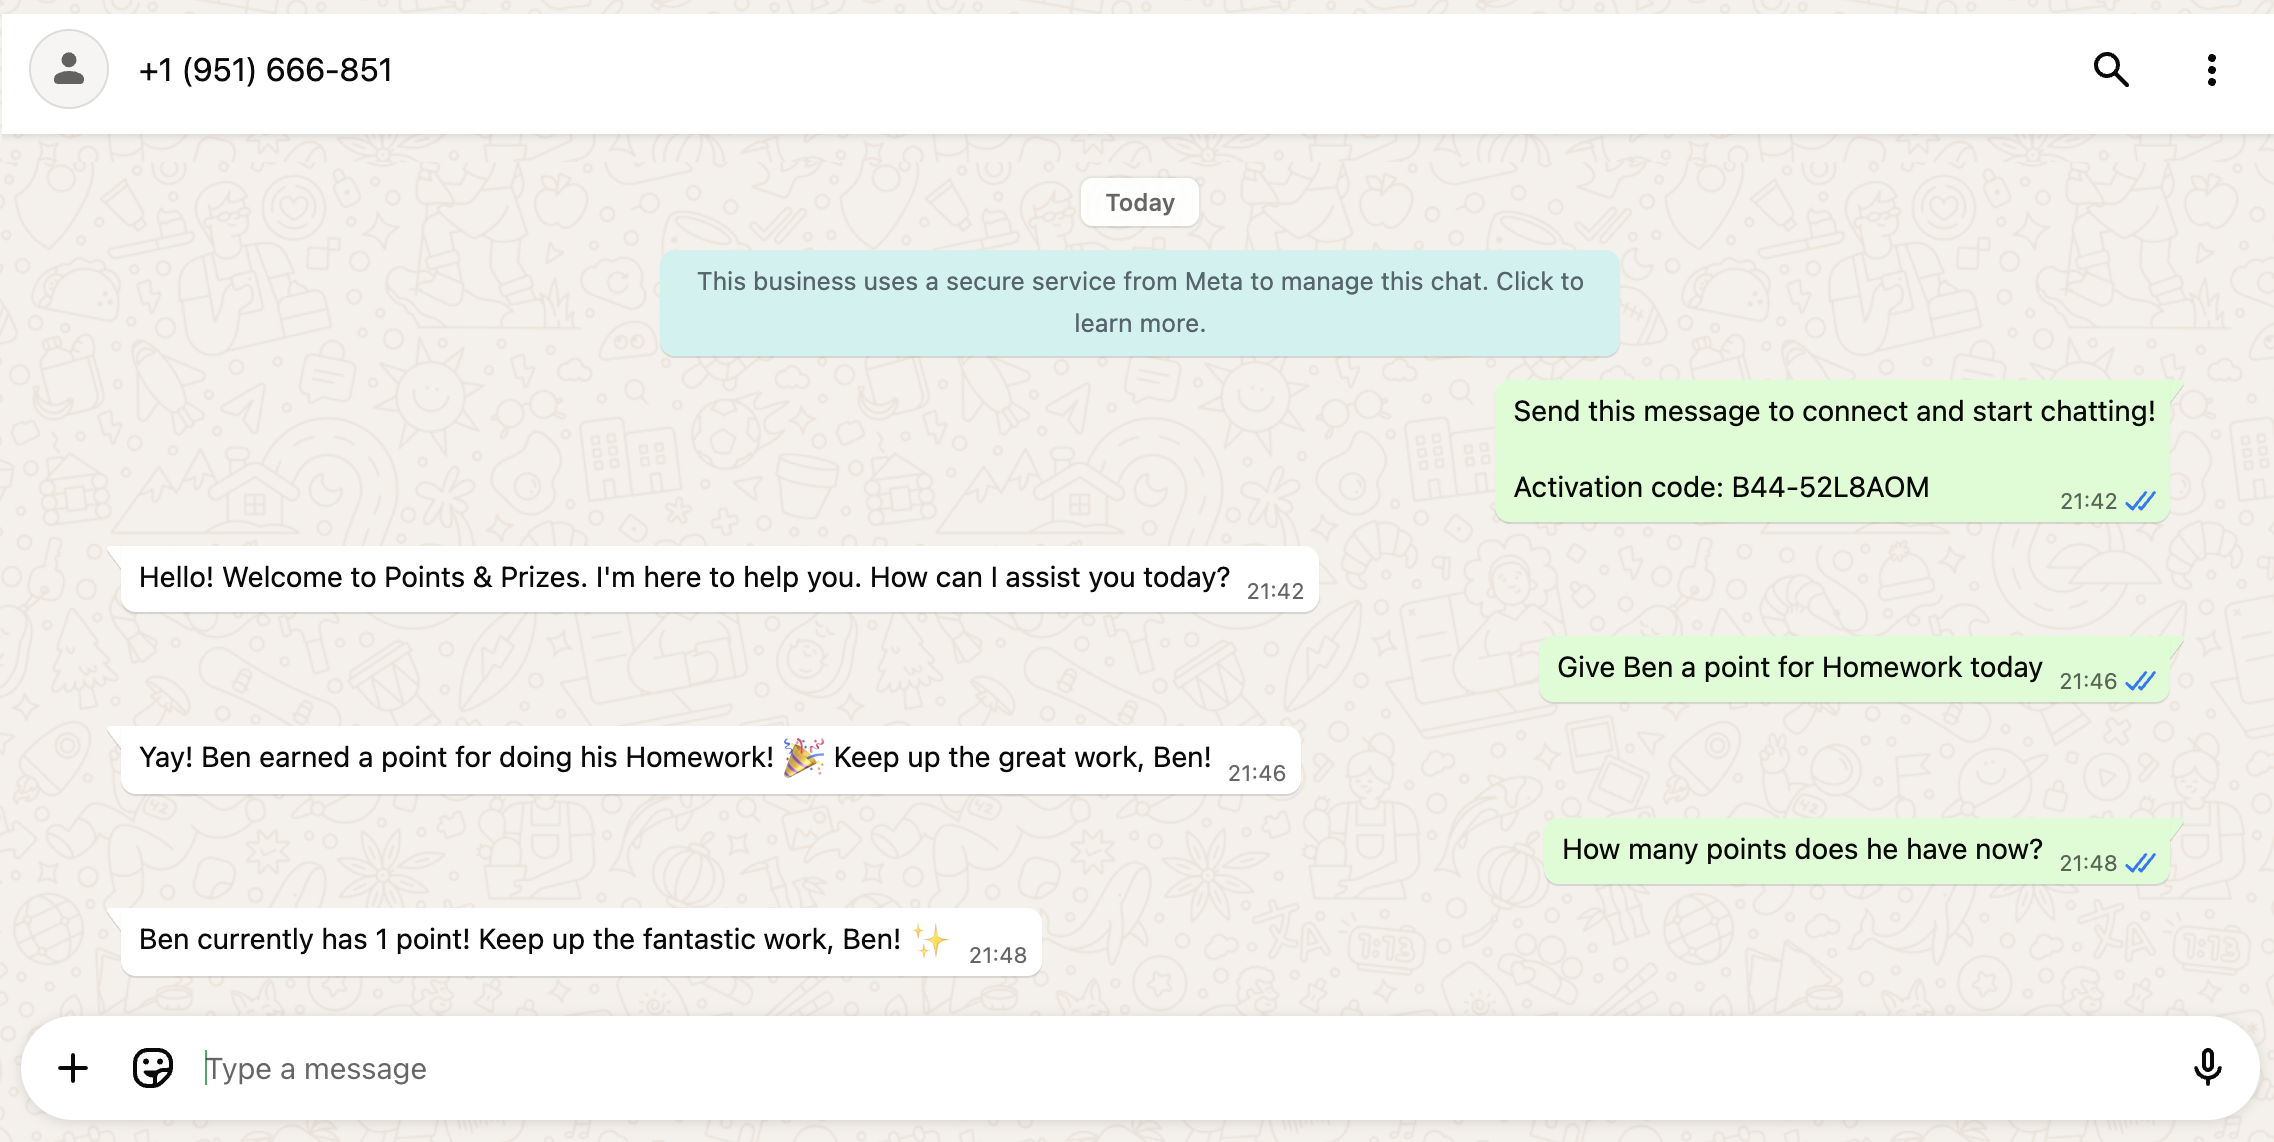
Using your agent in WhatsApp
Information about using WhatsApp with your agent
- This feature is available for free on all plans.
- A total of 3 in-app agents can be connected to WhatsApp across all your apps. This limit is separate from Superagent WhatsApp connections, which have their own pool. If you try to connect more than 3, you’ll be prompted to disconnect one before continuing.
- Each agent is assigned its own WhatsApp number.
- WhatsApp agents use integration credits only. No message credits are charged. Each message sent or received uses 1 integration credit for the WhatsApp relay, plus additional integration credits for agent actions such as LLM calls, image generation, or sending emails.
- Your app visitors don’t need to install anything to use WhatsApp agents. They simply tap the WhatsApp button in your app to start a chat. People must send the first message, to help prevent spam and keep them safe. Once the conversation begins, the agent can reply just like it does inside your app.
- WhatsApp conversations support images and voice messages.
- Your agent also reads shared locations and contacts. A location comes through with its coordinates, place name and address, and a contact as a name and phone number, with nothing else from the contact card.
- Your agent can tell that someone sent a sticker, but not what the sticker shows.
- When your agent needs approval to install a skill, it asks right in your WhatsApp chat with it. Reply Yes to install or No to cancel. Other actions that need your approval are handled from the Base44 agent dashboard instead.
- If your app is public, people need to log in to your app before they can use the WhatsApp agent. This makes sure the agent can identify who it is chatting with and respond based on their data. To let people chat without logging in, turn on Allow anonymous access in the agent’s Guidelines tab. Anonymous users can’t access per-user private data.
- Go to Dashboard in your app editor.
- Click Agents.
- Click Edit Agent on the relevant agent.
- Click WhatsApp.
- Click Send to Chat under Add WhatsApp to Your App to add a WhatsApp button to your app.
- Customize the WhatsApp welcome message.
- Click Save.
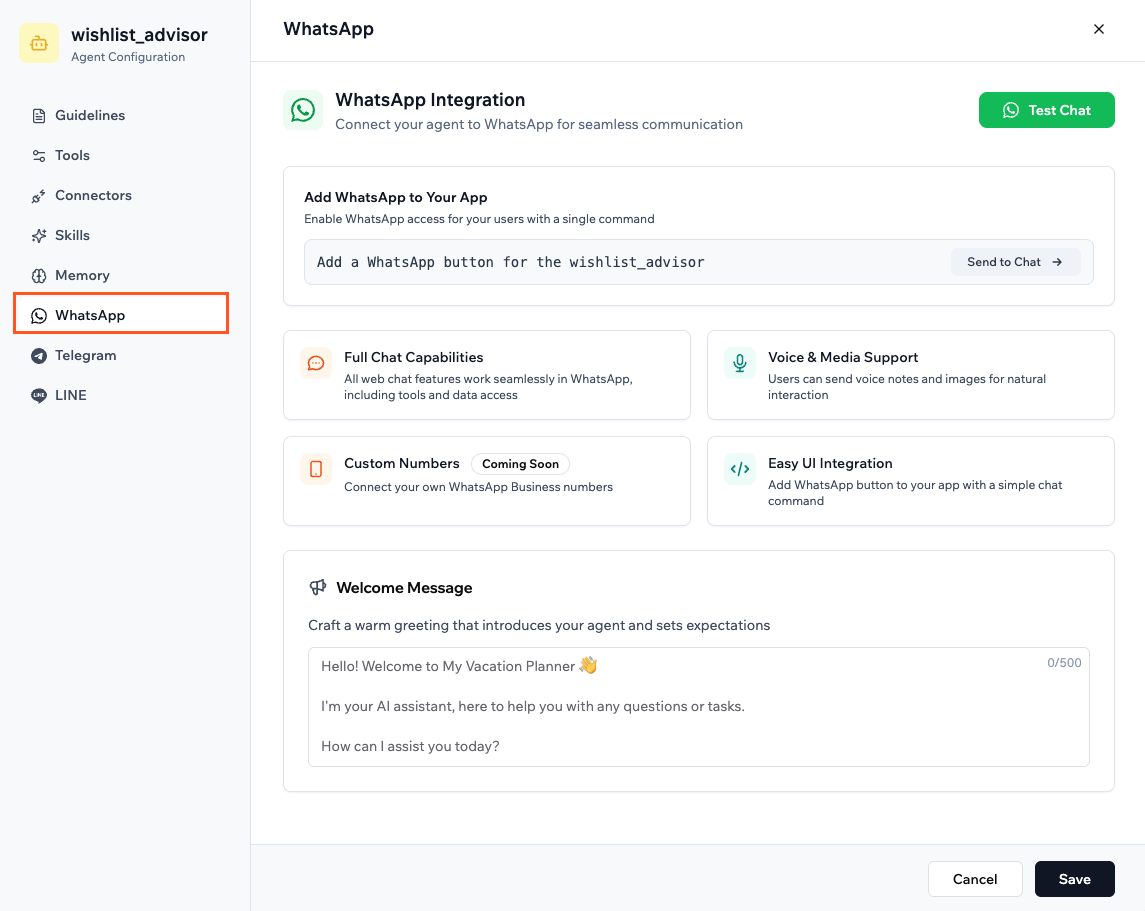
Connecting your app agent to WhatsApp
Telegram
Connect your agent to Telegram so people can message it directly from Telegram, without opening your app. A Telegram-connected agent has the same capabilities as your in-app agent. It can create, read, update, or delete records, trigger backend functions, and manage your app’s data.Information about using Telegram with your agent
- All web chat features work seamlessly in Telegram, including tools and data access.
- People can send voice notes and images for natural interaction.
- Your agent also reads shared locations, stickers and contacts. A pin or named place comes through with its coordinates and address, a sticker as the emoji it stands for, and a contact as a name and phone number, with nothing else from the contact card.
- A live location gives your agent one snapshot from the moment it was shared, not continuous updates.
- Your Telegram bot is created and connected instantly with no manual configuration needed.
- To start a conversation, users open your bot in Telegram and send
/start. - You can add a Telegram button to your app so users can open the bot directly from your app.
- Go to Dashboard in your app editor.
- Click Agents.
- Click Edit Agent on the relevant agent.
- Click Telegram.
- Click Connect Telegram Bot.
- Follow the prompts in Telegram to create and connect your bot.
- Click Send to Chat under Add Telegram to Your App to add a Telegram button to your app.
- Customize the Telegram welcome message.
- Click Save.
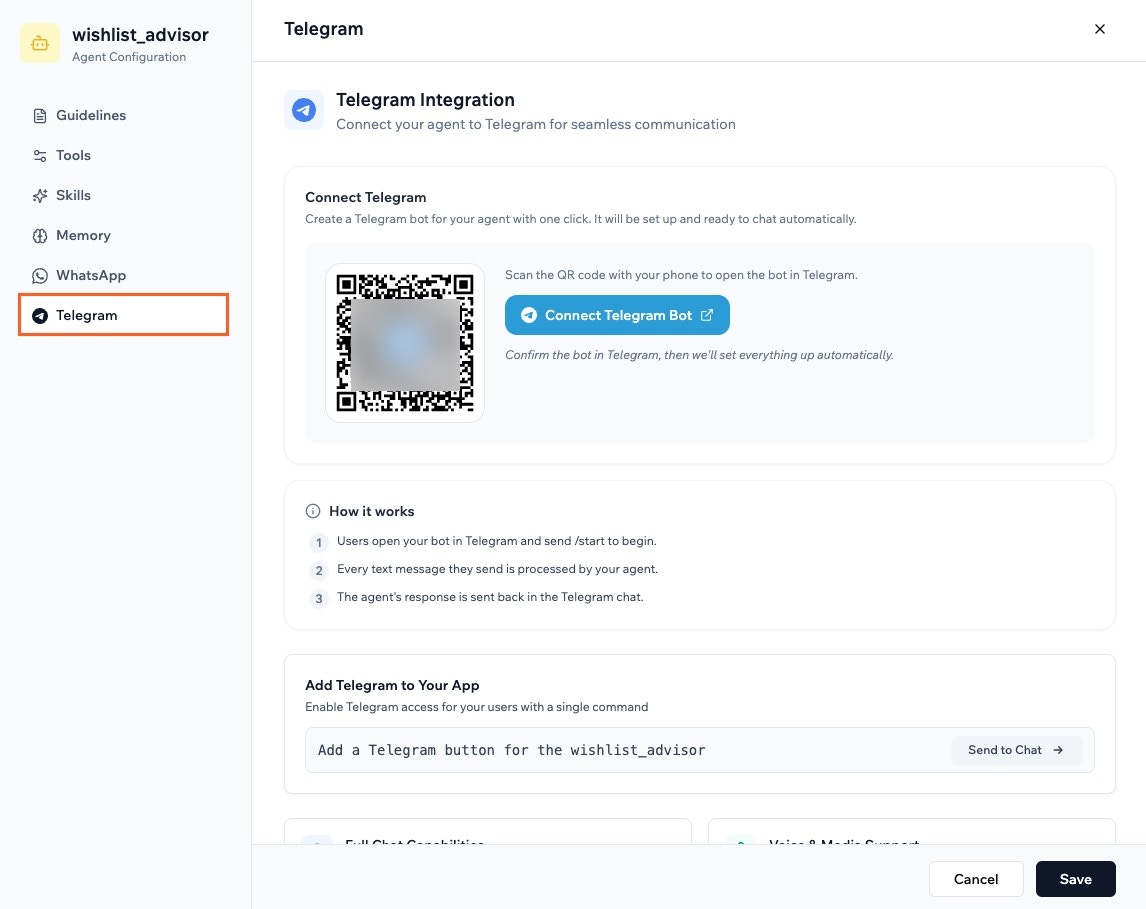
Connecting your agent to Telegram
LINE
Connect your agent to LINE so people can message it directly from the LINE app, without opening your app. A LINE-connected agent has the same capabilities as your in-app agent. It can create, read, update, or delete records, trigger backend functions, and manage your app’s data.- LINE is only available in Japan.
- LINE replies are plain text only. Avoid using markdown or HTML in your welcome message or guidelines.
- Go to Dashboard in your app editor.
- Click Agents.
- Click Edit Agent on the relevant agent.
- Click LINE.
- Scan the QR code or copy the activation code, open LINE on your phone, add the Base44 bot, and send the activation code to connect.
- Click Send to Chat under Add LINE to Your App to add a LINE button to your app.
- Customize the LINE welcome message.
- Click Save.
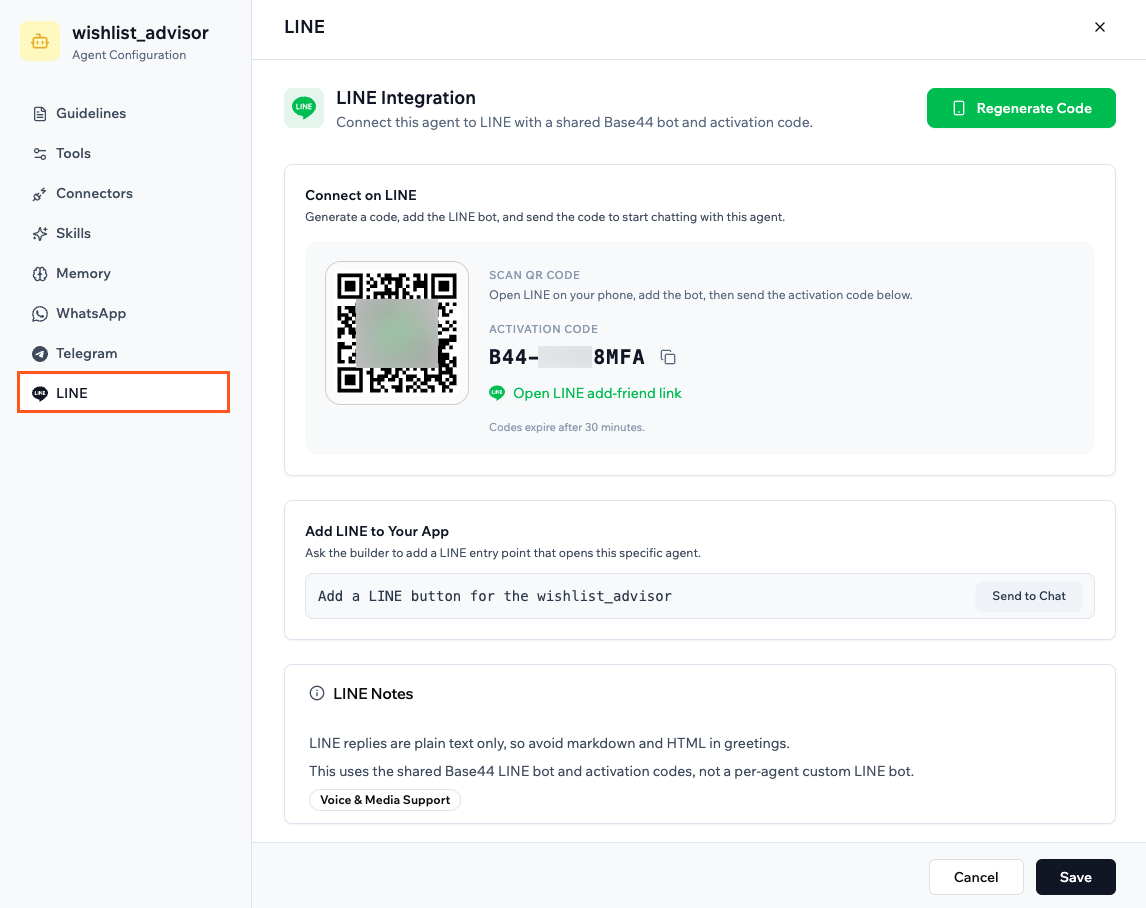
Connecting your agent to LINE
Chatting with your agent in a group
Your WhatsApp and Telegram agents can work in group chats, so a whole team or community can talk to the same agent in one place. Each channel connects a bit differently, and LINE groups aren’t supported.- By default, the agent replies to every message. You can switch it to reply only when someone mentions it or replies to one of its messages. This applies to both WhatsApp and Telegram groups.
- The agent has the same capabilities in a group as it does inside your app.
- It recognizes each member as their own user, and recognizes you as the group’s owner.
- All credit usage in the group is billed to you, the app owner.
WhatsApp groups
On WhatsApp, your agent creates the group for you and shares an invite link that others use to join. You do this by chatting with the agent, not from the WhatsApp settings.- Each group can include up to 8 numbers, including the agent’s own number.
- Each agent can run up to 5 groups at a time.
- To change a group’s name, description, or reply mode later, message the agent from inside that WhatsApp group.
- Open your agent’s chat, either in your app editor or in a WhatsApp chat with the agent.
- Ask the agent to create a WhatsApp group and give it a name. You can also set a description and choose when the agent replies.
- The agent creates the group and sends you an invite link.
- Share the invite link so others can join.
Telegram groups
On Telegram, you add the agent to a group you already belong to and make it an admin. You set this up from inside Telegram itself. To add your agent to a Telegram group:- Open your Telegram chat with the agent’s bot.
- Choose the option to add the agent to an existing group, then select a group you already belong to. Telegram only shows groups where you can add or edit admins.
- Add the bot to the group as an admin.
- In the group, send
/startto finish connecting.
Viewing who uses your agents
The Users tab in your Agents dashboard shows every app user who has chatted with one of your agents. For each user you can see their role, how many agents they have used, their total conversations, and credits used. You can sort the list by agents, conversations, or credits.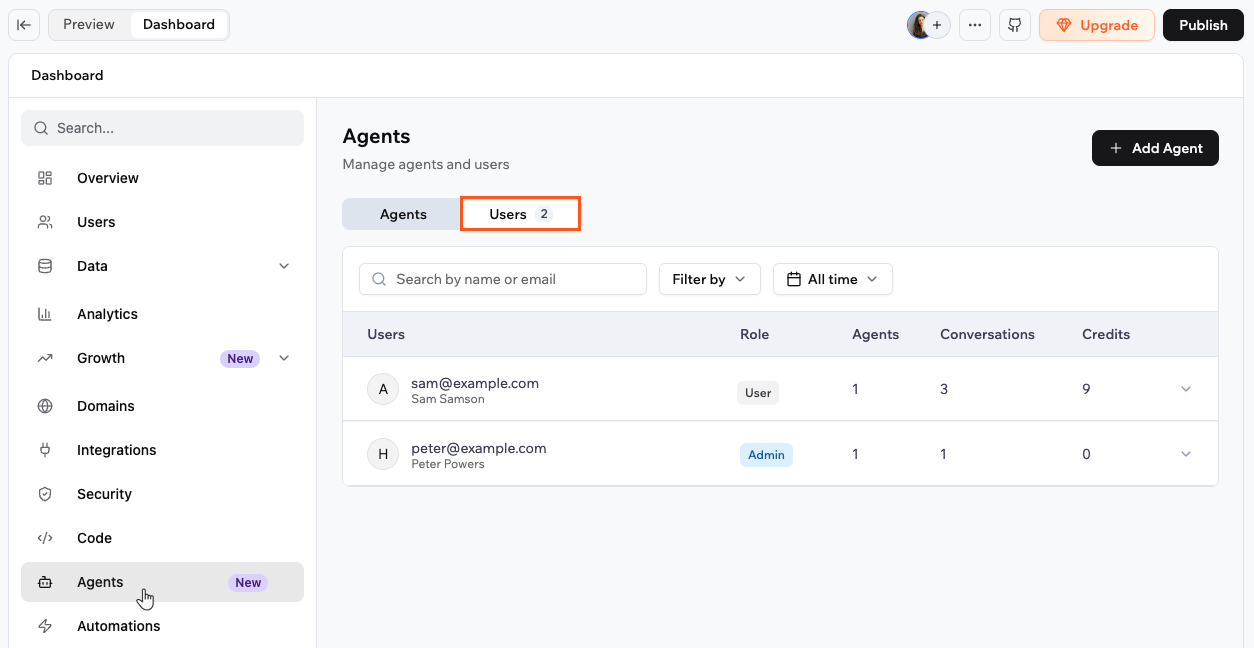
Viewing agent users in your app dashboard
- Go to Dashboard in your app editor.
- Click Agents.
- Click the Users tab.
- Click a user row to see which agents they have chatted with and how many conversations and credits each agent used.
- Click View next to an agent to see that user’s full conversation list for it.
- Click a conversation to read the full transcript, including messages, tool calls, and credits used.
FAQs
Click a question below to learn more about AI agents.Why do I see a "Failed to send message" or 404 error when messaging an agent?
Why do I see a "Failed to send message" or 404 error when messaging an agent?
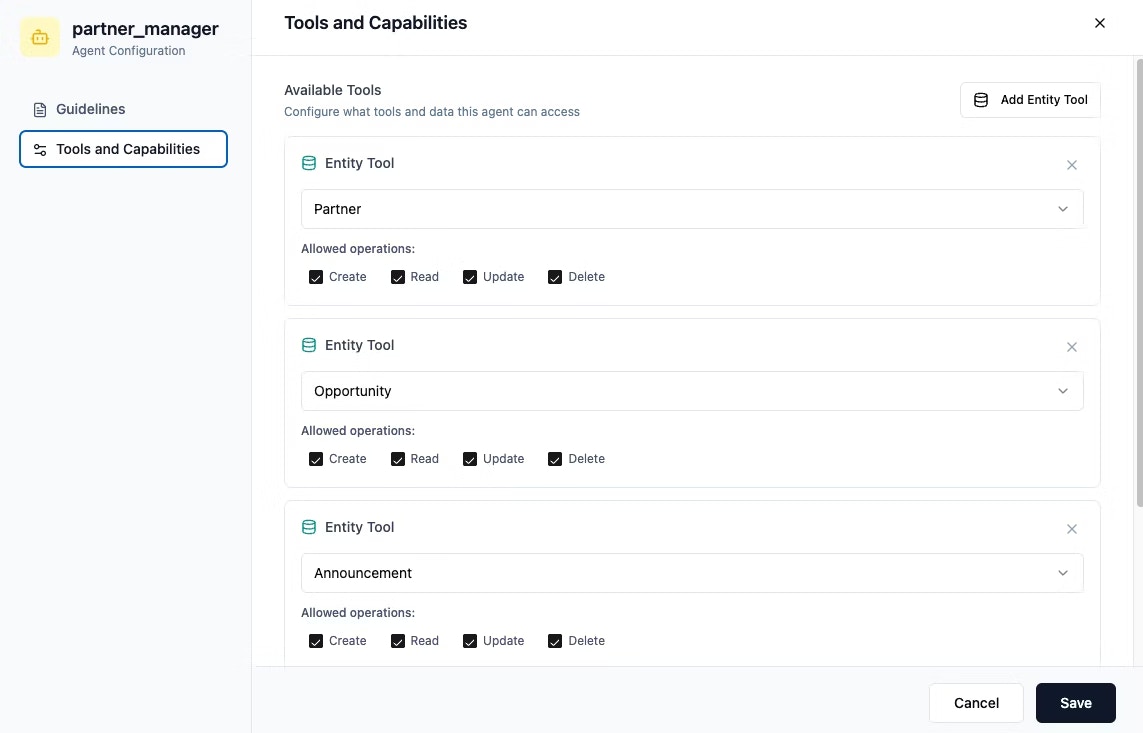
- Open your agent’s settings.
- Click the Tools and Capabilities tab.
- Either update or remove the empty entity.
-
Click Save.
Can I use agents on the free plan?
Can I use agents on the free plan?
Can I enable agents for all apps in my account?
Can I enable agents for all apps in my account?
- Click your profile icon at the top right of your workspace.
- Click Settings.
- Click Account settings.
- Turn on the Enable agents for new apps by default toggle in the Default Agents section.
What are the benefits of using agents?
What are the benefits of using agents?
- Automate repetitive tasks.
- Get informed, real-time answers.
- Keep your workflow inside one app.
- Pick the right tools automatically.
Where can I find my conversation history with an agent?
Where can I find my conversation history with an agent?
How does the AI model I choose affect credits and behavior?
How does the AI model I choose affect credits and behavior?
- Automatic picks a fast, general-purpose model for each message and starts at about 3 credits, rising with the length of the answer.
- GPT-5 Mini and Gemini 3 Flash cost around the same as Automatic.
- Gemini 3.1 Pro and Claude Sonnet 5 cost several times Automatic.
- GPT-5.6 Sol and the Claude Opus models are built for the hardest reasoning and cost roughly 10 times Automatic.
How many skills can I add to an agent?
How many skills can I add to an agent?
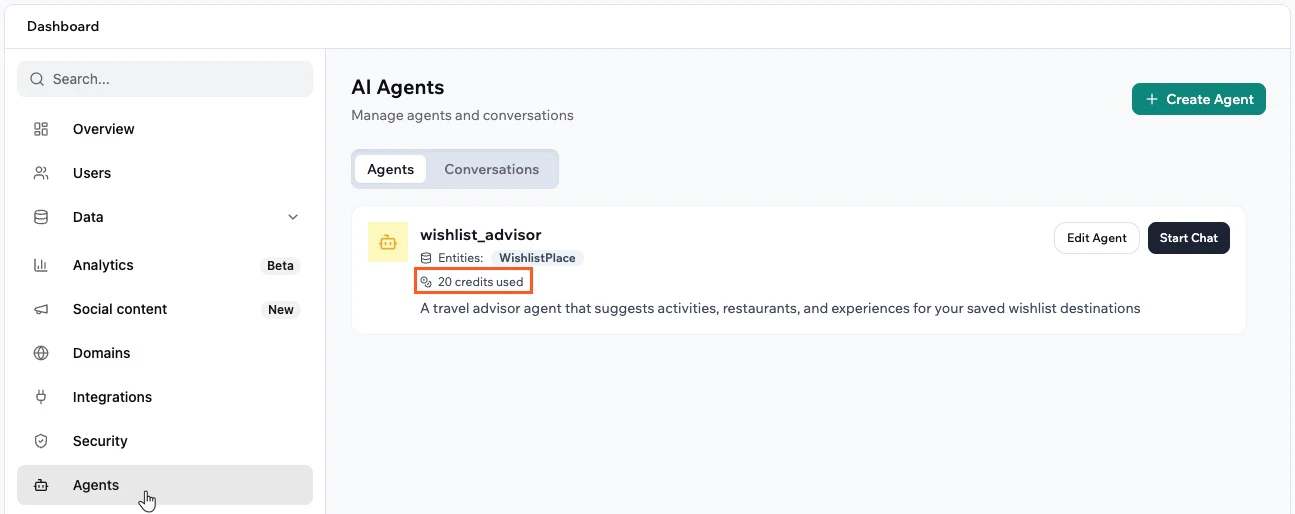
How do I see how many credits my agent has used?
How do I see how many credits my agent has used?
What is the difference between app skills and workspace skills?
What is the difference between app skills and workspace skills?
Can I trigger an automation when someone starts a conversation with my agent?
Can I trigger an automation when someone starts a conversation with my agent?