

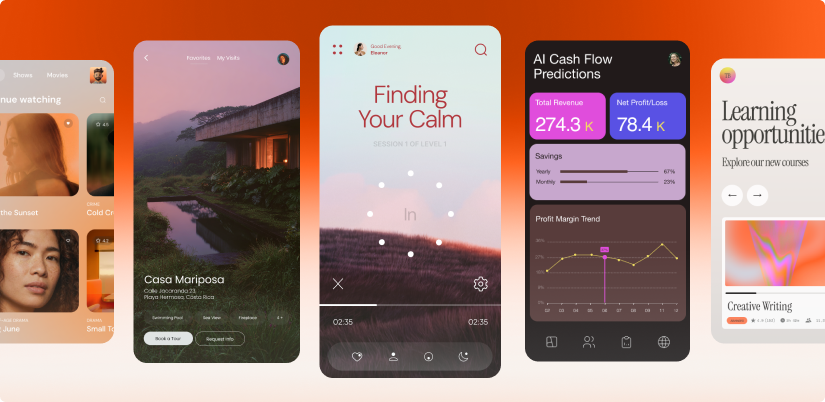
Apps built with Base44
Before you begin
- A published Base44 app with a stable URL
- An Apple Developer Program account with access to App Store Connect and API keys
- A Google Play Console developer account
- Permission to create and manage apps in both accounts (if you are working in a team)
- A logo that meets Apple and Google icon requirements, or a clear prompt to generate one with AI
- A privacy policy and terms of use page that explain how your app handles data and device permissions, and that are reachable from your main app pages
Selling in your app
If you plan to sell anything in your app, check what Apple and Google allow before you start the steps below. Selling the wrong kind of content is a common reason apps are rejected. Your mobile app can take payments for physical goods and real-world services with any payment provider, such as Base44 Payments, Stripe or a provider you connect through its API. Digital content is different, because Apple and Google require their own in-app purchase systems for it, and Base44 apps don’t support Apple In-App Purchase or Google Play Billing yet. Counts as digital, so it can’t be sold in your mobile app:- Premium or subscription tiers
- Unlocking features or content inside your app
- Courses, ebooks, videos or other content people use in your app
- Virtual currency, credits or extra AI generations
- A physical product you ship
- Booking a real-world service, such as an appointment or a table
- A service delivered outside your app, such as coaching
- Donations
Follow the App Store rules
Follow the App Store rules
- Reader apps: An app that mainly offers books, magazines, news, music or video can let people sign in and use content they already bought elsewhere.
- Linking to your website: Apple allows a link that sends people to buy on your website only for apps on the US App Store. In every other country, Apple rejects a button or link that points people to pay outside the app.
- Remove paid digital content from your iOS app, and keep selling it on the web version of your app. You can ask the AI chat to hide paid content, prices and purchase buttons only when your app runs as a mobile app.
- Release your iOS app only on the US App Store and link to your website for the purchase. Apple can still reject the app during review.
- Wait until Base44 supports In-App Purchase before you sell digital content in your iOS app.
Follow the Google Play rules
Follow the Google Play rules
Step 1 | Create your developer accounts
Before you can generate store files and submit your app, you need active Apple and Google developer accounts. These accounts let you own your listings, manage releases, and handle reviews directly in each store.Apple Developer account
Use your Apple Developer account to submit your iOS app in App Store Connect and manage releases. Make sure you have an Apple ID you can use for your business. To create your Apple Developer account:- Go to the Apple Developer enrollment page.
- Sign in with your Apple ID and start the enrollment process.
- Choose the account type that fits your situation:
- Individual: Select this if you are publishing as yourself.
- Organization: Select this if you are publishing on behalf of a company. Apple may ask for your legal business name and D-U-N-S number.
- Review and accept Apple program terms.
- Complete the payment to activate your Apple Developer Program membership.
- After your enrollment is approved, sign in to App Store Connect with the same Apple ID to manage your apps.
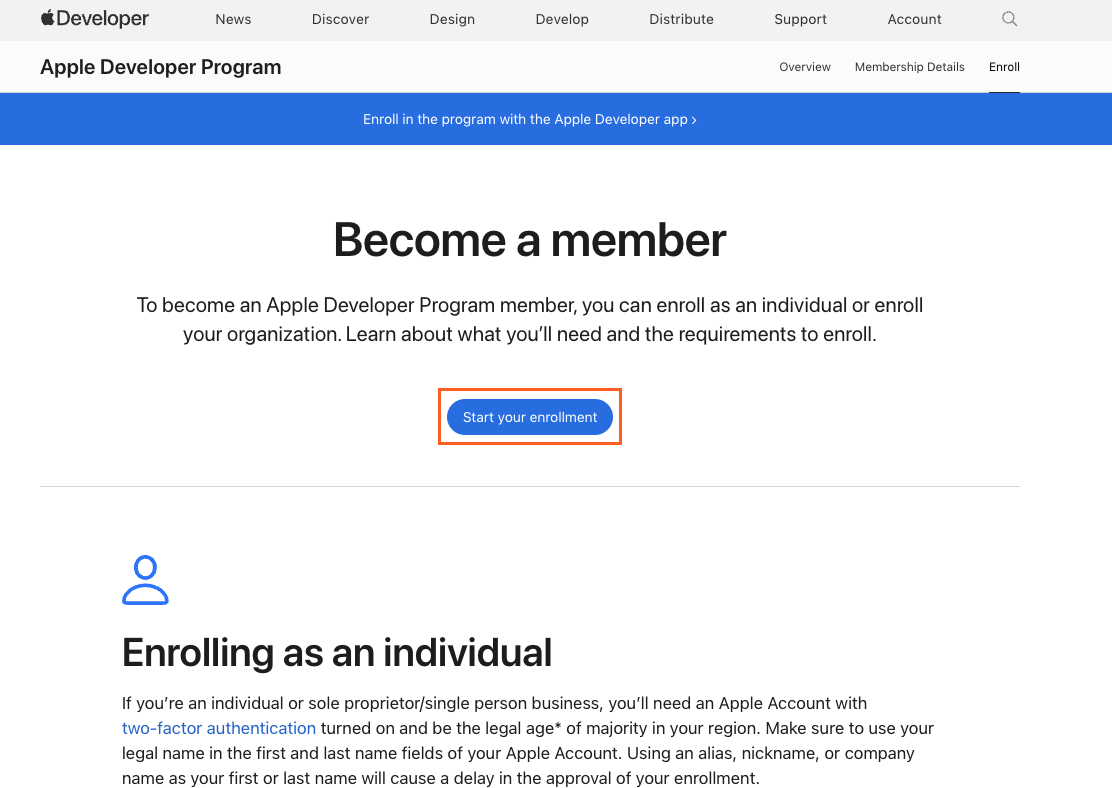
Creating an Apple Developer account
Google Play developer account
Use your Google Play developer account to submit your Android app in Google Play Console and manage releases. Make sure you have a Google account you can use for your business. To create your Google Play developer account:- Go to Google Play Console in your browser.
- Sign in with your Google account and start the registration flow.
- Enter your developer profile details, such as your developer name, contact email, and website if you have one.
- Review and accept Google Play terms and policies.
- Complete the registration payment to create your Google Play developer account.
- After setup finishes, sign in to Google Play Console and confirm that you can create a new app.
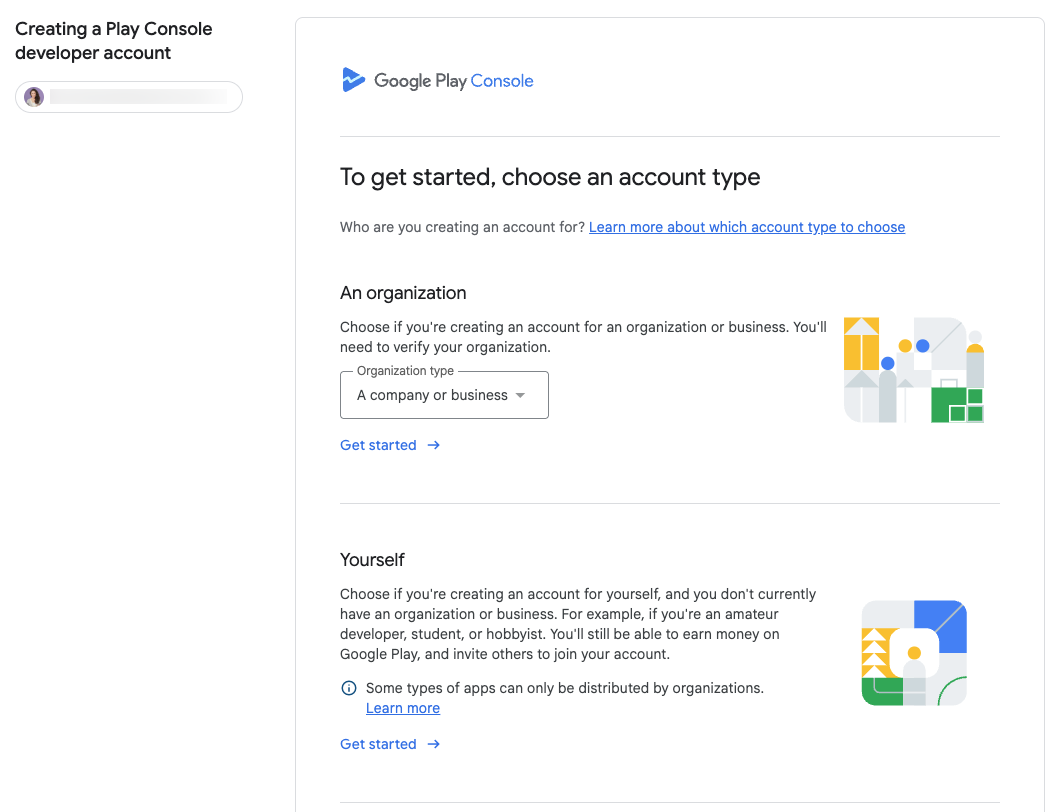
Creating a Google Play developer account
Step 2 | Scan your app for issues
From the app editor in Base44, scan your app against the latest App Store and Google Play guidelines. To run a scan:- Go to your app editor.
- Click Publish at the top-right.
- Click the Mobile app tab.
- Click Check Your App, then click Run App Scan and select what you want to scan your app against:
- App Store guidelines
- Google Play guidelines
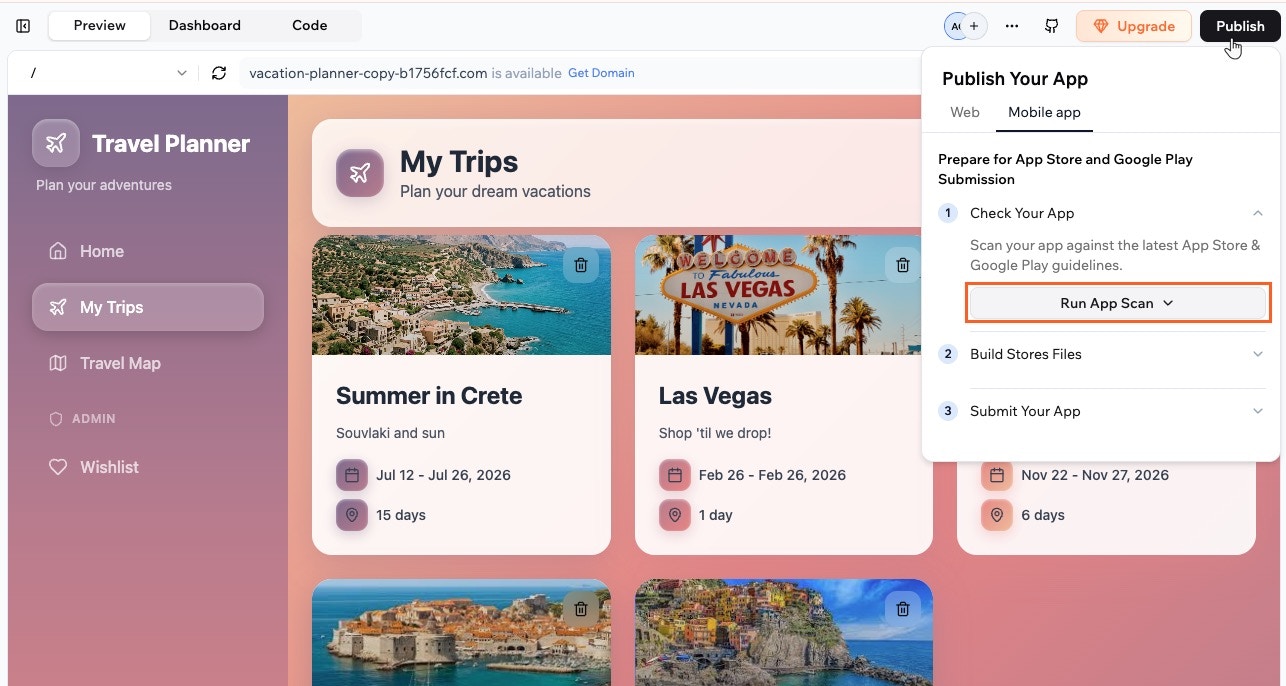
Running an app scan from the Mobile app tab
Step 3 | Use AI to fix issues
After the scan finishes, use the results panel to see how ready your app is for the stores and let the AI chat suggest fixes. You can review each issue, apply recommended changes, and rerun the scan until you are happy with your score.- Look at your Readiness Score and the number of passed, partial, and failed checks in the scan results panel.
- Choose how you want to fix the issues:
- Apply with AI: Open the AI chat with a tailored fix prompt based on your scan results.
- Copy Fix Prompt: Copy the fix prompt so you can paste it into the AI chat yourself and edit it first.
- Let the AI chat apply the suggested changes.
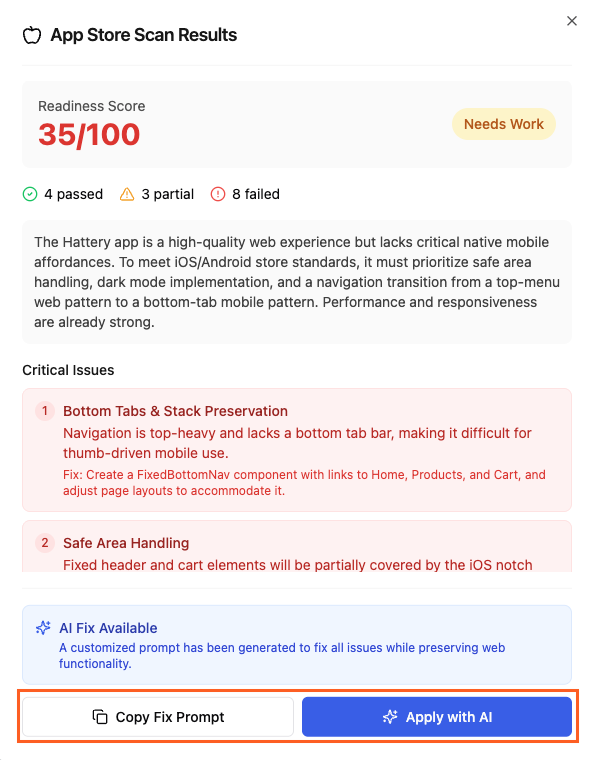
Using AI to fix issues for app submission to stores
Step 4 | Generate your app files
Generate the files for each store directly from the Mobile app tab so you do not have to leave the app editor. Use your scan-ready app to create the files you need to submit in the App Store and Google Play.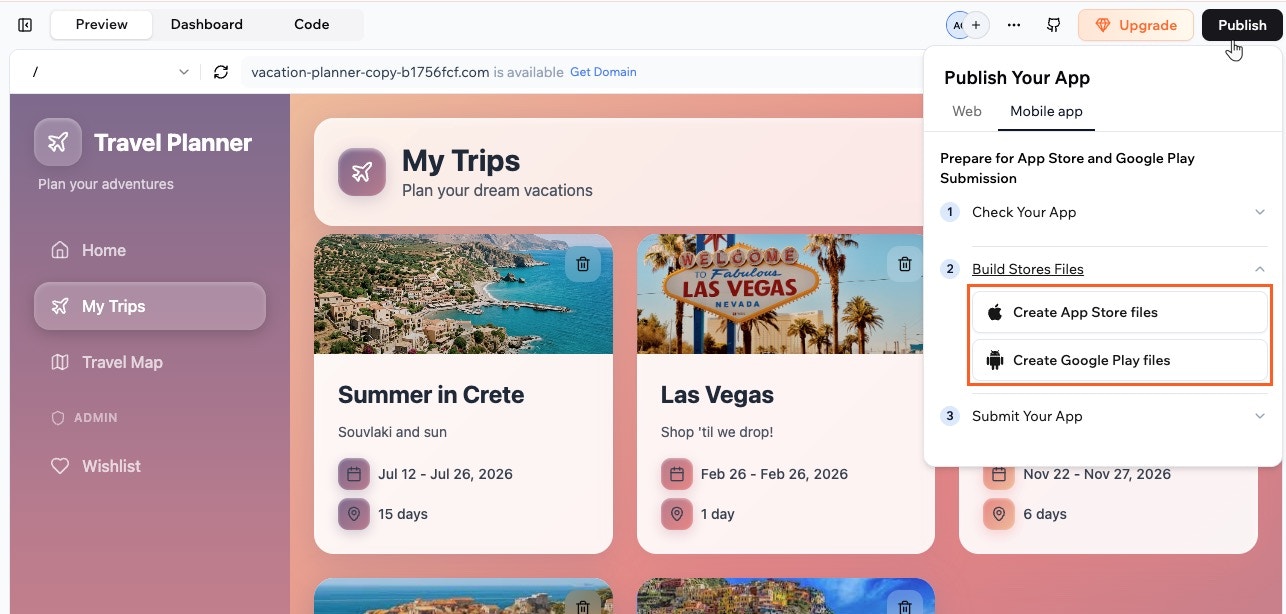
Creating App Store and Google Play files from the Mobile app tab
Creating App Store files
When your app is ready for iOS, use your Apple Developer credentials in the Mobile app tab to generate an App Store ready IPA bundle. When generation completes, download the file from Base44, keep it in a secure location, and use it when you upload your app to App Store Connect. To create App Store files:- Go to your app editor.
- Click Publish at the top-right.
- Click the Mobile app tab.
- Click Build Stores Files, then Create App Store files.
-
Add your Issuer ID, Key ID, Team ID, and upload the
.p8API key file from App Store Connect, then click Continue.Note: To send push notifications from your app, turn on Add push notifications in this window before you continue. See adding push notifications.Where do I find my IDs and API key file?
You need to generate your API key and then add the details to Base44. To generate your key:- Go to App Store Connect and sign in with your Apple Developer account.
- Click Users and Access.
- Click Integrations .
- Click + to create a new API key.
- Enter a name for the key and choose the appropriate access role (for example, Admin or App Manager).
- Click Generate to create the key. To find your Apple IDs and download the API key file (.p8):
- Go to App Store Connect and sign in with your Apple Developer account.
- Click Users and Access.
- Click Integrations .
- Find your Issuer ID and Key ID.
- Click Download to save the
.p8file to your computer and store it in a secure location. To find your Team ID: - Go to your Apple Developer account.
- Look for the Team ID value listed under Membership details.
- Review your app logo. Upload a new logo from your computer or generate one with AI, then click Generate Files.
- When your files are ready, click Download.
Creating Google Play files
When your app is ready for Android, use the Mobile app tab to generate a Google Play ready AAB bundle. After generation, download the file from Base44, keep it in a secure location, and upload it in your Google Play Console release. To create Google Play files:- Go to your app editor.
- Click Publish at the top-right.
- Click the Mobile app tab.
- Click Build Stores Files, then Create Google Play files.
-
Follow the on-screen steps to review your app logo, upload a new logo from your computer, or generate a new one with AI.
Notes:
- Changing the logo in the Generate Google Play files window also updates the logo you currently use for your app. Make sure you are happy with the logo before you generate the files.
- To send push notifications from your app, turn on Add push notifications in this window before you generate your files. See adding push notifications.
- Click Generate Files to create the AAB bundle.
- When your files are ready, click Download.
Adding push notifications
Push notifications appear on someone’s phone even when your app is closed. You turn them on in the same window where you generate your store files, then upload credentials from your Apple Developer account or your own Firebase project. iOS and Android are separate, so do both to reach everyone using your app.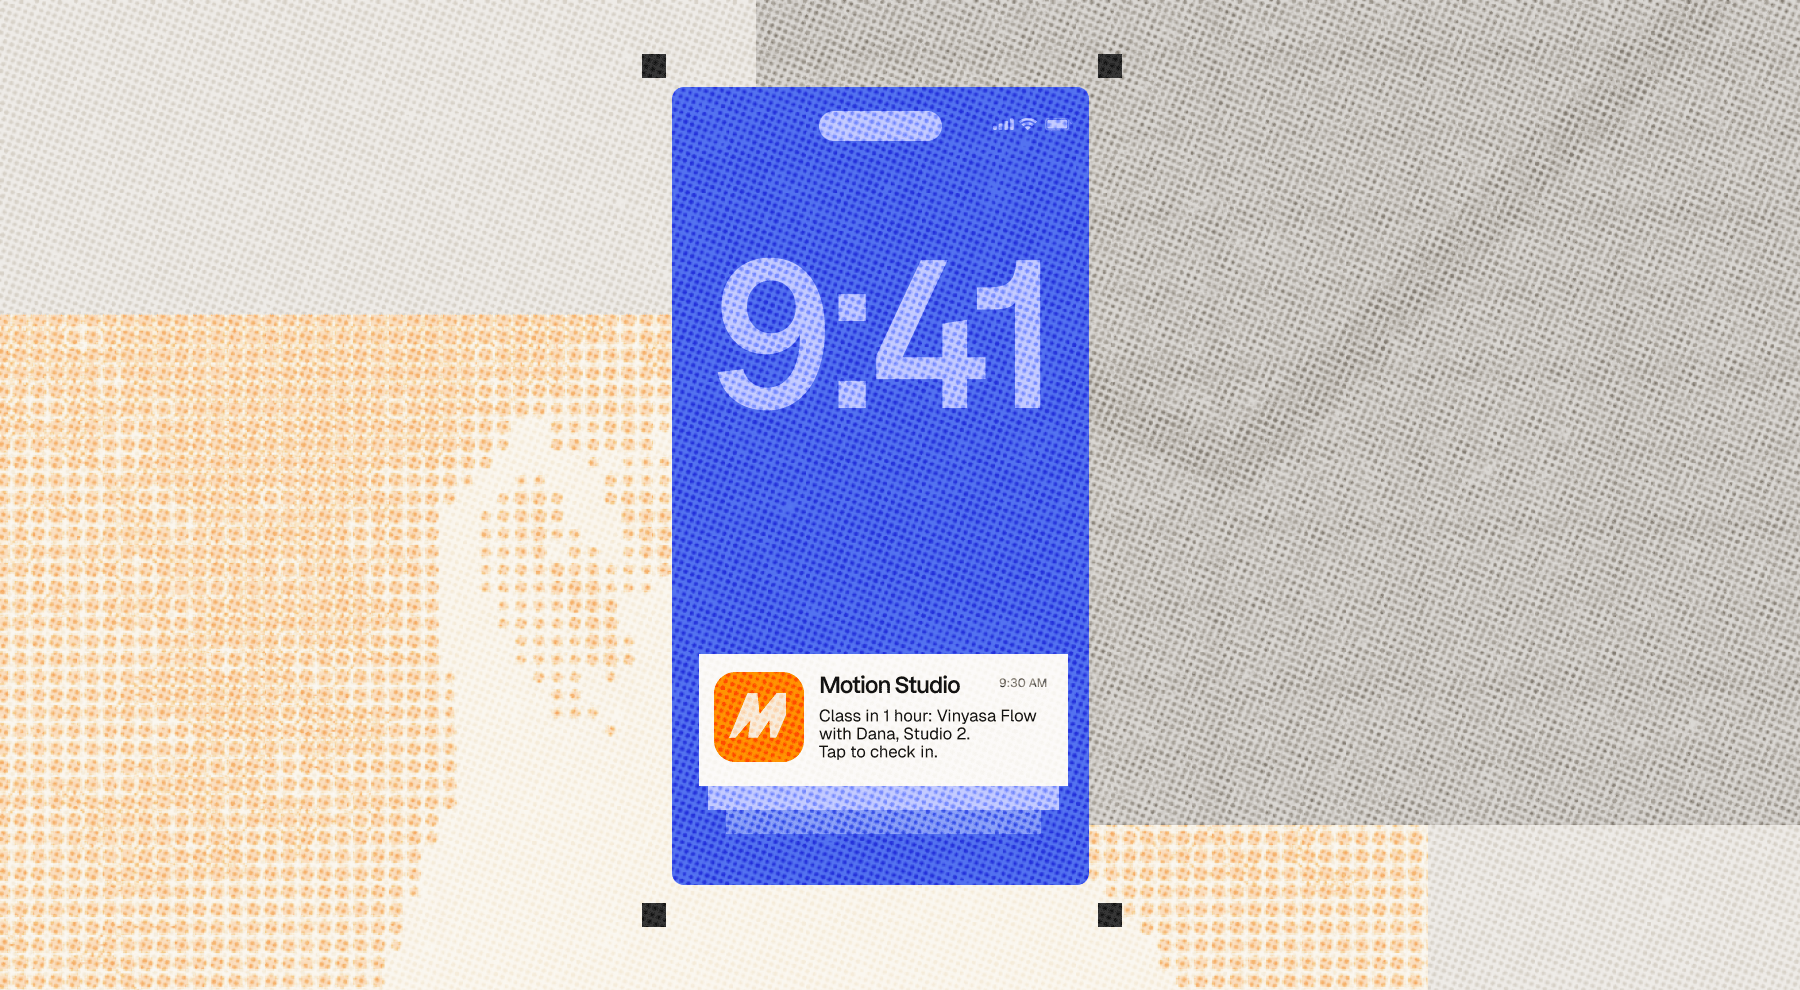
A push notification
Setting up push notifications for iOS
Setting up push notifications for iOS
.p8 file and a 10-character Key ID.This is a separate key from the App Store Connect API key you add earlier in the same window. Each has its own Key ID, and both files end in .p8, so keep track of which is which as you download them.To add your iOS push credentials:- Start creating your App Store files and fill in your App Store Connect credentials.
- Turn on Add push notifications.
- Click How to create an APNs auth key for the Apple steps, if you still need to create your key.
- Upload your key under Upload the APNs auth key (.p8).
- Check the APNs Key ID field. Base44 fills it in when you upload your key. If it stays empty, paste the Key ID you copied.
- Click Continue, then finish the flow to generate and download your files.
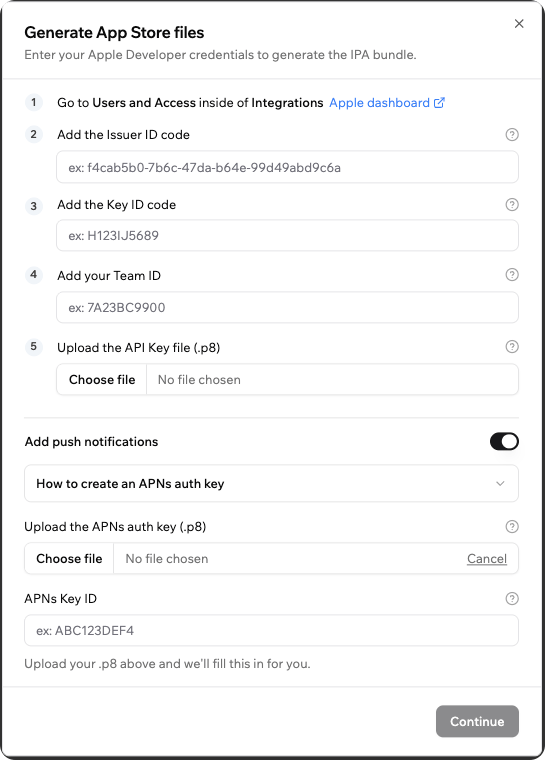
Adding your APNs auth key in the Generate App Store files window
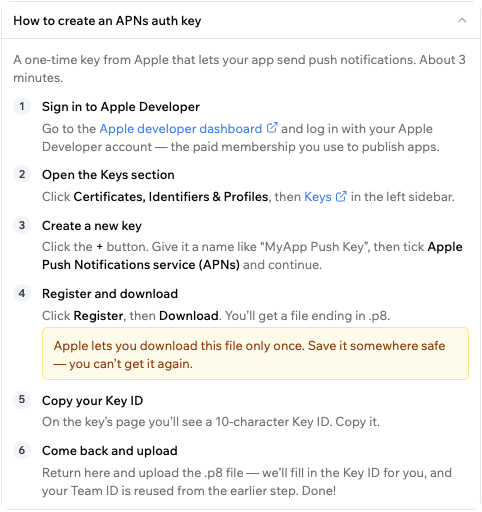
The built-in guide for creating an APNs auth key
Setting up push notifications for Android
Setting up push notifications for Android
google-services.json file is built into your app so it can receive notifications, and your service account key lets Base44 send them. Create your project in the Firebase console, register your Android app against the package name Base44 shows you, then download both files from that same project.To add your Android push credentials:- Start creating your Google Play files and review your app logo.
- Turn on Add push notifications.
- Click How to set up Firebase & download your files for the Firebase steps, if you still need to create your project.
- Upload your
google-services.jsonfile under Upload google-services.json. - Upload your service account key under Upload the service account key (.json).
- Click Generate Files, then download your files when they are ready.
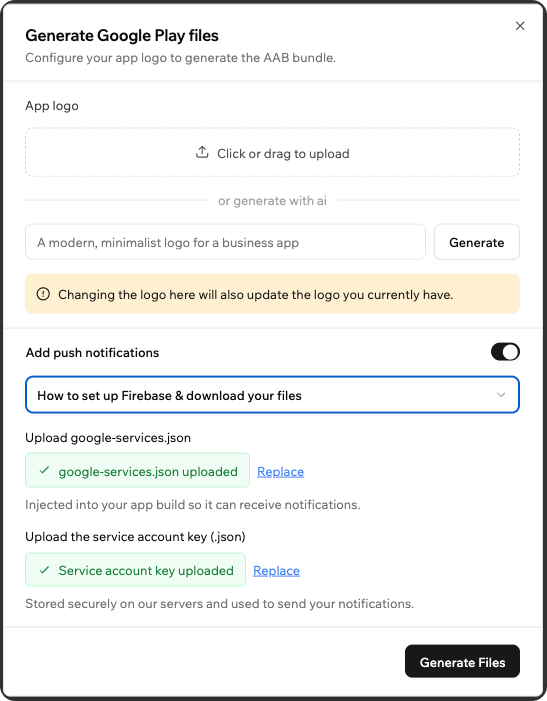
Adding your Firebase files in the Generate Google Play files window
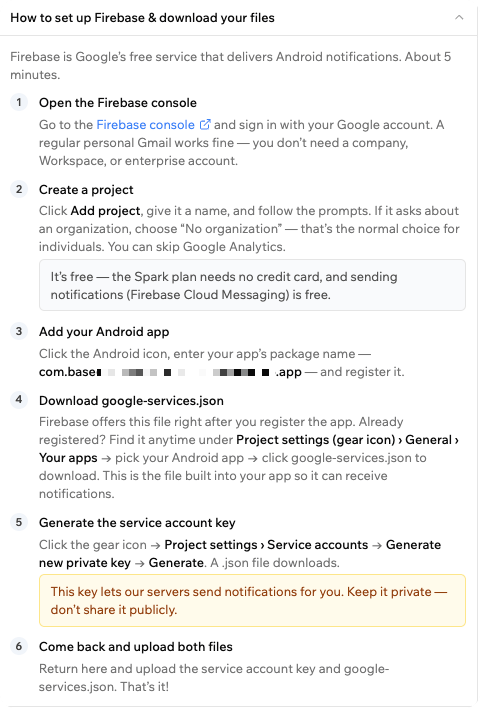
The built-in guide for setting up Firebase
Sending your notifications
You send notifications from your app’s backend with the SendPushNotification integration. Each one carries a title, a message, an optional action button label, and an optional link to a specific page in your app. The first time someone opens your app, they choose whether to allow notifications. You can send to everyone who accepts. Learn more about sending push notifications.Adding Google Play SHA
If your app uses login with Google, add your Google Play signing fingerprints to Base44 so Google login works in the version people install from Google Play. What you add depends on how Google Play signs your app. To get your fingerprints from Google Play Console:- Go to Google Play Console and sign in with your developer account.
- Go to Test and release, then App integrity, then App signing.
- Check whether the page shows a quantum-ready badge:
- Badge: Download the certificates .zip file from Downloads.
- No badge: Copy the SHA-256 fingerprint under App signing key certificate.
- Go to your app editor.
- Click Publish at the top-right.
- Click the Mobile app tab.
- Click Build Stores Files, then in the Google Play files section, click the More actions icon .
- Click Add Google Play SHA.
- Choose your signing setup:
- Quantum-ready signing: Click Upload certificates .zip and choose the file you downloaded.
- Standard signing: Paste your fingerprint into the SHA-256 Fingerprint field.
- Click Save.
Adding a Google Snippet
When you register your package name in Google Play Console, Google may provide an ADI registration snippet to verify your package name ownership. If prompted, you need to add this snippet to your Base44 app. Google is rolling out this requirement gradually, so not all accounts are affected yet. To add your Google Snippet in Base44:- Go to your app editor.
- Click Publish at the top-right.
- Click the Mobile app tab.
- Click Build Stores Files, then in the Google Play files section, click the More actions icon .
- Click Add Google Snippet.
- Paste your ADI snippet into the Google Snippet field.
- Click Save & Build.
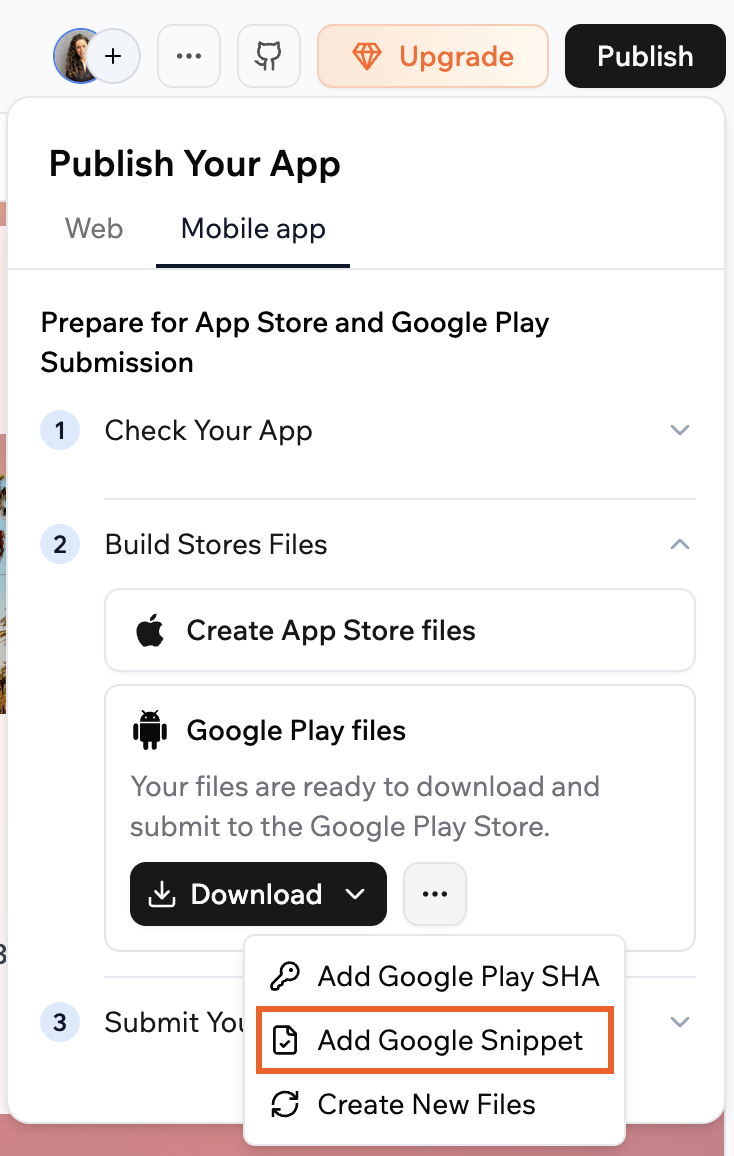
Adding a Google snippet
Step 5 | Submit your app
After you generate your App Store and Google Play files, complete submission in your Apple and Google dashboards. Base44 helps you get your app ready, but everything that happens after you submit in App Store Connect or Google Play Console is between you and the app stores. You are responsible for checking your submission status, responding to store emails, and applying any changes the stores request. Follow our step-by-step visual guide for submitting your app to Apple App Store and Google Play Store.Finding your bundle ID
When you create your app listing, App Store Connect asks for a bundle ID and Google Play Console asks for a package name. Base44 sets both for you, and they’re the same value:com.base[app-id].app, where [app-id] is your Base44 app ID.
You can find your app ID in the URL when you’re in your app editor. For example, if your editor URL contains 69e0c4bdd31bdu8fda51775g, your bundle ID and package name are com.base69e0c4bdd31bdu8fda51775g.app.
If Apple says the bundle ID isn’t available, the app probably already exists in your App Store Connect account. Add a new version to that listing instead of creating a new app.
After you create your App Store files, you can also copy your bundle ID from the Mobile app tab.
To copy your bundle ID:
- Go to your app editor.
- Click Publish at the top-right.
- Click the Mobile app tab.
- Click Build Stores Files, then in the App Store files section, click the More actions icon .
- Click Copy App Bundle ID.
Preparing listing assets
Each store asks for text and images for your listing page, separate from the files you generate in Base44.Prepare your store listing assets
- A short and long description for your app
- Screenshots of your app on common phone sizes, and tablet screenshots if you plan to support tablets. You can capture screenshots by opening your published app on a device or simulator, navigating through your main flows, and taking native device screenshots that you upload in each store.
- Your app icon and any required feature graphics that follow Apple and Google size and format guidelines
- A support URL and privacy policy URL from your Base44 app
Updating your app
Once your app is live in the stores, most changes reach your mobile app as soon as you publish them in Base44, because the app loads your live web app. You only need new app files and a store update when something built into the app itself changes, such as its name, icon or splash screen. The same applies when you add push notifications, or a feature that needs new device permissions.Creating new files
To send an update, create a new set of files in Base44 and upload them to the same listing in App Store Connect or Google Play Console. Each time you create new files, Base44 gives the build a higher build number automatically. To create new files for an update:- Go to your app editor.
- Click Publish at the top-right.
- Click the Mobile app tab.
- Click Build Stores Files, then click the More actions icon next to Download in the App Store files or Google Play files section.
- Click Create New Files.
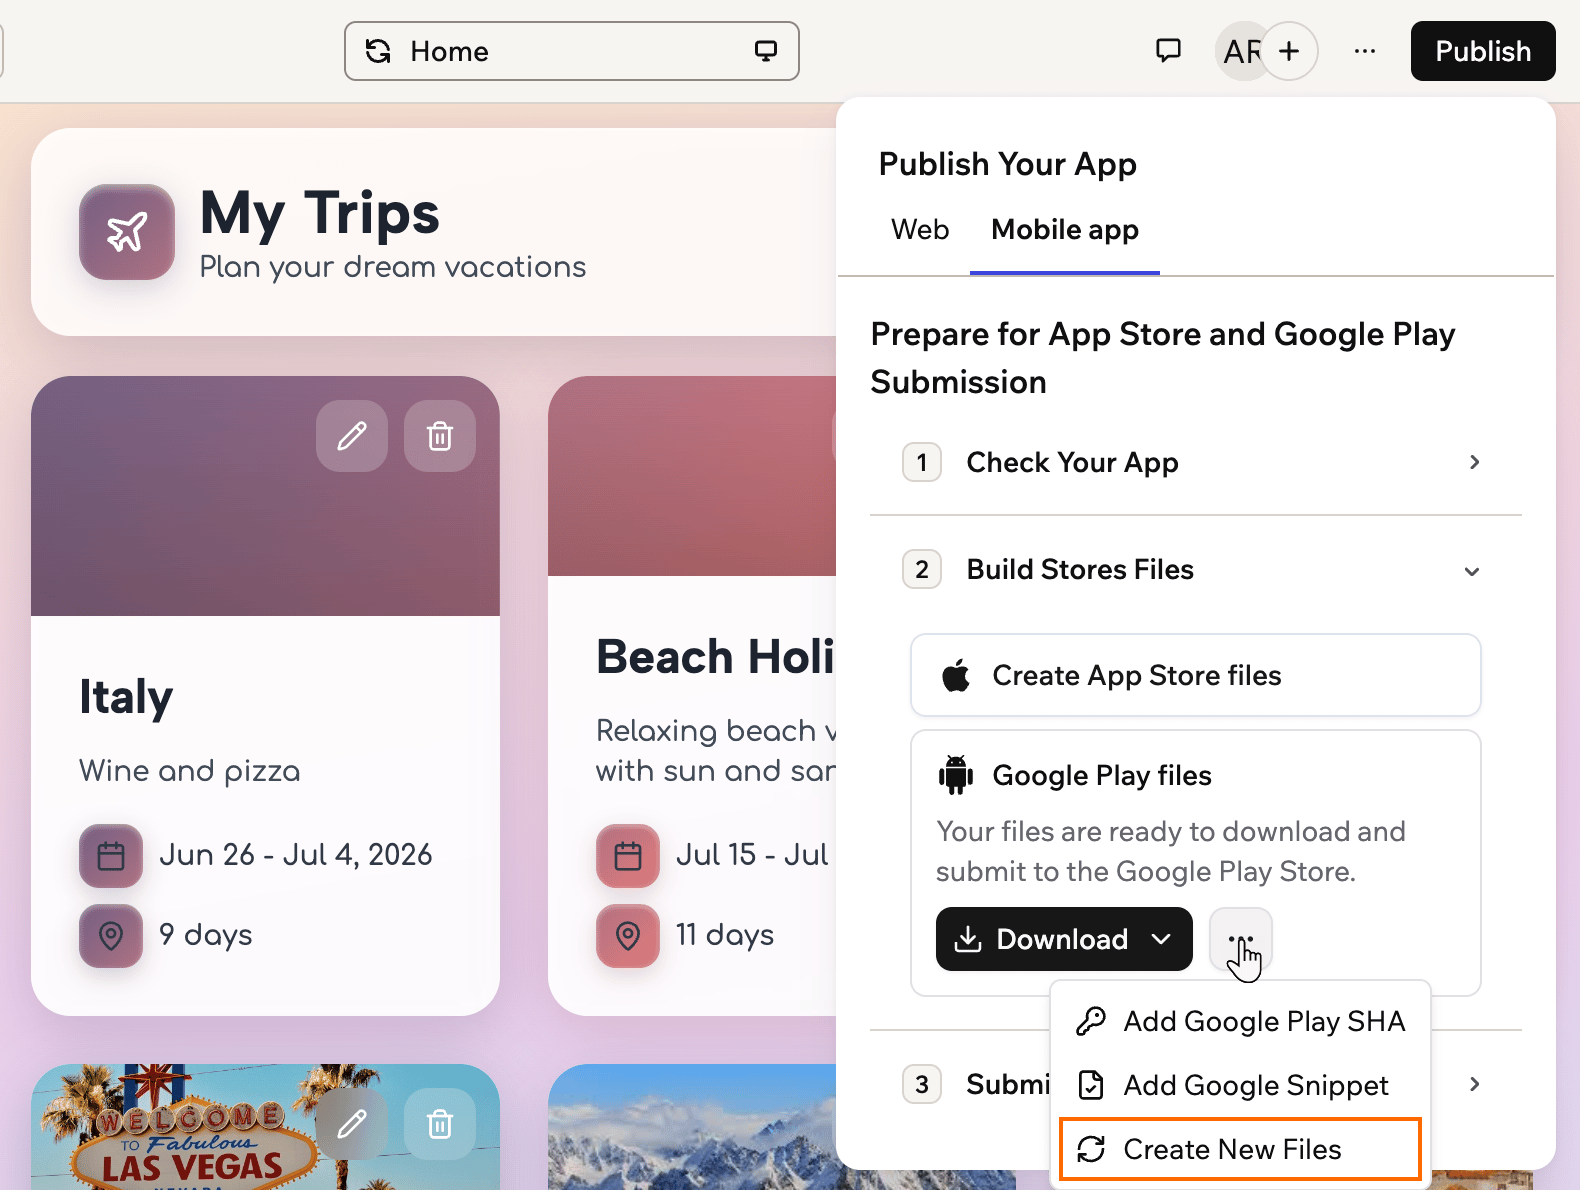
Creating new files from the More actions menu
- Follow the on-screen steps to review your details and app logo, then click Generate Files.
- When your files are ready, click Download.
- Upload the new file as a new version of your existing app in App Store Connect, or as a new release in Google Play Console.
Changing your app icon
Your app icon is your Base44 app logo. Your splash screen, the screen people see while your app opens, shows the same logo on a background color Base44 picks from your logo. There’s no separate upload for the splash screen. To change your app icon and splash screen logo:- In your app editor, create new files for the store you want to update.
- In the logo step, upload a new logo from your computer or generate one with AI.
- Click Generate Files, then download and upload the new file to the store.
- Your Base44 app logo: Changing the logo in this window also updates the logo you use for your Base44 app.
- Splash screen background: Base44 picks the background color from the first logo you build with, and it stays the same when you change your logo later. Use a PNG logo with a solid background so the color matches.
- Store listing images: The icon and screenshots on your listing page are managed in each store. Google Play asks you to upload a listing icon in Play Console, so update it there too.
- Extra splash screen on Android: On Android 12 and later, the phone shows its own splash screen first, then your app’s splash screen, so the logo shifts slightly when the second one appears. This is expected. Don’t ask the AI chat to add a splash screen to your app, as that adds another screen after them.
Troubleshooting
Most problems come up when you upload your files, fill in your store listing or go through review. Find the problem you’re seeing, then follow the steps to fix it.Common problems
If you’re having problems submitting your app, find your situation below.Apple says my app has no architectures in the binary
Apple says my app has no architectures in the binary
ITMS-90085: No architectures in the binary, your app files are usually fine. Newer versions of Transporter need Apple’s developer tools to check your app before it uploads, and without them the check fails.To fix the error:- On your Mac, open Terminal, paste this command and press Return:
- Click Install and wait for the tools to finish installing. You can also install the full Xcode app from the Mac App Store instead.
- Quit and reopen Transporter.
- In Base44, create new files and upload the new file. Uploading the old file again fails, because Apple already has its build number.
Apple warns about fonts in my app
Apple warns about fonts in my app
ITMS-91198 and lists fonts such as Arial or Verdana, the fonts come from the app files Base44 generates, not from your app. This is a warning, not a rejection. Your upload goes through and your app works normally, so you don’t need to change anything.Apple rejected my app on iPad
Apple rejected my app on iPad
- In your app editor, switch the preview to tablet view and check each main page.
- Ask the AI chat to fix anything that looks stretched, cut off or hard to tap. For example:
- Publish your changes. Most layout changes reach your app without new files.
- Add iPad screenshots to your listing in App Store Connect, because Apple asks for them when an app runs on iPad.
- Reply to the reviewer in App Store Connect and resubmit your app.
My app doesn't turn to landscape
My app doesn't turn to landscape
I want an APK to install on Android without Google Play
I want an APK to install on Android without Google Play
- Click Publish at the top right of your app editor.
- Click the Mobile app tab.
- Click Build Stores Files, then create your Google Play files if you haven’t yet.
- Click Download in the Google Play files section, then click APK (Direct Install).
- Send the file to your Android phone and open it. If your phone asks, allow installs from the app you used to open the file.
I want to show AdMob ads in my app
I want to show AdMob ads in my app
Apple asks for a demo account to review my app
Apple asks for a demo account to review my app
- Open your published app and sign up with an email address you can check. Use email and password, not Google or Apple login, so the reviewer can sign in with it. To check which methods your app offers, see choosing your sign-in methods.
- Add some sample content to the account, so the reviewer can see how your app works.
- In App Store Connect, go to your app version, select Sign-in required under App Review Information, and enter the email and password.
- In Google Play Console, enter the same details in the App access section of your app’s content settings.
App Store Connect asks for a SKU and bundle ID
App Store Connect asks for a SKU and bundle ID
Errors and rejections
If you see an error message when you generate your files, or a store rejects your app, find the message or reason below.Error 401 when generating iOS IPA files
Error 401 when generating iOS IPA files
- Go to App Store Connect and sign in with your Apple Developer account.
- Click Users and Access, then click Integrations.
- Check that the Issuer ID, Key ID, and Team ID values you entered in Base44 match the values shown in App Store Connect.
- Confirm that the
.p8API key file you uploaded is the correct file and that the key has not been revoked or expired. - If anything looks incorrect, generate a new API key in App Store Connect, download the new
.p8file, update all fields in Base44, and try generating the files again.
Error 403 when generating iOS IPA files
Error 403 when generating iOS IPA files
- Go to App Store Connect and sign in with your Apple Developer account.
- Click Users and Access, then Integrations.
- Check the Access role for the API key you are using.
- If the key is not set to Admin, create a new key:
- Click + to add a new key.
- Enter a name and select the Admin role.
- Click Generate and download the
.p8file.
- In Base44, update the Issuer ID, Key ID, Team ID, and upload the new
.p8file, then try generating the App Store files again.
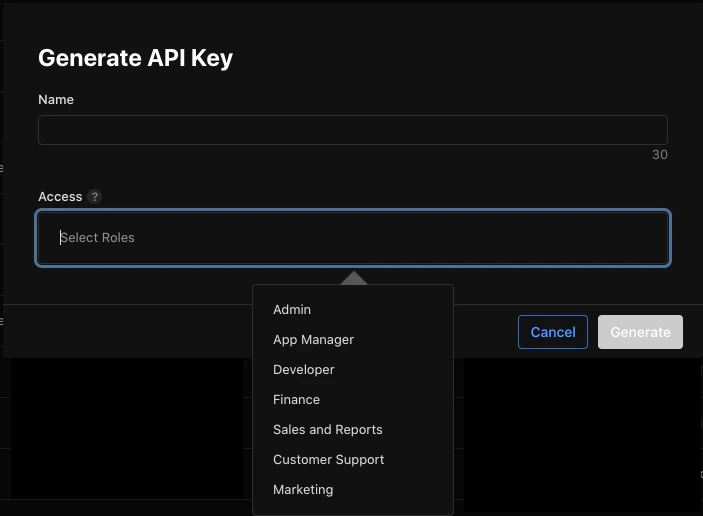
The Admin role for an API key
Error 409 when generating iOS IPA files
Error 409 when generating iOS IPA files
- Go to your Apple Developer account and open Certificates, Identifiers & Profiles.
- Click Certificates and filter to iOS Distribution certificates.
- Revoke at least one iOS Distribution certificate that you no longer need.
- Try generating the App Store files again from the Mobile app tab in Base44.
- An iOS Distribution certificate can usually be revoked after an app has been approved, without affecting people who already installed the app.
- Apple typically allows:
- Up to 3 active production/distribution certificates for the standard Apple Developer Program
- Up to 2 active enterprise distribution certificates
- Up to 12 development certificates
App Store or Google Play rejection for charging through Stripe
App Store or Google Play rejection for charging through Stripe
- Go to your app editor and ask the AI chat to change your app so it follows that store’s rules. For example, remove the checkout for digital content from the mobile app.
- Publish the change and create new files.
- Reply to the reviewer through Apple’s Resolution Center or Google Play’s appeals process, explaining what you changed.
- Resubmit your app.
Google Play asks for a billing permission
Google Play asks for a billing permission
com.android.vending.BILLING permission, your app doesn’t include Google Play Billing. Base44 apps don’t support it yet, and you can’t add the permission yourself, so you can’t sell subscriptions or in-app products for your app in Google Play Console. See selling in your app for what you can do instead.App Store rejection due to HealthKit entitlement
App Store rejection due to HealthKit entitlement
NSHealthShareUsageDescription key in Info.plist, this is caused by a HealthKit entitlement included in the iOS build.Base44 does not support HealthKit, and there is currently no way to add NSHealthShareUsageDescription to the build configuration. If your app does not use HealthKit, you do not need to take any action on your end. This is a known limitation of the current iOS build.Bundle ID or signing key mismatch when uploading an update
Bundle ID or signing key mismatch when uploading an update
- Review the existing app listing in App Store Connect or Google Play Console and compare the Bundle ID and signing key with the values from your Base44 build.
- If they do not match and you cannot update the existing listing, create a new app entry in the store and submit the Base44 build as a new app.
- Update your icon, app name, or description if needed so people can clearly identify the new app.
Store rejects the build number or says the bundle is unchanged
Store rejects the build number or says the bundle is unchanged
Permissions, privacy policy, and app review feedback
Permissions, privacy policy, and app review feedback
- Read the rejection email carefully to see which permission or behavior the store is concerned about.
- Update your privacy policy and terms pages on your Base44 app so they:
- Describe the types of data your app collects (for example, location, camera, or microphone)
- Explain why you collect the data and how people can contact you about privacy
- Make sure links to your privacy policy and terms appear before people register or sign in (for example, in your home page footer or login screen).
- Resubmit your app after updating the content.
Main URL and access to legal pages
Main URL and access to legal pages
- Make sure your privacy and terms pages are live on your Base44 app.
- Add visible links to these pages from the entry page of your app, such as in the footer or a menu.
- If your app uses a gated or members-only home page, ensure that privacy and terms links are still accessible before sign-up (for example, from the login or sign-up page).
FAQs
Click a question below to learn more about submitting your Base44 app to the Apple App Store and Google Play.Do I need to reach a readiness score of 100 before I submit?
Do I need to reach a readiness score of 100 before I submit?
Can I submit to only one store, not both?
Can I submit to only one store, not both?
What happens if the scan still shows failed checks after fixes?
What happens if the scan still shows failed checks after fixes?
Can Base44 submit my app to the stores for me?
Can Base44 submit my app to the stores for me?
Can Customer Care check on my submission or talk to the app stores for me?
Can Customer Care check on my submission or talk to the app stores for me?
Do I need a custom domain to submit my app?
Do I need a custom domain to submit my app?
Which native features does the Base44 mobile app support?
Which native features does the Base44 mobile app support?
- Full offline mode and HealthKit are not supported yet.
- Some native capabilities may still require additional review by Apple or Google, depending on the permissions your app needs.
How long do people stay logged in to the app?
How long do people stay logged in to the app?